Why I love bicycles so much now!

Yes this is mainly but not exclusively a motorcycle related blog some of you may wonder why I seem so enamored with bicycles. The contents of  this post were originally written as a reply to the thread “What triggered your bicycle revival” over at Rat Rod Bikes. After re-reading it I decided to share it with you.

I was a really small little geeky nerdy kid. As a child I learned to ride a bike and rode around a lot, didn’t think much of it. I had go-karts & mini-bikes to play on. The bicycle wound up just being around the neighborhood transport. I was too small, too slow, and perhaps too lazy to really care about even trying to race anybody or jump anything so even though I grew up through the infancy of BMX & mountain biking I honestly did not care. Being a twerpy deaf guy with thick glasses athletic endeavors were something I strenuously avoided.  At the age of 12 I got my first motorcycle, and my last bicycle. Both were green, a Kawasaki KD100 and a 26″ Western Flyer cruiser. Once I mastered the operation of the motorcycle the bicycle never moved unless I was either out of gas, or prohibited from riding the Kawi for some reason. At 15 I got a license and a junkyard Mustang. The bicycle was never seen again, and was probably abandoned in the garage when we moved. Many years, cars, motorcycles, jobs, & a family later it finally happened, I had that gnarly bone grinding crash that every motorcyclist dreads. My left knee was repaired by a partial knee replacement and I spent some time in a wheelchair until the broken ribs I also incurred healed enough to walk on crutches. When the leg healed enough for me to begin walking on it again it was a flabby atrophied shadow of its former self. I had a really bad limp and would occasionally fall flat on my face just because it was not strong enough to hold me up. In order to build up strength in it I purchased and began using an exercise bike, but riding and not going anywhere got b-o-r-i-n-g. At the flea market I grabbed an old $20 mountain bike, and took up light trail riding.

But I really liked styling and profiling on a mean looking ride so when a friend of mine gave me this even though it actually rode great I instantly jumped on the internet looking for ideas to customize besides the “Lowrider” style and that is when I found this site and this community

Vintage Huffy bike

The start of my custom bicycle fetish!

Today I have a great hobby, have met and befriended many interesting people, built an interesting collection of bicycles, and plan to continue indefinitely. Oh yeah as I nice bonus I no longer walk with a cane, rarely fall down any more. 😯  Plus my wife loves trail riding with me and doesn’t mind going to the bike show either. Wins all around as far as I am concerned.

Peace Y’all

amtique Murray bicycle

Yes this is my home office/studio.

<custom Western Flyer with truss rods>

One of my favorite customs that I have done.

20" Ross Polo Bike Jr

My show winning 20″ Ross custom.

Changing the oill in your forks. (yes you should occasionally)

I’m going to cheat a little bit and just link to an excellent article over at Eric Peters Autos. In addition to doing automotive reviews and how to he has a great selection of motorcycle articles as well. This particular article that I am pointing out to you today is,        “Fork Oil Change How-To (and Why-To)” It’s informative and a good general guide for anyone who has never performed this often neglected prevenative maintenace on their own cycle. Enjoy!


2012 in review Thanks to all of my readers!

2012 was a very good year for motopsyco.com, I hope to entertain and inform you even more in the years ahead! Thhank you all, come back often and bring friends.

Peace Y’all


The WordPress.com stats helper monkeys prepared a 2012 annual report for this blog.

Here’s an excerpt:

600 people reached the top of Mt. Everest in 2012. This blog got about 12,000 views in 2012. If every person who reached the top of Mt. Everest viewed this blog, it would have taken 20 years to get that many views.

Click here to see the complete report.

Lining a Fuel Tank with Kreem Tank Liner

Kreem tank liner kit

Kreem tank liner kit

This is sort of a combo how to and product review. I will admit that my review is a little biased because I have been using this product for over 20 years and have always been satisfied with the results. I wont repeat the instructions word for word but I will give you a few tips to help you get better results. First empty your tank and remove the petcock and filler cap if it is bolted to the tank.

Remove the Kawasaki locking fuel cap

Remove the Ninja’s locking fuel cap

The next step is critical to getting good results especially if working with the tank from a 2 stroke engine. You must completely degrease the inside of the tank with a good industrial degreaser. Do not use dish liquid because it often contains oils to protect skin. Be prepared to wash it more than twice if needed to get the oil out.

Wash & degrease tank thougoughly

Wash & degrease tank thoroughly

Now open up the kit and get out the bottle labeled “A” wash & cleaner. Use duct tape or a blocking plate to block all of the holes in the bottom of your tank. I like to use a piece of metalized tape first and then cover it with duct tape.

Kreem Kit Part A

Kreem Kit Part A Use proper precautions for mild acid.

The instructions say to use warm water and I agree it does help the acid work much faster. Please note the standard kit shown here is for smaller tanks. Normally for a 5 gallon tank like this I would buy the larger size, but I had some left over from a previously restored tank, that I added in after using this up according to the instructions. The cleaner part A can be saved and re-used a time or two.

Warm water is reccomended to mix with cleaner

Warm water is recommended to mix with cleaner

After the tank is full seal off the top and let it sit for at least the minimum time given in the instructions. Since this was an old tank with some rust inside I let it sit overnight. At this stage some people will put in rocks or nuts & bolts and shake the tank to help remove thick rust. If you need to do this I recommend that you use steel nuts & bolts so that you can retrieve them easily with a magnet. Some fuel tank designs make it difficult to remove rocks after you are finished cleaning out the rust.

Next remove all tape from the openings rinse the tank well until the water comes out clean. and then thoroughly dry the tank on the inside. Since I had plenty of time I placed the tank in a hot sunny location to air dry. In the winter time or if you are in a hurry use a hair dryer or a hot air gun to speed up the process.

<ninja fuel tank drying in the sun>

fuel tank drying in the sun

I do need to warn you about one thing if you are trying to fix a tank with a nice paint job or if you are coating a new tank as a preventative measure you want to be very careful with this stuff, especially in the next two steps.

Seal up all the holes again and get out part “B” the conditioner. This bottle contains MEK which can remove paint faster than tequila removes panties. If you have a nice paint job & spill this on it, you wont have a nice paint job anymore, so be careful. I am re-painting this tank so I don’t really care if I spill some. After sealing the tank back up shake all around the inside of the tank & the carefully drain it out protecting your paint as needed.

Kreem Part B final rinse

This is highly flammable & can destroy paint so be careful.

Since the petcock on this one bolts into place before going to the next step I put two screws in the bolt holes to keep the threads clear. To me this is just much easier than cleaning out the holes afterward.

petcock screw holes

I like to put bolts in these holes to keep them clear

Now you are ready for the bottle of fuel tank liner. All the same warnings about paint damage apply to this bottle as well.

Kreem Part C liner

Kreem Part C liner

Here is a shot of how I use the metal tape first & then cover it with duct tape to seal the openings in the tank. It works well for me, but I make no garuntee that it will work this well for everyone.

<handymans best friend>

Red Green is absolutely right about this stuff! (Duct tape that is)

Then pour in the whole bottle of liner, and then seal up the filler hole as I did in the next picture.

pour in Kreem Tank Liner

pour in Kreem Tank Liner

then seal up the filler hole

then seal up the filler hole with duct tape

Then spend the next 30 minutes or so slowly rotating the tank end over end and sideways until you are 100% certain that the entire inside of the tank has been covered with sealant. Next (and this is very important) open the tank back up and drain the excess sealant back into its original bottle. Do not leave it in the tank as it will greatly increase drying time. If too thick it may skin over on the top and take nearly forever to dry all the way through, causing you to have problems later. I usually save the excess to use on the next project. I am usually able to do a lawnmower tank or two with the leftovers.

Like I said if you follow the instructions in the kit and the hints that I gave here you should be able to tackle this job yourself at home. Just give yourself a couple of days if your tank is rusty, and be sure you drain the excess sealant out of the tank and give it time to dry really well. This stuff aint cheap at approximately $50 a pop (November 2012 price) so you want it to work right the first time. I have used other tank sealers with varying degrees of success, but I always come back to the original Kreem brand. Plus it is usually in stock on the shelves in most motorcycle dealerships. Besides have you priced a new gas tank lately? It’ll give you a coronary!

Peace Y’all

The 2012 Royal Enfield Bullet Classic 500 A Psyco Road Test and Review!

a real1956 Royal Enfield Bullet!

a real1956 Royal Enfield Bullet

a real 2012 Royal Enfield Bullet

a real 2012 Royal Enfield Bullet

Let’s take an adventure, a time machine trip of sorts if you will. Imagine if you could take a trip back to 50’s, the golden age of the British motorcycle industry, snag yourself a snazzy new 500cc sporting machine and bring it back to your garage. Since we are dreaming big, now pretend that you have your hand crafted real steel motorcycle back in your fully equipped garage with all the latest and best machine shop equipment you could want. Then while your “friends” in the gasket industry make you a set of the finest modern gaskets and seals, you tear down the engine and re-machine and re-assemble it using modern tolerances and technology. While you are in there update the valve train to hydraulic lifters, so you don’t have to spend any time adjusting valve lash ever again.

A genuine 1954 Royal Enfield Clipper

A genuine 1954 Royal Enfield Clipper

A genuine 2012 Royal Enfield Classic 500

A genuine 2012 Royal Enfield Classic 500

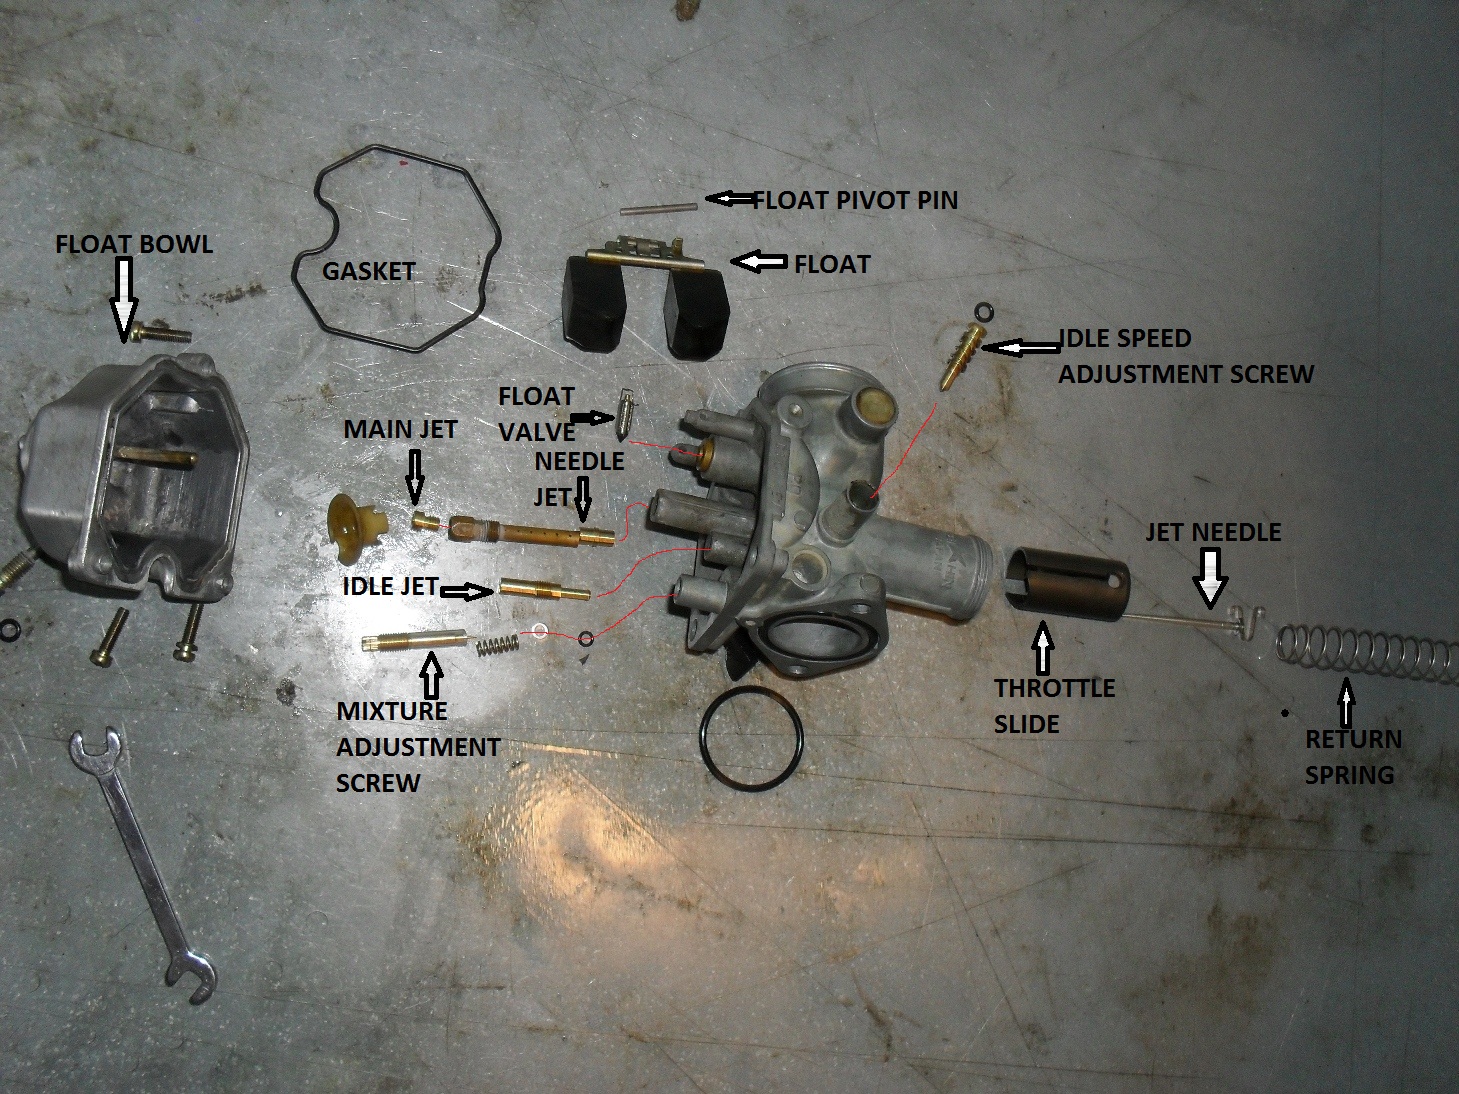
Next load it into your private jet & fly it to Japan for an electronic ignition. While you are there have Kehin to custom build you a fuel injection system and calibrate for your engine. No more tickling the carbs, or cleaning them, or gas dribbling all over your garage from a 1950’s Amal trying to cope with  our 21st century imitation gasoline.

How 'bout a fuel injected thumper?

How ’bout a fuel injected thumper?

Oh well it is a nice fantasy, but one part of it is true. You can get a brand new hand built “British” (in name and style anyway) motorcycle that looks like it fell out of a time capsule from 1955. The first Royal Enfield motorcycles were produced in 1901. In 1967 the factory in England closed but the Indian made Enfield Bullets soldiered on and have evolved into the reliable, oil tight and modern emissions compliant machines we have today. While these are not fantastically powerful machines compared to our modern machinery they are much better in so many ways than an actual antique motorcycle.
Immediately when approaching the Classic or Bullet 500 you are struck by its relatively compact looking dimensions. Today so many “retro” styled machines have turned into larger than life caricatures of the machines they are trying to imitate. This is one of the reasons I dislike so many of them, being a fan of 50’s-70’s bikes such as the CB400, XS650, or old Triumphs and Enfields, to me the new “retro bikes” look tacky compared to the real thing. The 2012 Royal Enfields are not retro replicas; they are still the real deal. An upgraded genuine vintage motorcycle that is available right now with a 2 year warranty, imagine that.

See what I mean about the size of modern bikes?

See what I mean about the size of modern bikes?

When I threw my leg over the Classic 500 and hoisted it off the kickstand the first though that went through my mind is whoa this thing feels substantial. Not overweight & porky but definitely dense, solid, and hefty feeling. You can feel the steel in this one. With my 29 inch inseam I can sit on the saddle with both boots firmly on the ground.

motopsyco on Enfield Classic 500 with Desert Storm paint

Just hit the magic button and you’re ready to go!

2012 tan Royal Enfield Classic 500

Rolling it round a little bit.

Bike; 2012 Royal Enfield Classic. Rider; motopsyco

Bike; 2012 Royal Enfield Classic. Rider; Motopsyco

Hit the starter button and the fuel injected single starts up with a nice thump-thump-thump idle note that is a characteristic of a big slow revving single. Yes it vibrates a little but it’s a pleasant soothing feeling not annoying. Pull in the clutch, snick it into first gear, and ease out on the lever. Just remember that you are working with authentic 1950s horsepower (27.5hp @ 5250 rpm) so don’t pull out too closely in front of that sports car that is barreling down the street at twice the speed limit. Even 1950s horsepower is more than enough to stay ahead of most traffic from stoplights around town. Plus people look. These are good looking motorcycles that are different from the mundane and commonplace Hogs and crotch rockets that litter the streets around here.
In addition to thanking LA Motorsports for allowing me to borrow a couple of their motorcycles I really want to thank general manager John for pointing me towards Jamison Road in Summerville. While it had too much traffic to really cut loose it is the kind of road that is perfectly matched to the feel and great handling of these bikes. It was just a couple of miles of nice sweeping turns that let me roll the bike from side to side in a most enjoyable fashion while the engine played a slow bass drum beat as I rolled the power on through each curve, and slowed back down just so I could do it again & again. This is the kind of handling that comes only from classic British motorcycle architecture. No high tech suspension and wheels, just good frame design and a nice wide handlebar. Sure I could probably run that same road at 3 times the speed of the Enfield on any late model plastic covered crotch rocket, but to be honest with you, I would not have been any happier, nor had a better time doing so.

leaving LA Motorsports in Summerville S.C

leaving LA Motorsports in Summerville S.C. for a ride on an accessorized Enfield

A red Classic Royal Enfield 500

The Accessory exhaust sure sounds good on a Royal Enfield 500

I did not try any interstate trolling or top speed runs, and quite frankly as the top speed is around 85 or so I would not be afraid to, but this is a bike that really belongs on twisty country roads. The suspension is basic stuff but competent. The single disc front brake & rear drum brake are well up to the task of handling what this bike can dish out.
One selling point of this machine is its 85 mpg fuel economy. Folks, that is getting close to moped territory, but on a real solid steel motorcycle that can haul 2 people around with aplomb and looks damn good doing it.
As India becomes more and more of a manufacturing powerhouse the fit and finish of these motorcycles is now much better than when they were first reintroduced to the western world back in the early ‘80s. They have always had the right look, but now they have the polish and refinement to go with it. Plus this is probably the most comfortable motorcycle I have ridden in the last ten years.

one good looking classic motorcycle

one good looking classic motorcycle

The Royal Enfield 500 engine is the epitome of classic style

The Royal Enfield 500 engine is the epitome of classic style

<the 2012 Royal Enfield Classic in red>
the 2012 Royal Enfield Classic in red

If you want to turn curves at reasonable speeds in the country and turn heads like a rock star in town, and you don’t care about being able to run 150 mph, or looking like a rich yuppie poser, then this is the bike for you. My road tests are not about outright performance, but about how a motorcycle makes me feel, and this bike makes me feel damn good. It’s not badass, does not have exotic cachet, power, and is not a status symbol, it is just a motorcycle without all that extra bullshit. Plus you can get a brand new one out the door tax, title, tags & all for around 7 grand.
And I can see myself owing one….

Peace Y’all

Pee Dee A.B.A.T.E. Chapter Halloween Fun Run

abate halloween fun run flyer

Pee Dee ABATE Halloween Fun Run flyer!

The Pee Dee chapter of A.B.A.T.E. is having a benefit run on October 27th to benefit the local chapter of Biker Down. Go have fun! It’s for a good cause.

Factory Punch Marks Another Random Tech Tip

This tech tip is for all of the people who are just starting to wrench on their own motorcycles, although I have met a few old timers who may not know it. All of the big four makers do this on most of their machines. I don’t know about HD or the current European brands but all of the top Japanese motorcycle companies do it. They put punch marks on the various components that mount to shafts with splines. Shift lever, decompression levers, drum brake levers etc. almost always have punch marks indicating the correct  alignment of the part to the shaft. Here is an example below from a Honda drum brake.

So now you know one more thing to look for when you start to tear into your own machine, and should your atv or motorcycle not have punch marks like this you can always add them before taking it apart if you need to. After all anything that makes it easier to reassemble your parts and get your machine running in top form is a great thing.

Cleveland Cyclewerks My August Website of the Month

I just love this picture and the text it contains….

250 cc cafe racer

one cool 250cc cafe racer

Normally I don’t get too excited about new American motorcycle start ups, after all we’ve been down that road before with Indian, Excelsior Henderson, etc. Sure Victory made it but they have the power of the colossal Polaris corporation behind them. Plus they specialize in exactly the kind of motorcycle that the above photo from Cleveland Cyclewerks is talking about.

My current motorcycle of choice is a 250 Ninja that my wife purchased for me as a Christmas gift a few years ago when I was ready to start back riding after a gnarly bone crushing crash. I was sure that it if I kept riding that it would be gone soon in favor of a larger & more powerful machine. Guess what? It has turned out to be a fantastic ride that I may keep forever. Plus it has opened my eyes to just how much sense motorbikes in this class make. Yet they are still capable of providing one with all of the thrills and chills found in a larger motorcycle.

Please keep in mind that I have never ridden any of their products, am not a paid endorser, nor do I have anything to gain from this. But I like their style and bravado, and I am a fan of small and quick handling motorcycles. The bikes that make sense is what their ad copy says, and in these times, this class of machine makes a lot of sense.

Of course if the fine people at Cleveland Cyclewerks feel so inclined as to set a lonely blogger up with a chance for an extended test drive, I’ll be glad to give them an honest review from the viewpoint of a rider, commuter, and small bike enthusiast.

Go check out Cleveland Cyclewerks and see if you like their style as much as I do!

Dirtbike Carb 101 Part 3 Lets Put It Back Together!

If you are just joining this class and would like to read lesson 1 it can be found here.

Here is an exploded view of the carburetor with all of the key parts labeled. Everything has been cleaned or replaced and is now ready to be re-assembled!

motorcycle carb exploded view
The red lines indicate which hole the various parts go in.

The first thing you want to do when you pull the carburetor body out of the parts washer is to take a compressed air gun or a can of spray carb cleaner and blow out all of the  holes and passages in carburetor body. In general if you spray cleaner into any port on the body it should come out somewhere else. This is to get all of the passages completely clear. Do wear some eye protection while you are doing this.

motorcycle dirtbike mixture screw, main jet & idle jet
mixture screw, main jet & idle jet

In this picture I have already re-installed the needle jet, main jet holder & jet, and the idle or slow jet as some like to call it. The mixture adjustment screw is leaning up against the carb so you can see how the spring, washer, and o-ring fit over it in that order. This screw goes into the large hole on the right side of this picture. To install it pick up the carb with one hand, and hold it upright, with your other hand take the assembled mixture screw components and place them up into the hole and turn the screw until it has engaged the threads and will stay in. Return it to the workbench and turn the screw all the way in until it just touches the bottom. Do not tighten it! Do you remember how many turns you have to back it out to reach it’s original position that it was in before you removed it? I told you to write it down in lesson 2. If not check your service manual for the initial starting position, and be prepared to tweak it a little til you get a smooth transition from idle to accelerating.

Now it is time to re-install the float. There is usually a small wire retainer over the float valve that slides over a matching tab between the floats. Holding it together place the float valve into the brass ringed hole shown on the left side of the picture above. Then you should be able to slide the retainer pin in from one side to hold it into place, like this.

Honda xr 100 carb floats installed
carburetor floats installed


Don’t forget to put the little plastic shroud back on in the same way it came off.

Normally I wish vile and unspeakable torture on people whom make the mistake of using any type of gasket sealers on any type of fuel system assembly, but there is always an exception to every rule. In this case the fit of the float bowl o-ring into its groove on the float bowl was just not good enough to hold it into place so I applied a very thin film of  a gasoline resistant, Permatex product. A small amount of Permatex 1 or similar product. Use just barely enough to hold the gasket in place. After all you don’t want it squeezing out and stopping up your nice clean carburetor do you?

dirt bike carb float bowl gasket
carburetor float bowl gasket

Of course if the gasket will stay in place by itself long enough to get the float bowl screwed back into place I never put any kind of adhesive on it. but sometimes life just doesn’t work that way.

Once you have the float bowl back on it’s time to reassemble the slide. If you are replacing the needle  aka the metering rod, be sure you put the tiny little e clip on it in the same groove that the original one was in on the old needle. Push the needle in through the hole in the center and instal the retainer as shown.

metering rod & slide
retainer clip and needle nose pliers


This picture shows the retainer installed in the slide, exact positioning is not important just be sure you don’t block the slot on the side that the throttle cable goes through.

motorcycle metering rod retainer installed
motorcycle jet needle (metering rod) retainer installed


Now go bolt the carburetor back to the engine (remove the plug from the intake first if you used one), hook up the air cleaner hoses, new gas filter etc. This is the time to be sure the air filter is clean also.

Now back to the slide it only fits into the carb one way so if it does not smoothly slide all the way to the bottom something is wrong. This shot shows how the slide has a notch for the idle speed adjustment screw.

Honda xr 100 carb slide and spring
xr100 carburetor slide and spring

Now reverse the steps from lesson one to reinstall the slide to the end of the throttle cable under the top of the carburetor and then slide it into place and tighten the cap down by hand. Guess what? It is time to re-connect the gas tank and fill it with fresh fuel. I consider installing a new fuel filter mandatory and so should you.

motorcycle fuel filter
motorcycle fuel filter on Honda XR


Once you have the engine up and running you may need to set the idle speed using the idle speed screw as indicated here.

dirtbike idle speed adjustment
XR100 idle speed adjustment screw

Let the engine warm up thoroughly for a few minutes before making any final adjustments to either the idle speed screw or the pilot mixture screw. If you need to adjust anything make changes in very small increments.

Now go have some fun!

Dirtbike Carburetor 101 Part Two!

Welcome back everyone,

At the end of the last class we ended with the carb sitting on the bench and the intake port in the head plugged to keep out dirt & small critters. Now let’s pull off the vent hoses and turn it upside down on the bench like this.

Take note of the pilot mixture adjustment screw that I have labeled here for you. I will be giving you a tip about it later in the lesson so be ready to refer back to this picture if you need to. Please remember these are not in the same place on all carburetors. I have seen them on the top and on the side depending upon the make and model. Some late model machines have them hidden under aluminum caps to keep you from tampering with them, but if you have a real problem you can remove the caps to repair it. Just be sure to replace them especially if you have to pass emissions inspections in your state. As usual I recommend you consult your handy dandy service manual for your motorcycle just to be on the safe side, because some carbs have more than one aluminum plug and you don’t want to remove the wrong one. Trust me I know….

Of course this bike has none of those annoying issues so let’s go ahead and take the screws out of the float bowl and look inside.

EWWW!

Now I am a fairly environmentally conscious guy, I grow organic veggies, the shop that I work in is powered by solar electricity, drive reasonably efficient vehicles etc. but you will never convince me in a million years that today’s gasoline is good for the environment. Once the lead was removed there really was not that much left to improve. There is no way  fuel that will rapidly break down into this toxic and corrosive sludge as fast as the fuel made in this day and time, can possibly be good for the environment. Just think of what it is doing to your vehicles as they sit in the driveway right now.

Let me get out of rant mode and get on with the lesson; here’s a shot of it with the float removed. You should be able to push the pin out to one side with a small punch and lift the float and float needle (float valve) out of the bottom of the carb.

So when someone tells you the float is sticking this is what they are talking about. Sticking floats are usually caused by either a piece of trash getting under the point of the float valve, or if the motor has been sitting by gasoline evaporating, and gluing it into place with a coat of gunk like you see here.

In this next shot I have removed the jets and the mixture adjustment screw. Even if you have a service manual handy, before removing the mixture screw, turn it all the way in slowly and count how many turns it takes to go all the way in. Write the number down somewhere, and then remove the screw along with the spring the washer and the o-ring that are in the hole under it.

You’ll probably have to dig for the o-ring using a piece of wire or a small pick like I did above.

At this point all of the metal parts are ready for a good long soak in the parts washer or carburetor cleaner until tomorrow. In fact the longer the better. Gather up some supplies.

If you have an air compressor and a parts washer you may not need the spray carb cleaner. If you don’t have a compressor it is mandatory even with a parts washer or a dip bucket of carburetor cleaner. For this bike I did pick up a carburetor overhaul kit. If your o-rings are all still in good shape and you can get all of your jets spotless you may not need it, but it is often difficult to clean the idle jet good enough to work again even with all of the right tools. If it’s my own bike, and I am broke that week, I might chance it, cause hey it’s part of the price I pay for this hobby. If it is your bike, you are getting new parts, because if it does not work, then I would be working on it for free and that would just piss me off. You would probably be upset at me too.

Here’s a teaser shot of everything laid out on the bench after cleaning, be sure to come back for the next lesson!

exploded view!

Click here to continue this lesson!