
If you are just joining this class and would like to read lesson 1 it can be found here.
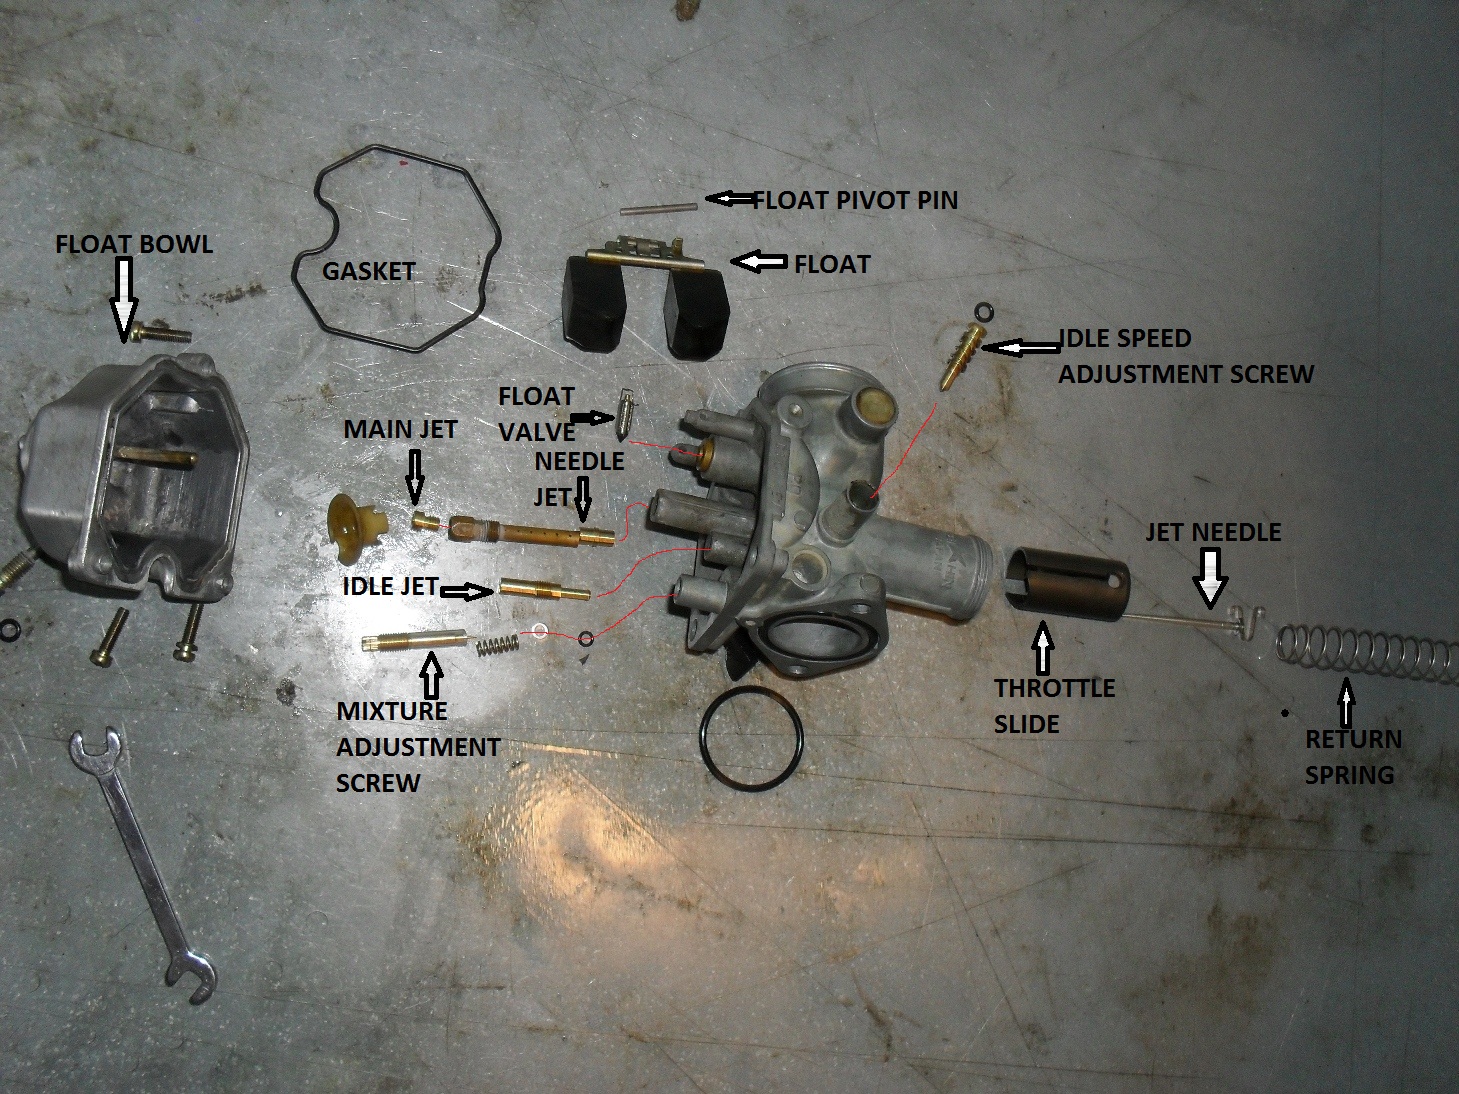
Here is an exploded view of the carburetor with all of the key parts labeled. Everything has been cleaned or replaced and is now ready to be re-assembled!
The first thing you want to do when you pull the carburetor body out of the parts washer is to take a compressed air gun or a can of spray carb cleaner and blow out all of the holes and passages in carburetor body. In general if you spray cleaner into any port on the body it should come out somewhere else. This is to get all of the passages completely clear. Do wear some eye protection while you are doing this.

In this picture I have already re-installed the needle jet, main jet holder & jet, and the idle or slow jet as some like to call it. The mixture adjustment screw is leaning up against the carb so you can see how the spring, washer, and o-ring fit over it in that order. This screw goes into the large hole on the right side of this picture. To install it pick up the carb with one hand, and hold it upright, with your other hand take the assembled mixture screw components and place them up into the hole and turn the screw until it has engaged the threads and will stay in. Return it to the workbench and turn the screw all the way in until it just touches the bottom. Do not tighten it! Do you remember how many turns you have to back it out to reach it’s original position that it was in before you removed it? I told you to write it down in lesson 2. If not check your service manual for the initial starting position, and be prepared to tweak it a little til you get a smooth transition from idle to accelerating.
Now it is time to re-install the float. There is usually a small wire retainer over the float valve that slides over a matching tab between the floats. Holding it together place the float valve into the brass ringed hole shown on the left side of the picture above. Then you should be able to slide the retainer pin in from one side to hold it into place, like this.

Don’t forget to put the little plastic shroud back on in the same way it came off.
Normally I wish vile and unspeakable torture on people whom make the mistake of using any type of gasket sealers on any type of fuel system assembly, but there is always an exception to every rule. In this case the fit of the float bowl o-ring into its groove on the float bowl was just not good enough to hold it into place so I applied a very thin film of a gasoline resistant, Permatex product. A small amount of Permatex 1 or similar product. Use just barely enough to hold the gasket in place. After all you don’t want it squeezing out and stopping up your nice clean carburetor do you?

Of course if the gasket will stay in place by itself long enough to get the float bowl screwed back into place I never put any kind of adhesive on it. but sometimes life just doesn’t work that way.
Once you have the float bowl back on it’s time to reassemble the slide. If you are replacing the needle aka the metering rod, be sure you put the tiny little e clip on it in the same groove that the original one was in on the old needle. Push the needle in through the hole in the center and instal the retainer as shown.


This picture shows the retainer installed in the slide, exact positioning is not important just be sure you don’t block the slot on the side that the throttle cable goes through.

Now go bolt the carburetor back to the engine (remove the plug from the intake first if you used one), hook up the air cleaner hoses, new gas filter etc. This is the time to be sure the air filter is clean also.
Now back to the slide it only fits into the carb one way so if it does not smoothly slide all the way to the bottom something is wrong. This shot shows how the slide has a notch for the idle speed adjustment screw.

Now reverse the steps from lesson one to reinstall the slide to the end of the throttle cable under the top of the carburetor and then slide it into place and tighten the cap down by hand. Guess what? It is time to re-connect the gas tank and fill it with fresh fuel. I consider installing a new fuel filter mandatory and so should you.

Once you have the engine up and running you may need to set the idle speed using the idle speed screw as indicated here.

Let the engine warm up thoroughly for a few minutes before making any final adjustments to either the idle speed screw or the pilot mixture screw. If you need to adjust anything make changes in very small increments.
Now go have some fun!

