Hello everyone & welcome back! It’s time for just a few more pictures of this little project TS185 I’ve been working on but first let me talk to you a little about the banner ad above. I have applied for one of these grants and I only have until June the 19th 2015 to reach the required number of votes. If you have a couple of minutes of time & a Facebook account could you please go vote for me? It would be greatly appreciated.
As mentioned last time this motorcycle is more of a restomod than a proper TS185 restoration and one of the things that I have always wanted to try out was putting a set of BMX bicycle platform pedals on a motorcycle. So out came the reciprocating saw some scrap metal & the welder.
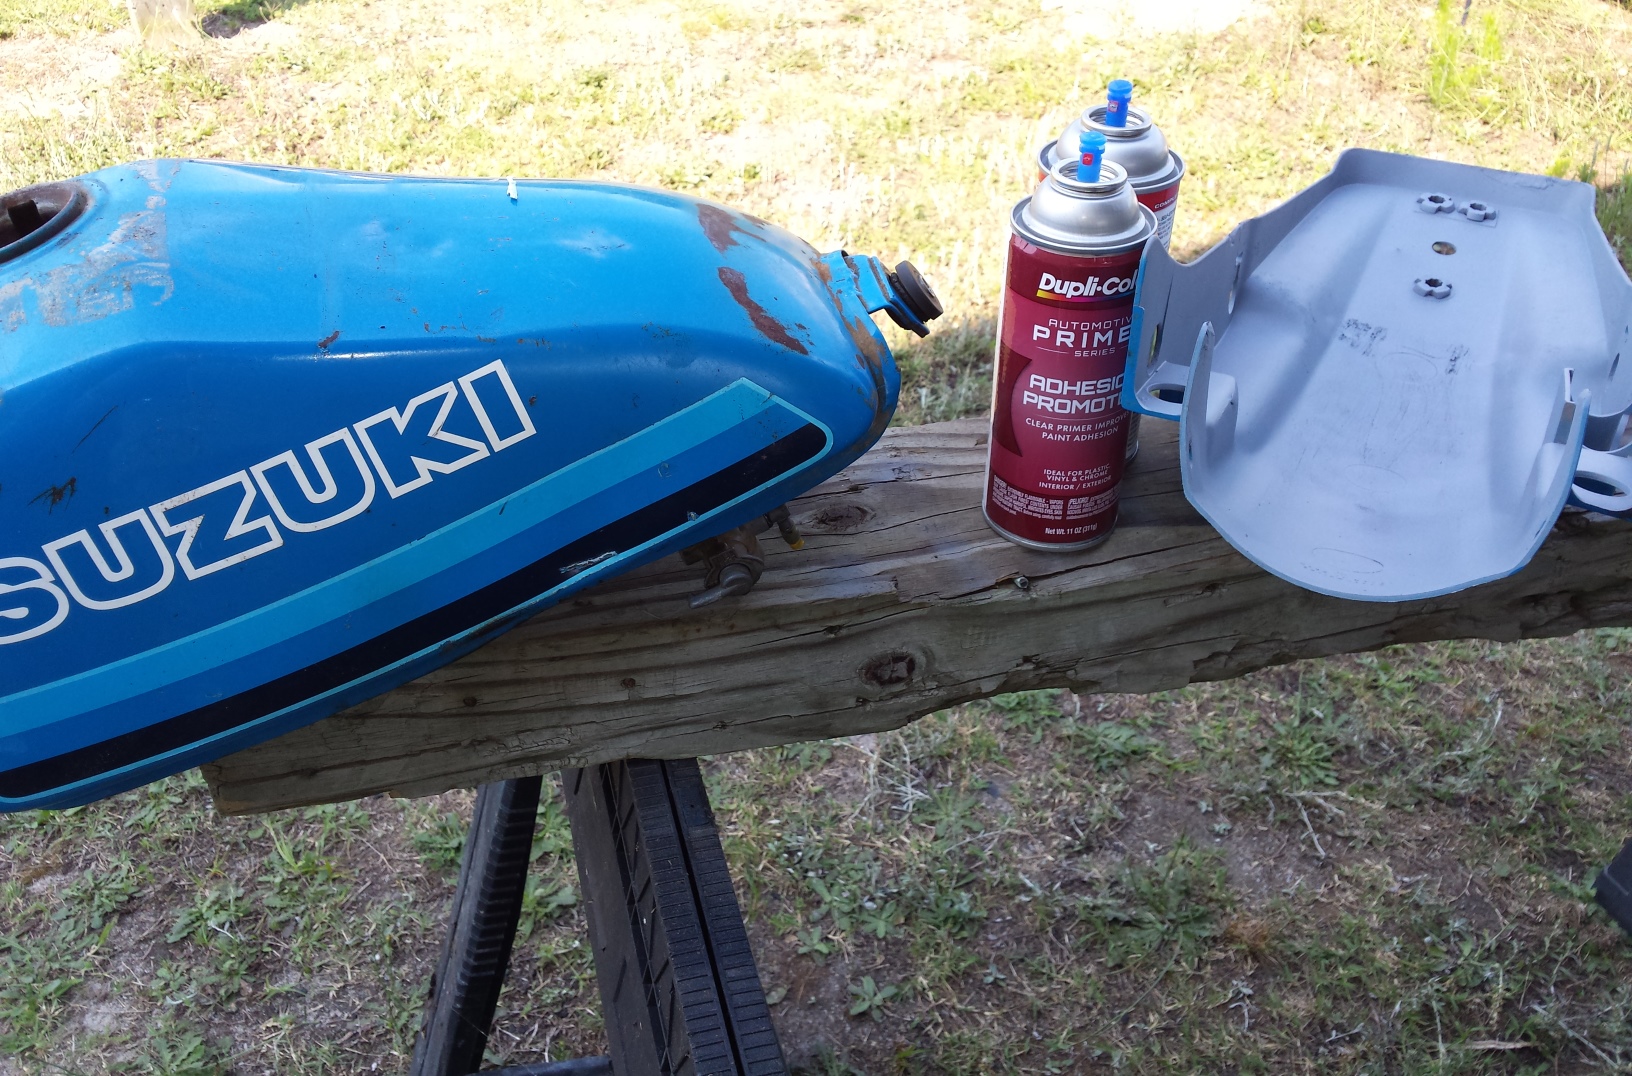
As I mentioned the last time I was changing the color so here it is just a plain old machinery gray from a Duplicolor spray can.
Added the shop logo to the number plates
Of course there were some new parts installed, missing bolts replaced & a few leaks stopped while I was at it.
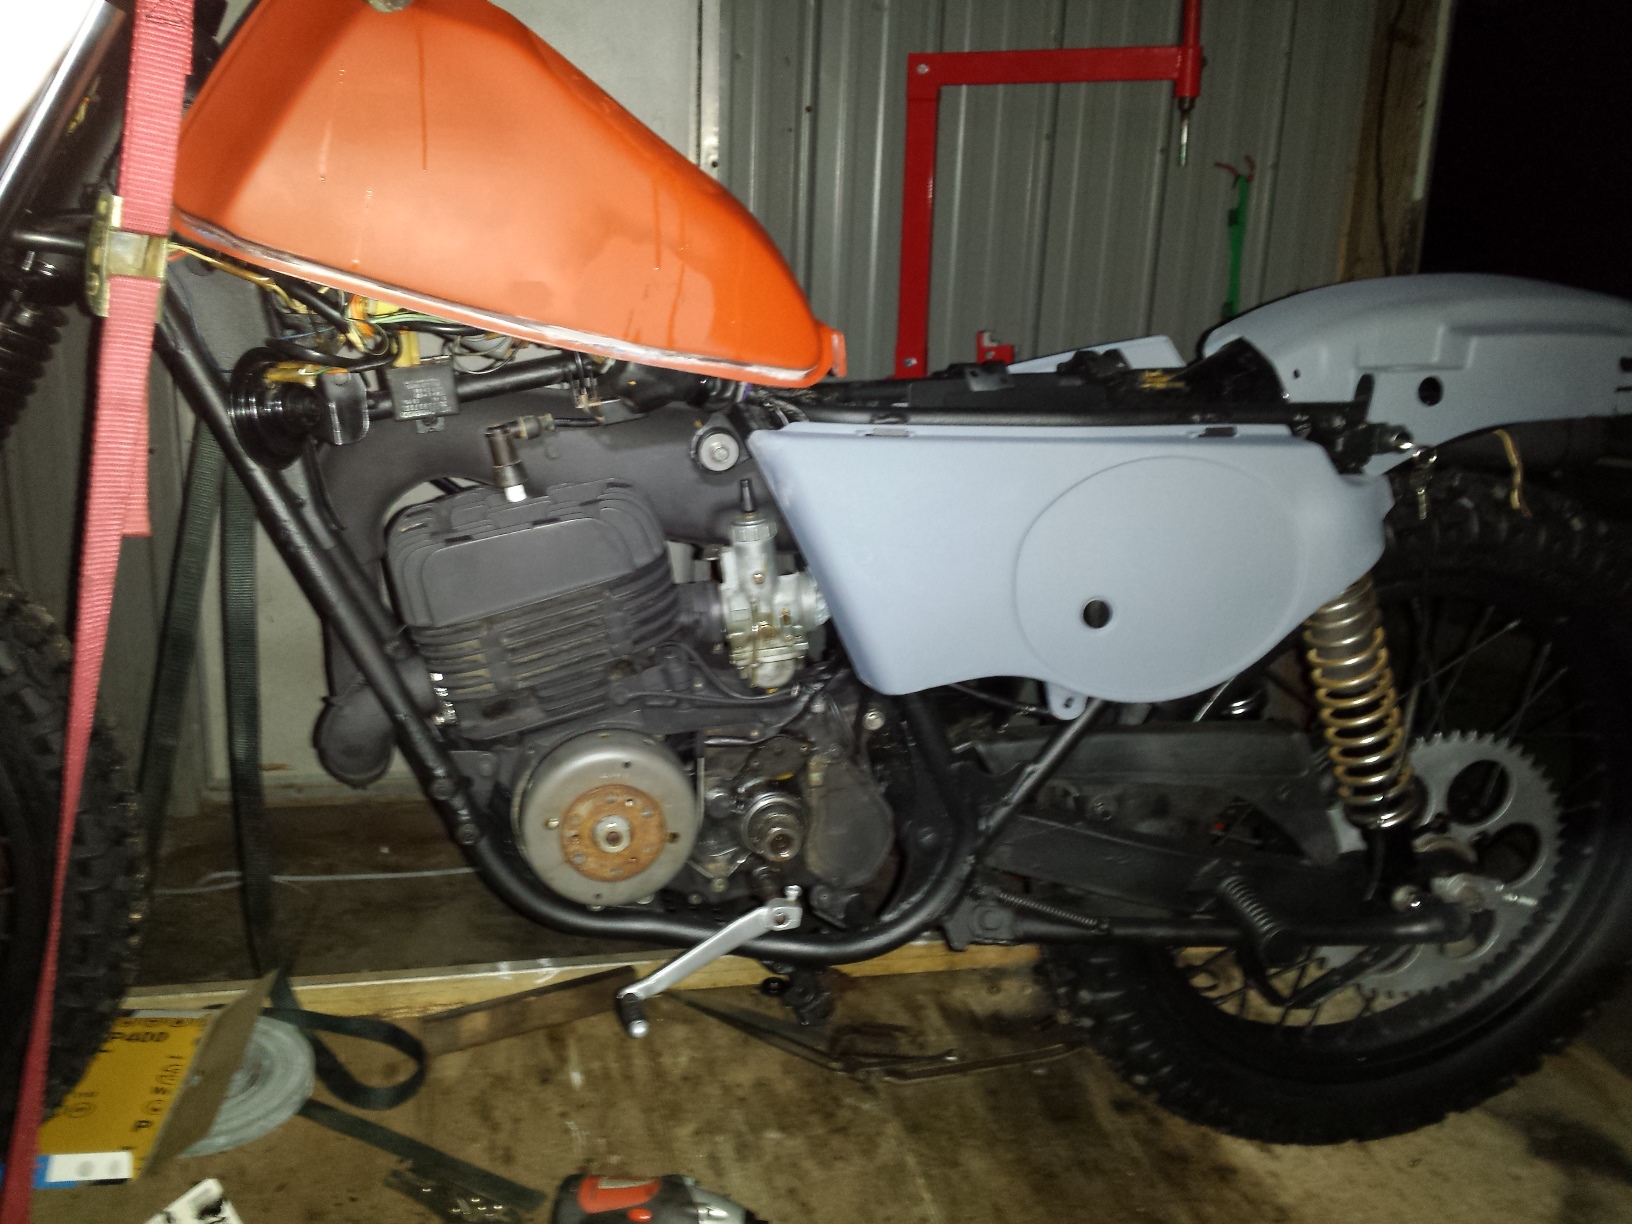
Some hard lessons were learned such as don’t install the clutch release arm upside down and that cheap enamel clear really doesn’t spray well in 100 degree temperatures. There are still a few odds & ends that need doing but it is mostly done. Now I just need the upholstery shop to have my seat ready this week! I also think the new pedals are fantastic looking but I do have to be careful when using the kick starter.
One advantage to doing all of this was having time to sort out the various electrical bodges that previous owners had inflicted on this poor machine. It now has a fully functional key switch, brake & taillights, a battery, fuse etc. Of course it still starts easily & runs like a top!
This old motorcycle is finally making it’s way back into one piece. It has new tires, wheel bearings, brake shoes, tapered roller steering head bearings, and anything else it needed to make it safe & reliable. Surprisingly enough even after 34 years of being beaten like a government mule, the engine & transmission are still in very good functional condition. This makes my life a lot easier.
Lets start with a quick look at the rear wheel & brake linkage before I started.
Yes I know I need my head examined for riding it for so long in this condition, but it was still a lot of fun!
I had to replace the brake rod, adjuster and the lever. The rod & its hardware are new old stock parts, & the lever was simply adapted from a junked motorcycle.
This is the exact same brake pedal that is shown in the picture above. I straightened it with a torch, hammer & anvil, before cutting the end off of an old dirtbike footpeg and welding it to the brake lever.
I had to buy an entire extra used carburetor to get a couple of parts that are no longer available separately, and I’m still waiting on my throttle cable to arrive from England so for now the carb is just sitting here until I receive the cable.
While waiting on some other parts it was time to start some body work.
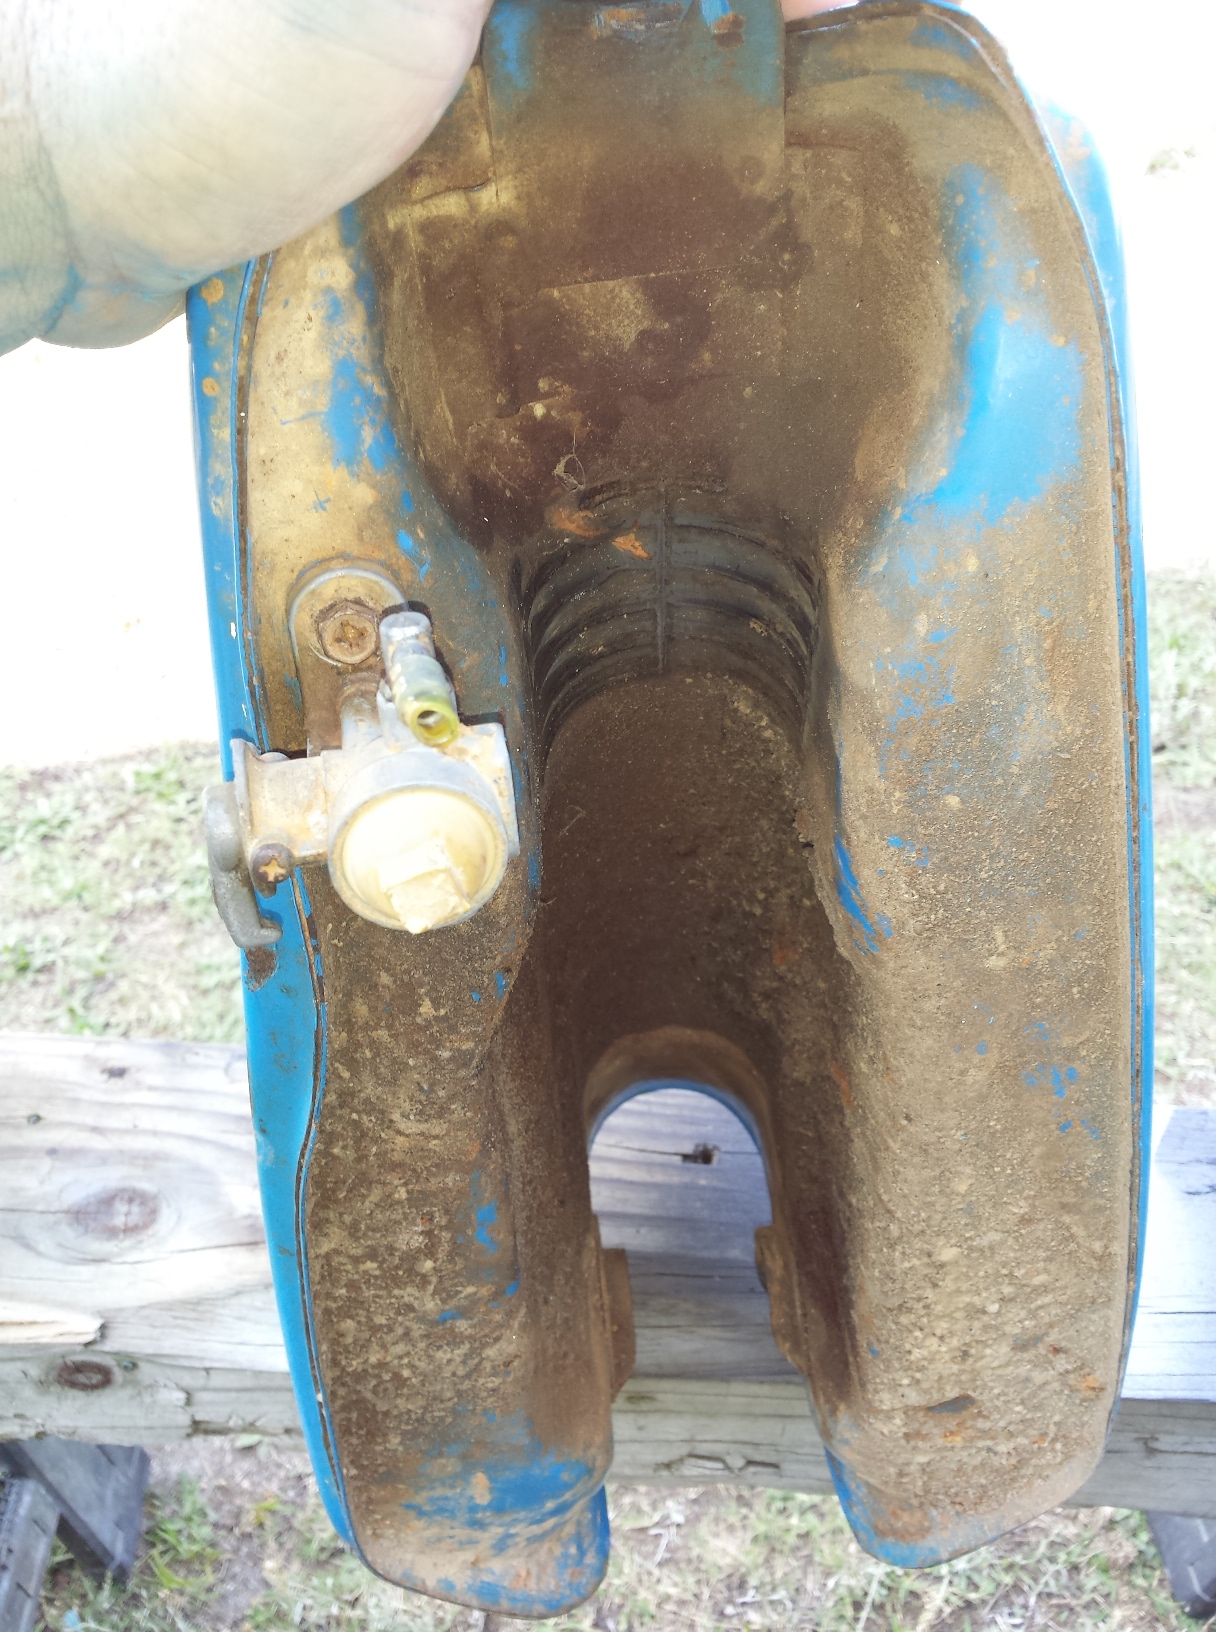
Have I mentioned anywhere in this series just how incredibly nasty this thing was? Check out the red clay mud dried to the bottom of this tank.
The side covers are decent used parts that only required minor work to repair, but the tank itself is actually requiring a fair amount of body work to make look good.
It’s so tempting just to throw money at a project like this, and to a certain extent I have done that with the mechanical & safety bits. Since this is the 2o Foot Restoration the appearance of the machine will be handled in the most economical way possible, with a few cans of Duplicolor spray enamel. So many of the parts needed for this bike are either unavailable or priced beyond what I feel like spending on it, this is actually going to be a resto-mod more than a restoration. Plus the blue has to go, I want a tougher more subdued look for my trail bike so the color will be changed. No I’m not going to tell you yet, keep checking back (or just scroll down & subscribe) o see what it winds up looking like!
Okay when I found it the engine was still in the frame.
Yeah Baby this is what I like! A big ole thumper with stump pulling torque & enough grunt to get the front wheel off the ground without using the the clutch at all. To bad it had a shattered piston in the cases with the transmission and had been sitting under a tree for several years.
Fortunately this junkyard dog story had a happy ending as I wound up stripping it down to a bare frame and a set of engine cases and then rebuilt it wit a Wiseco 520cc piston kit. Yeehaa!
I also built several bespoke parts for it just because I could, the muffler, rear rack, hand guards & gas cap were all products of my own handiwork.
after I restored it
Temporary tattoos can be great decals for a couple of years.
I rode the snot out of it for 10 years afterward and it was a little bit raggedy around the edges and starting to get weak again when I sold it to a very happy man who was planning to restore it again and ride it some more!
Sometimes I wish I had kept it but at the time I was fresh out of a wheelchair and was not sure if I’d ever ride again.
I’m going to cheat a little bit and just link to an excellent article over at Eric Peters Autos. In addition to doing automotive reviews and how to he has a great selection of motorcycle articles as well. This particular article that I am pointing out to you today is, “Fork Oil Change How-To (and Why-To)” It’s informative and a good general guide for anyone who has never performed this often neglected prevenative maintenace on their own cycle. Enjoy!
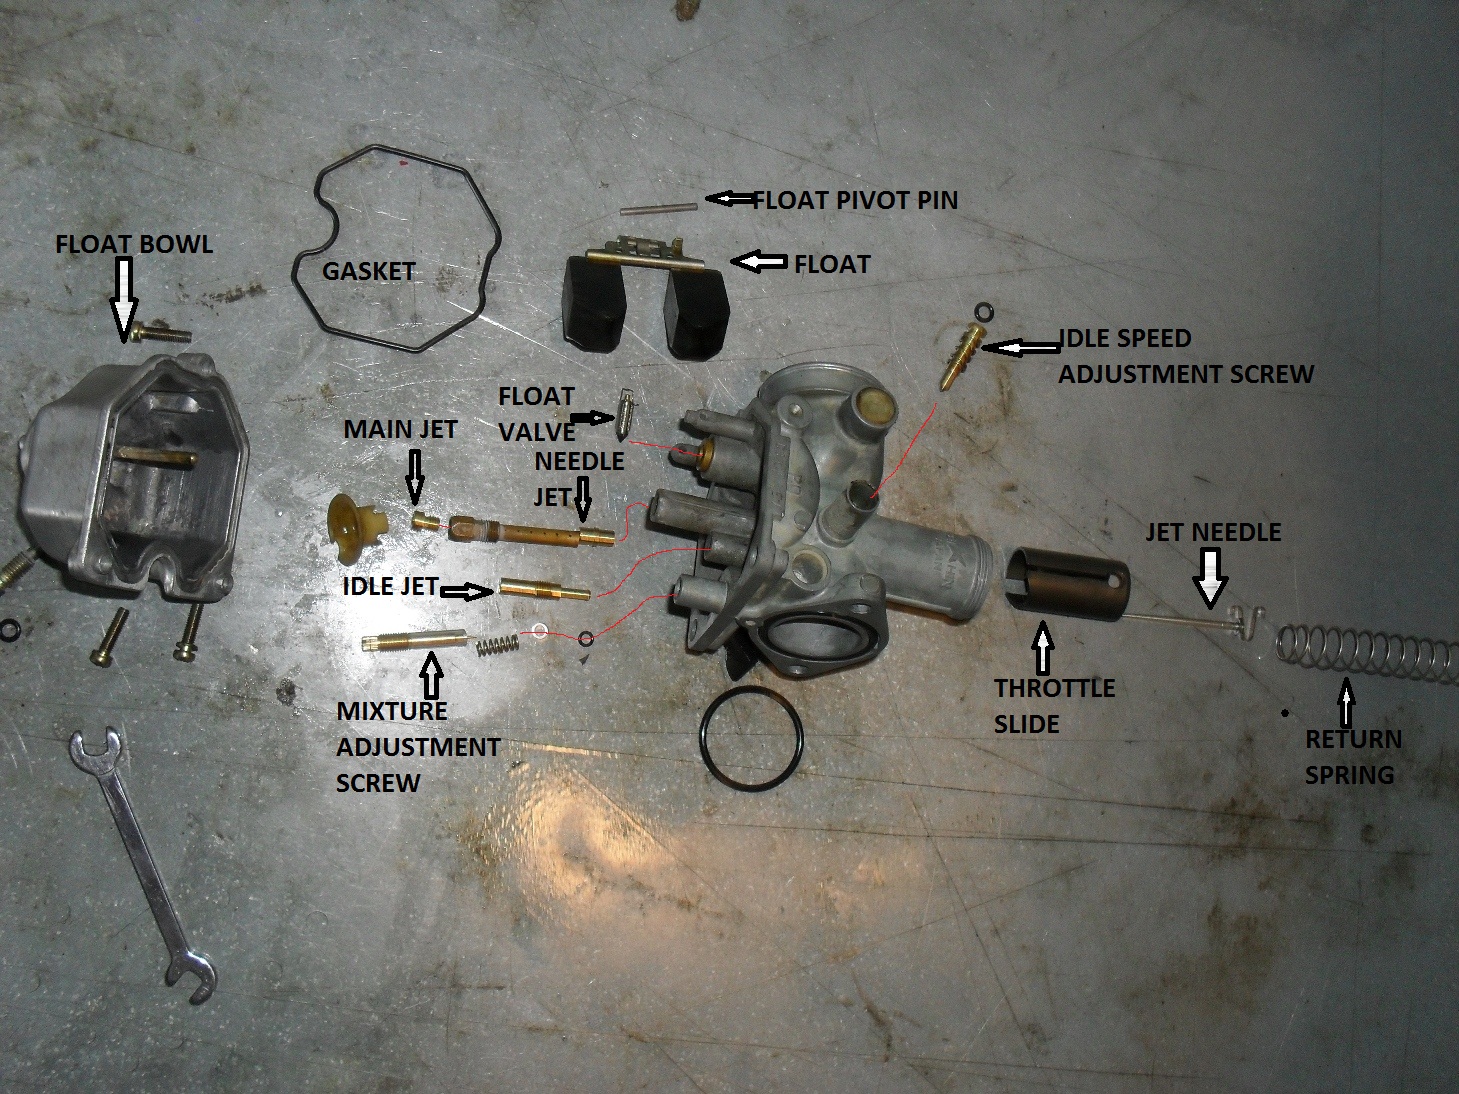
Here is an exploded view of the carburetor with all of the key parts labeled. Everything has been cleaned or replaced and is now ready to be re-assembled!
The red lines indicate which hole the various parts go in.
The first thing you want to do when you pull the carburetor body out of the parts washer is to take a compressed air gun or a can of spray carb cleaner and blow out all of the holes and passages in carburetor body. In general if you spray cleaner into any port on the body it should come out somewhere else. This is to get all of the passages completely clear. Do wear some eye protection while you are doing this.
mixture screw, main jet & idle jet
In this picture I have already re-installed the needle jet, main jet holder & jet, and the idle or slow jet as some like to call it. The mixture adjustment screw is leaning up against the carb so you can see how the spring, washer, and o-ring fit over it in that order. This screw goes into the large hole on the right side of this picture. To install it pick up the carb with one hand, and hold it upright, with your other hand take the assembled mixture screw components and place them up into the hole and turn the screw until it has engaged the threads and will stay in. Return it to the workbench and turn the screw all the way in until it just touches the bottom. Do not tighten it! Do you remember how many turns you have to back it out to reach it’s original position that it was in before you removed it? I told you to write it down in lesson 2. If not check your service manual for the initial starting position, and be prepared to tweak it a little til you get a smooth transition from idle to accelerating.
Now it is time to re-install the float. There is usually a small wire retainer over the float valve that slides over a matching tab between the floats. Holding it together place the float valve into the brass ringed hole shown on the left side of the picture above. Then you should be able to slide the retainer pin in from one side to hold it into place, like this.
carburetor floats installed
Don’t forget to put the little plastic shroud back on in the same way it came off.
Normally I wish vile and unspeakable torture on people whom make the mistake of using any type of gasket sealers on any type of fuel system assembly, but there is always an exception to every rule. In this case the fit of the float bowl o-ring into its groove on the float bowl was just not good enough to hold it into place so I applied a very thin film of a gasoline resistant, Permatex product. A small amount of Permatex 1 or similar product. Use just barely enough to hold the gasket in place. After all you don’t want it squeezing out and stopping up your nice clean carburetor do you?
carburetor float bowl gasket
Of course if the gasket will stay in place by itself long enough to get the float bowl screwed back into place I never put any kind of adhesive on it. but sometimes life just doesn’t work that way.
Once you have the float bowl back on it’s time to reassemble the slide. If you are replacing the needle aka the metering rod, be sure you put the tiny little e clip on it in the same groove that the original one was in on the old needle. Push the needle in through the hole in the center and instal the retainer as shown.
metering rod & slide
retainer clip and needle nose pliers
This picture shows the retainer installed in the slide, exact positioning is not important just be sure you don’t block the slot on the side that the throttle cable goes through.
Now go bolt the carburetor back to the engine (remove the plug from the intake first if you used one), hook up the air cleaner hoses, new gas filter etc. This is the time to be sure the air filter is clean also.
Now back to the slide it only fits into the carb one way so if it does not smoothly slide all the way to the bottom something is wrong. This shot shows how the slide has a notch for the idle speed adjustment screw.
xr100 carburetor slide and spring
Now reverse the steps from lesson one to reinstall the slide to the end of the throttle cable under the top of the carburetor and then slide it into place and tighten the cap down by hand. Guess what? It is time to re-connect the gas tank and fill it with fresh fuel. I consider installing a new fuel filter mandatory and so should you.
motorcycle fuel filter on Honda XR
Once you have the engine up and running you may need to set the idle speed using the idle speed screw as indicated here.
XR100 idle speed adjustment screw
Let the engine warm up thoroughly for a few minutes before making any final adjustments to either the idle speed screw or the pilot mixture screw. If you need to adjust anything make changes in very small increments.
At the end of the last class we ended with the carb sitting on the bench and the intake port in the head plugged to keep out dirt & small critters. Now let’s pull off the vent hoses and turn it upside down on the bench like this.
Take note of the pilot mixture adjustment screw that I have labeled here for you. I will be giving you a tip about it later in the lesson so be ready to refer back to this picture if you need to. Please remember these are not in the same place on all carburetors. I have seen them on the top and on the side depending upon the make and model. Some late model machines have them hidden under aluminum caps to keep you from tampering with them, but if you have a real problem you can remove the caps to repair it. Just be sure to replace them especially if you have to pass emissions inspections in your state. As usual I recommend you consult your handy dandy service manual for your motorcycle just to be on the safe side, because some carbs have more than one aluminum plug and you don’t want to remove the wrong one. Trust me I know….
Of course this bike has none of those annoying issues so let’s go ahead and take the screws out of the float bowl and look inside.
EWWW!
Now I am a fairly environmentally conscious guy, I grow organic veggies, the shop that I work in is powered by solar electricity, drive reasonably efficient vehicles etc. but you will never convince me in a million years that today’s gasoline is good for the environment. Once the lead was removed there really was not that much left to improve. There is no way fuel that will rapidly break down into this toxic and corrosive sludge as fast as the fuel made in this day and time, can possibly be good for the environment. Just think of what it is doing to your vehicles as they sit in the driveway right now.
Let me get out of rant mode and get on with the lesson; here’s a shot of it with the float removed. You should be able to push the pin out to one side with a small punch and lift the float and float needle (float valve) out of the bottom of the carb.
So when someone tells you the float is sticking this is what they are talking about. Sticking floats are usually caused by either a piece of trash getting under the point of the float valve, or if the motor has been sitting by gasoline evaporating, and gluing it into place with a coat of gunk like you see here.
In this next shot I have removed the jets and the mixture adjustment screw. Even if you have a service manual handy, before removing the mixture screw, turn it all the way in slowly and count how many turns it takes to go all the way in. Write the number down somewhere, and then remove the screw along with the spring the washer and the o-ring that are in the hole under it.
You’ll probably have to dig for the o-ring using a piece of wire or a small pick like I did above.
At this point all of the metal parts are ready for a good long soak in the parts washer or carburetor cleaner until tomorrow. In fact the longer the better. Gather up some supplies.
If you have an air compressor and a parts washer you may not need the spray carb cleaner. If you don’t have a compressor it is mandatory even with a parts washer or a dip bucket of carburetor cleaner. For this bike I did pick up a carburetor overhaul kit. If your o-rings are all still in good shape and you can get all of your jets spotless you may not need it, but it is often difficult to clean the idle jet good enough to work again even with all of the right tools. If it’s my own bike, and I am broke that week, I might chance it, cause hey it’s part of the price I pay for this hobby. If it is your bike, you are getting new parts, because if it does not work, then I would be working on it for free and that would just piss me off. You would probably be upset at me too.
Here’s a teaser shot of everything laid out on the bench after cleaning, be sure to come back for the next lesson!
Hello everyone and welcome to this multi-part lesson on the basics of carburetor cleaning for single cylinder motorcycles. The cadaver we will be resuscitating in this lab is an 02 Honda XR100.
“barn fresh” xr100
Believe it or not this bike would still run with the choke on even with the dead gas and clogged jets, gotta love a Honda! This will be a general step by step guide to repairing carbs, so I will not be giving you the actual specifications as they vary so much from year to year on some bikes. As I’ve said before you need to obtain the specific information for your exact bike from a reputable source like say a service manual. For this first post let me show you how to remove the carburetor from this bike.
First let me say that it is possible to pull the carb from an XR100 without removing the bodywork, but A; you need to clean or replace the air filter and B; if it’s been sitting long enough to need the carburetor cleaned you need dispose of any fuel in the tank and clean it out before re-starting the bike after you finish the carb.
Now take off the side covers. This picture shows the location of the air filter cover on the XR100
Next look under the rear fender and remove the 2 nuts holding the seat on. Then pull it up and rearward to remove it.
I like to put the nuts and any spacers back on the studs like this so they will not get lost. In fact whenever possible I do this for all nuts and bolts as it keeps them from disappearing.
Now go the the fuel switch, valve or petcock, whichever terminology you use for it and turn off the flow of gas to the carburetor and disconnect the fuel line. Be prepared to cut it off with a knife and replace it if necessary.
Remove the rubber strap that holds down on the rear of the fuel tank and the two bolts at the front of the tank.
It is not required that you remove the shrouds like I did for this photo, I simply removed them so that I could show you the location of the bolts at the front of the gas tank.
After setting the gas tank aside in a safe location it is time to disconnect the throttle cable. On some models it attaches to an arm on the side of the carb but on simpler ones like this it is attached directly to the carb slide. Unscrew the cap as indicated by the screwdriver and pull the slide out.
This next shot is a little fuzzy but it indicates how the throttle cable is retained in the slide, and the following picture shows the slot in the side of the slide that allows you to remove it from the cable.
Now all you have to do is to compress the spring and push the end of the cable out of its hole, past the end of the slide, pull it out through the slot and then through the big hole at the top.
Here’s the removed and disassembled slide, jet needle, and return spring laid out for you to see.
Loosen the clamp holding the rubber hose from the air box to the carb and then remove the bolts attaching it to the engine and pull it out.
Yes I’m using the obstruction wrenches again. Two tools that I feel are must haves for any serious cycle mechanic are obstruction wrenches of decent quality and some extra long screwdrivers of the finest quality money can buy (i.e. Snap On etc.) Inexpensive wrenches are often okay but cheap screwdrivers will drive you bleeping crazy, by stripping out the soft metal heads on Japanese motorcycle screws.
Here’s a shot of the carburetor on the workbench. I like to use the red toolbox tray shown to help me organize the parts as I disassemble the carb, and to keep the parts from disappearing into the wormhole that exists behind my workbench. No part that falls back there is ever seen again, so I try to keep them from rolling of of the back edge. No dear reader I am not going to move the bench to look for them either. In my shop I coexist peacefully with all matter of snakes and spiders both harmless and venomous, and that is their territory and I stay out of it.
Don’t’ forget to protect the engine by plugging the intake hole while the carburetor is off.
I’ll show you the rest later, don’t forget to bookmark this page or to sign up for the email notification of updates on the right side of this page. Click here for part two!