Cheap Fake Cad Plating & ABS Plastic Repair


There are two things that are commonly found when working on old motorcycles, one is cadmium plated parts that are faded, rusted or discolored somehow, and the other is broken or cracked mounting tabs on plastic parts such as air boxes or side covers. Today we’ll learn how to do a reasonably good job of creating cheap fake cad plating with spray paint. Then we will tackle a minor repair of some ABS plastic parts. Most of the black plastic parts on motorcycles are ABS and on some such as early sport bikes such as EX250 or 500 Ninjas the bodywork is also.

Cheap Fake Cad Plating

Passport steering lock to get cheap fake cad plating

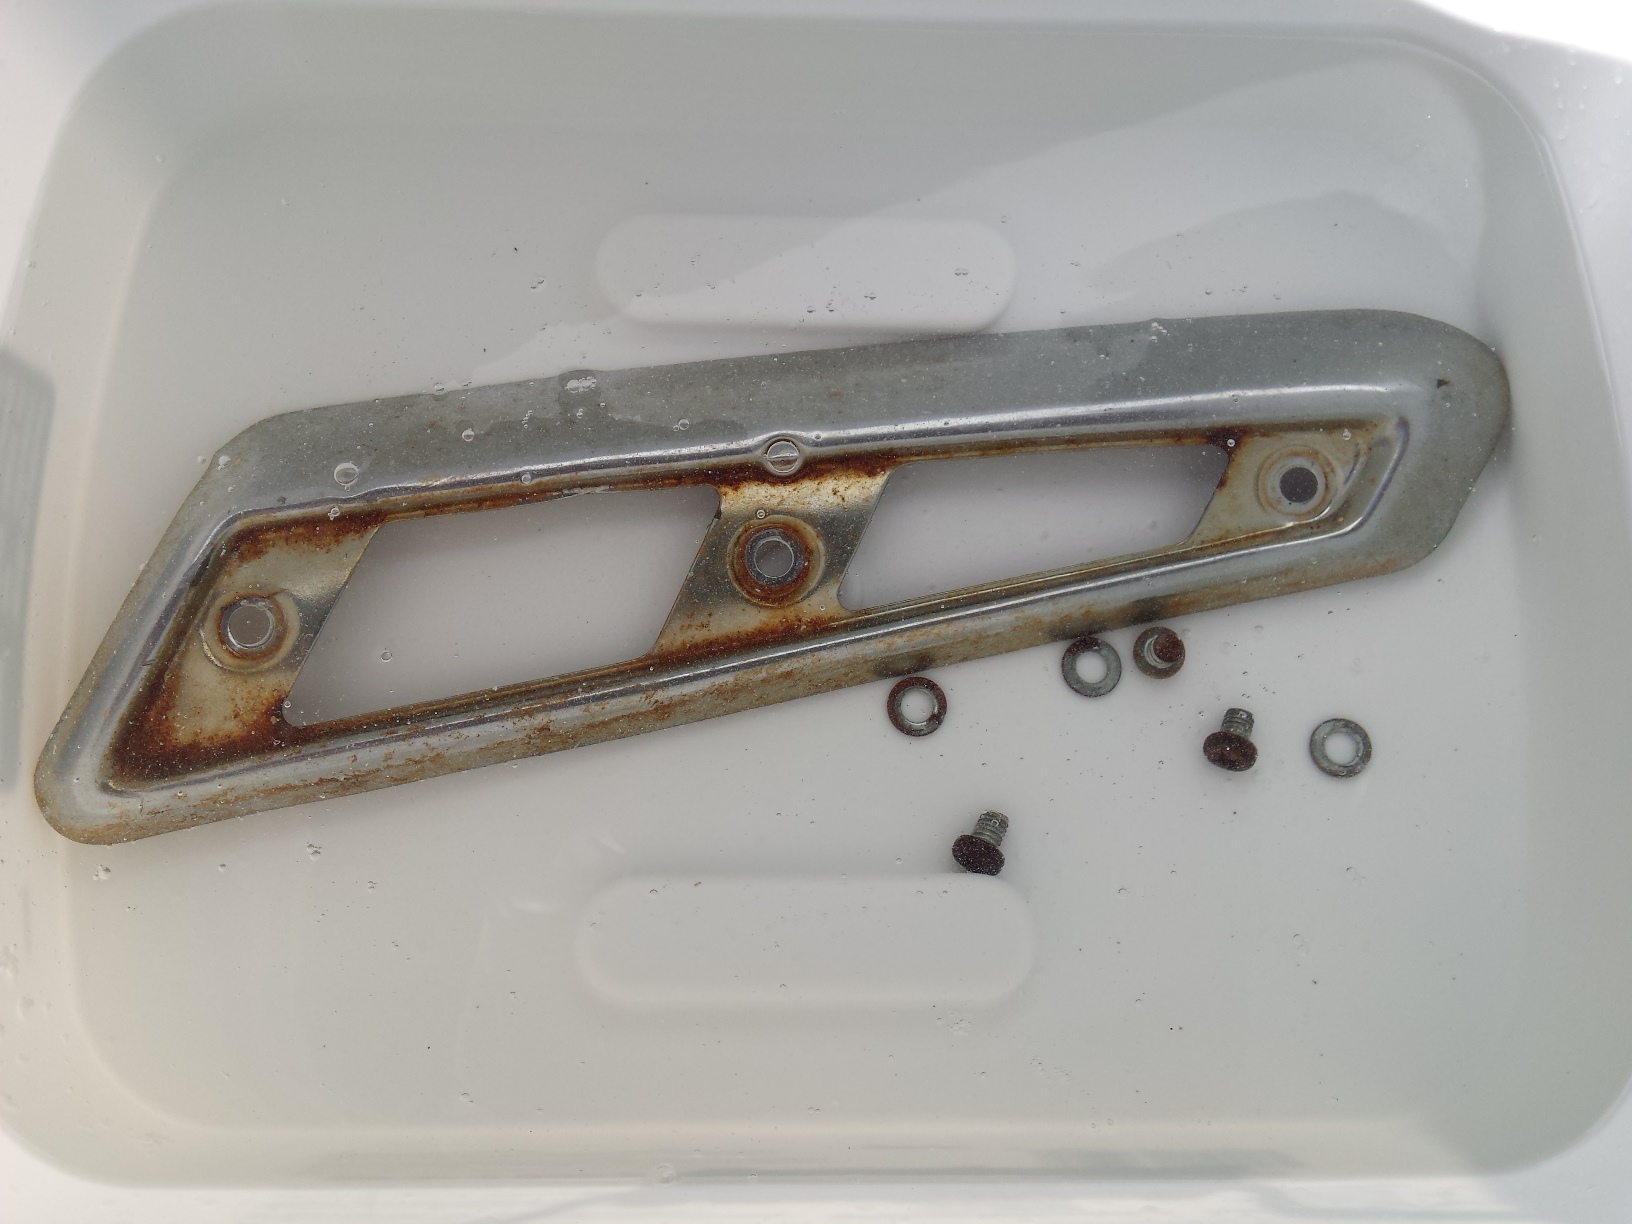
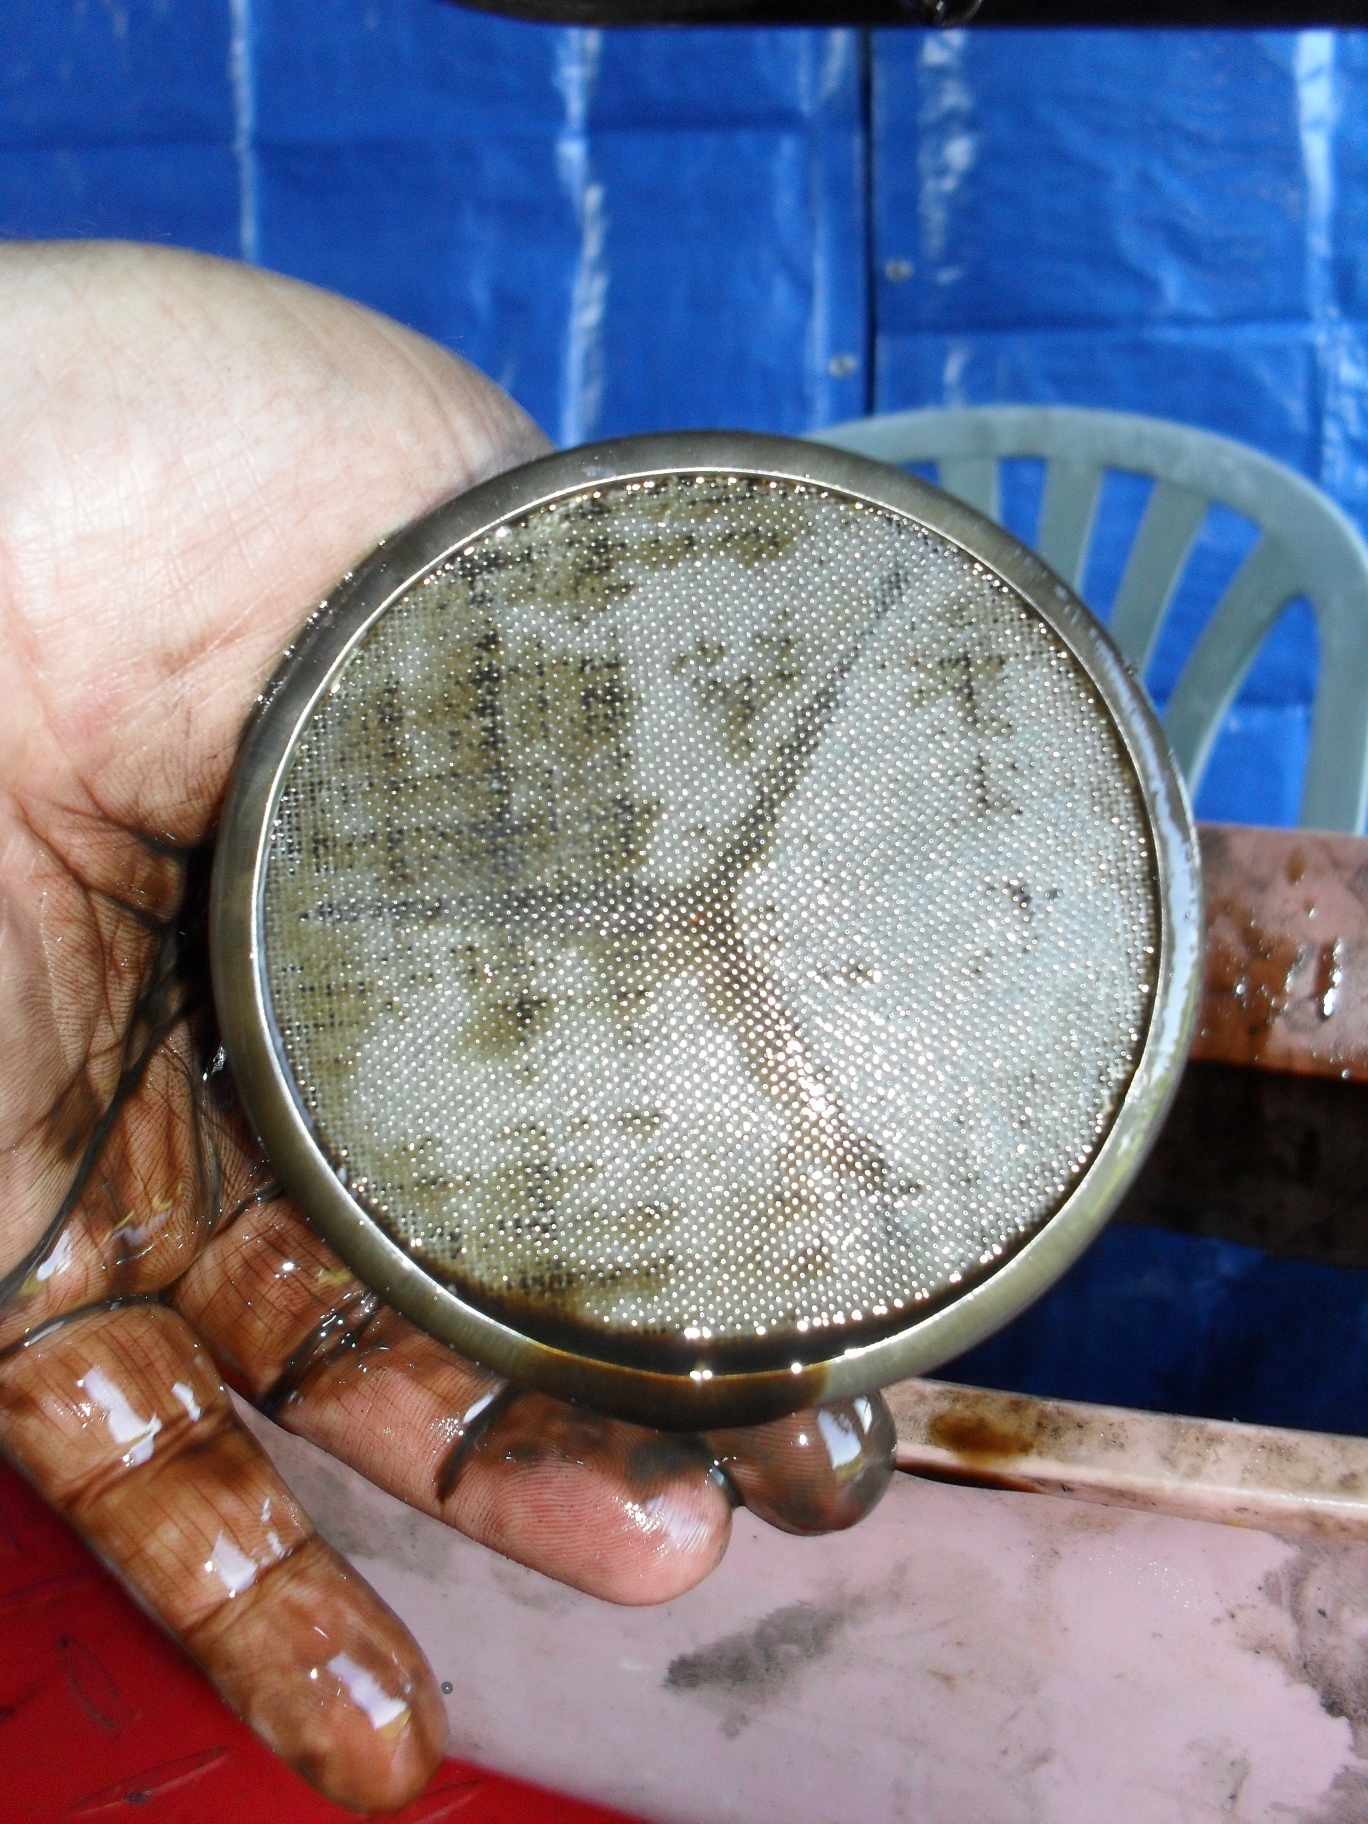
Let’s start with this steering lock that goes on my 1982 Honda C70. In the picture it doesn’t look too terrible, but this was after washing it in the parts washer with a Scotchbrite pad to get rid of some light rust.

Duplicolor adhesion promoter

Once it was dry I taped off the key slot and sprayed on a couple of coats of adhesion promoter.

chrome spray paint for cheap fake cad plating

After giving the adhesion promoter about 8-10 minutes to dry I gave the part a couple of coats of metallic “chrome” paint. This paint doesn’t really look like chrome but it really is a very bright silver.

Passport lock with chrome paint

After allowing the chrome paint to dry thoroughly, take a can of the metallic “gold” spray paint and from 18-20 inches away lightly fog the gold paint over the chrome. Just do one or two light coats. the idea is to lightly tint the part with gold but not to completely cover up the chrome.

gold metallic spray paint for cheap fake cad plating

It’s really best to do this in a well lit place so that you can see when there’s enough gold on the part and stop spraying it.

how to cheap fake cad plating

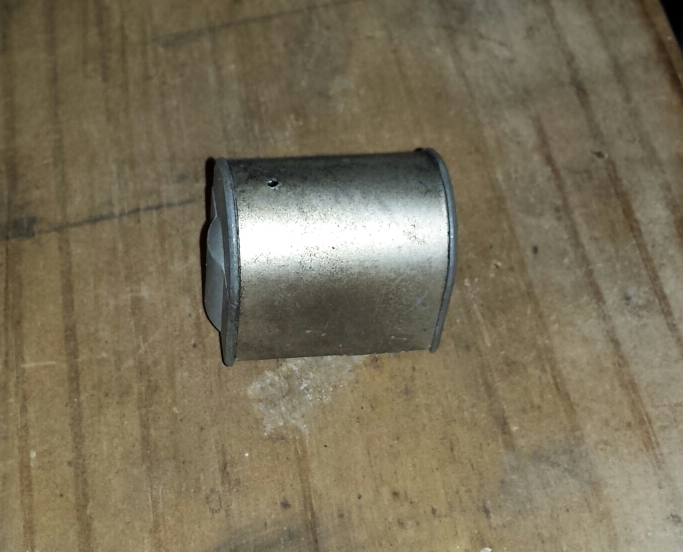
Here you can see my cheap fake cad plating next to one of the well sheltered original cadmium plated brackets from this same motorcycle. Naturally if you plan on having a 100 point national show winning motorcycle, real cad plating is the only way to go, but for your average rider or local bike night hero this is a nice inexpensive way to get a clean authentic look to parts that should look cad plated.

ABS Plastic Repair

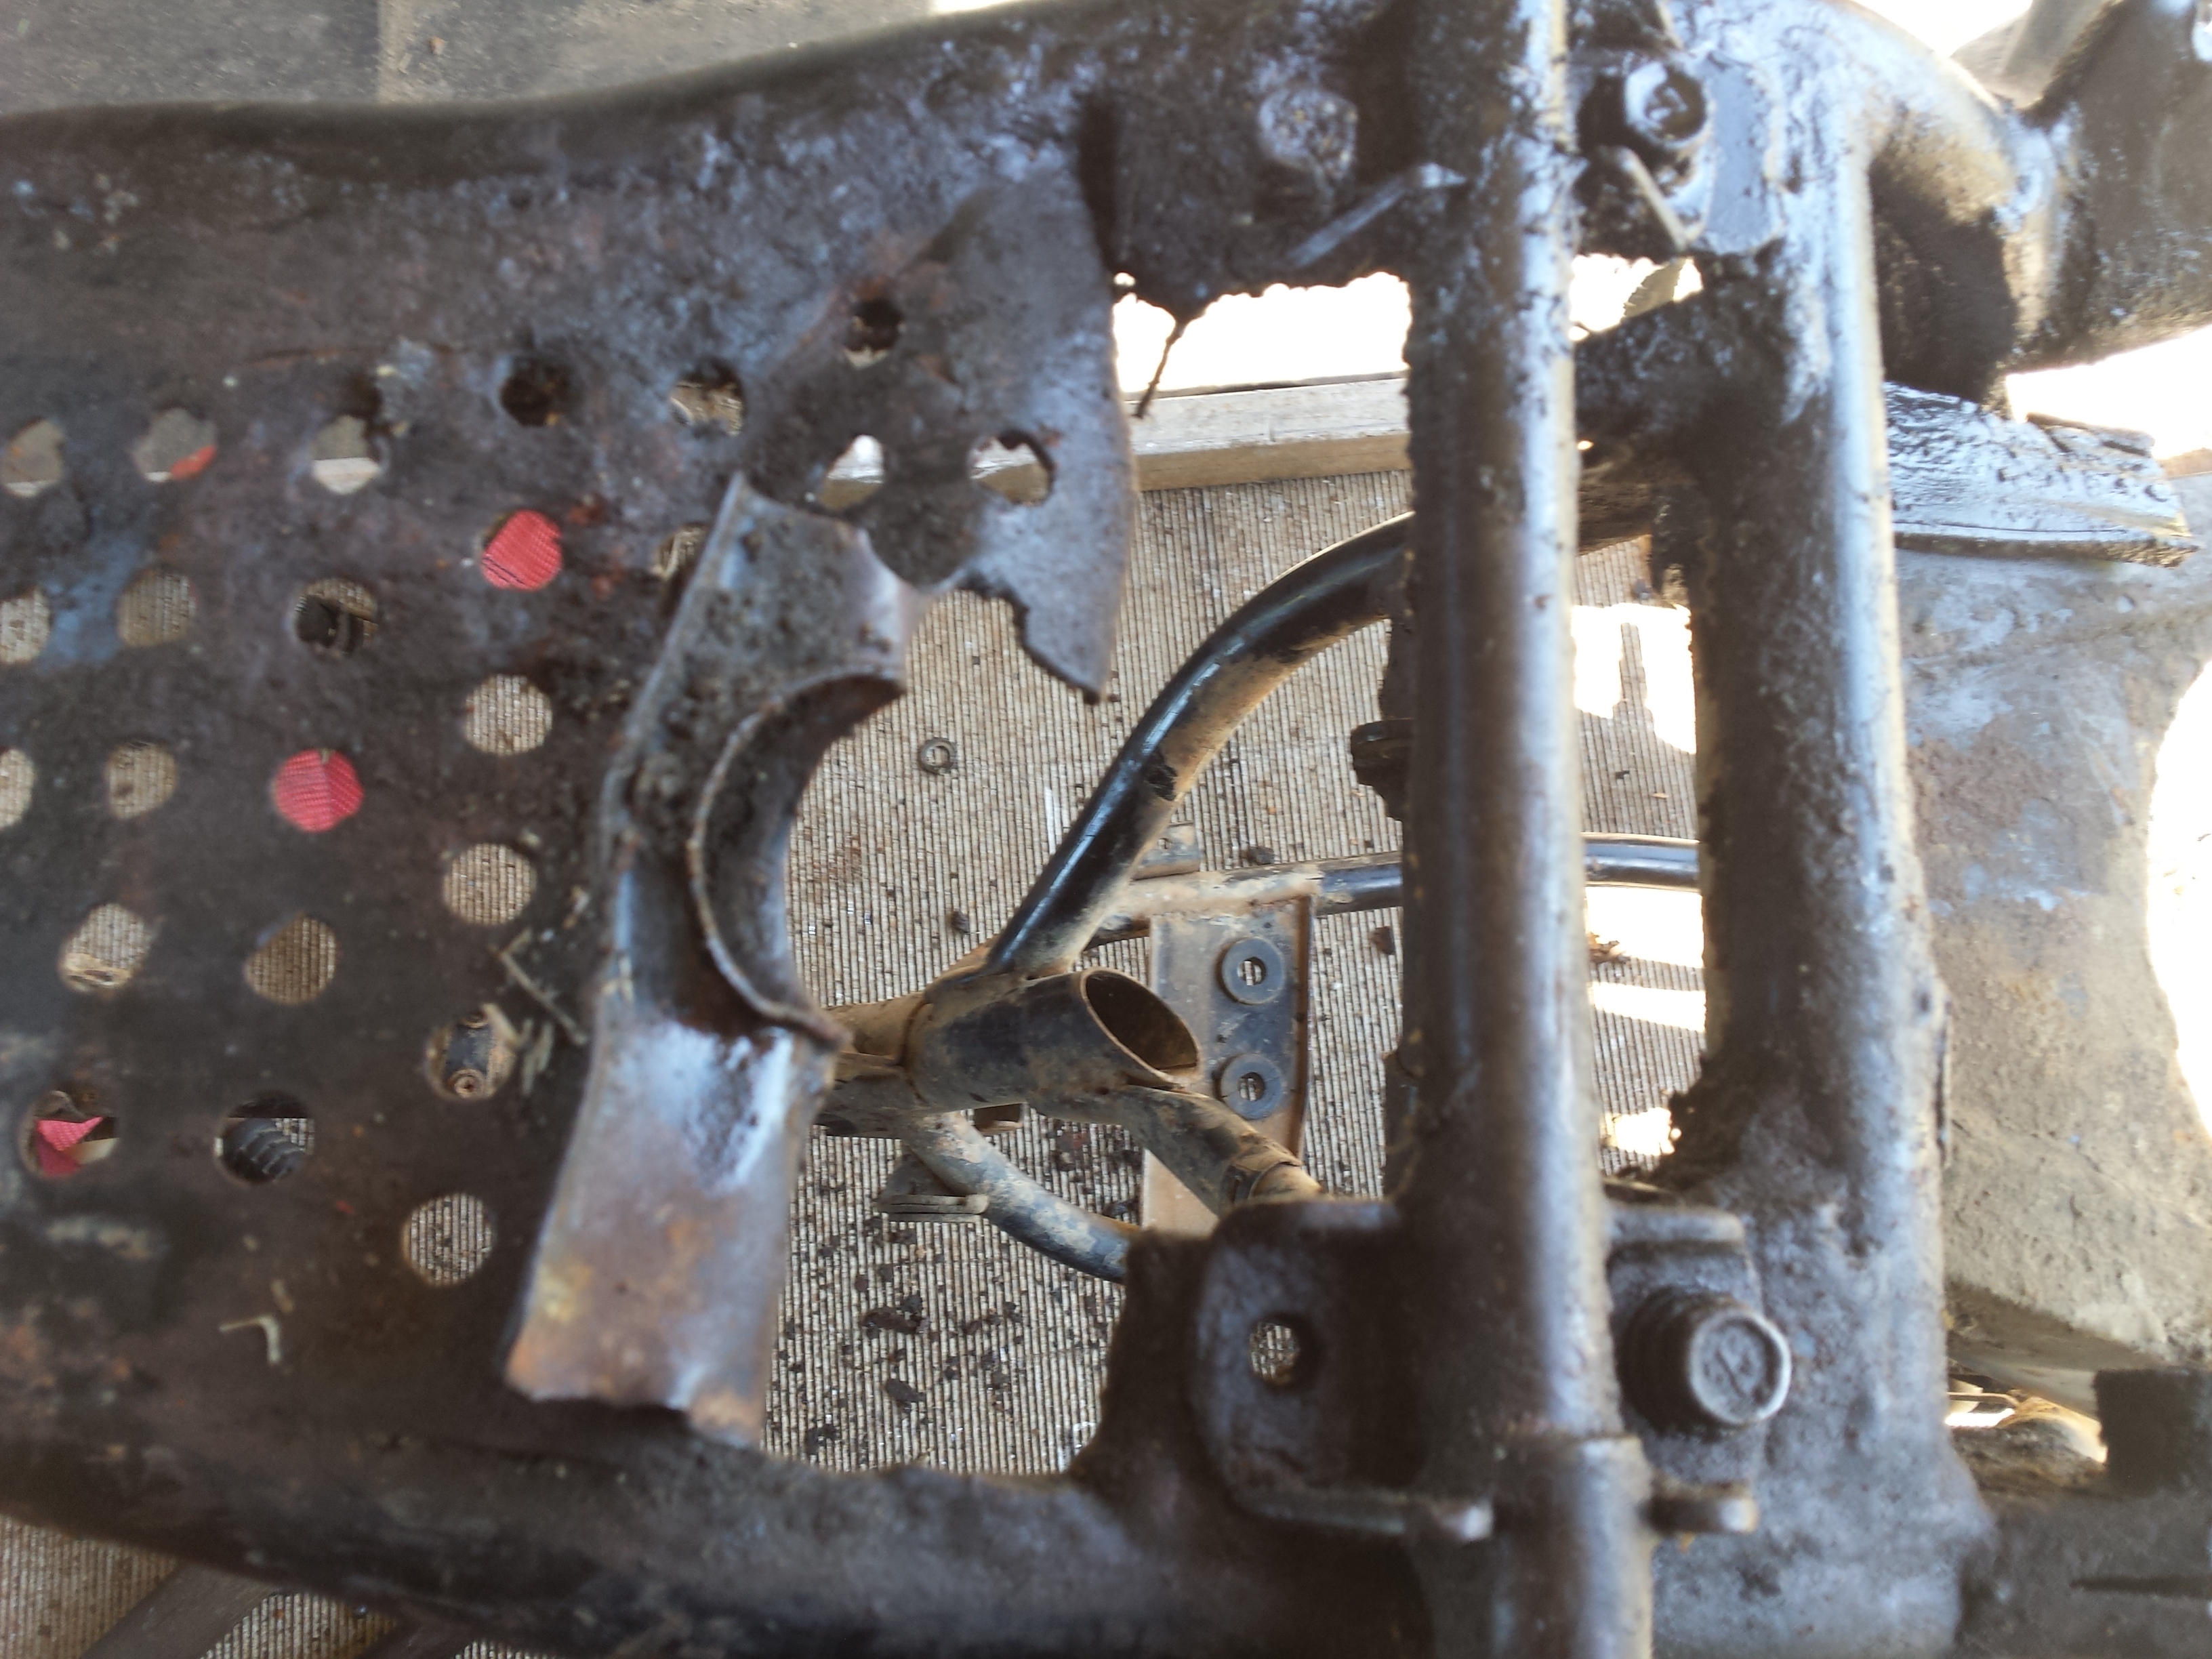
A major source of aggravation are cracks in plastic parts and or mounting tabs broken off of them. But since since a lot of these plastic parts are made of the same ABS material as sewer & drain pipe there really is quite a simple solution. Glue them back together with common ABS cement that you can find at any local hardware store. The air box on this little C70 that I’m working on had been reinstalled at some point in the past without the metal spacers that are normally used to secure such parts to the metal frame without damaging it. The result was that one mounting tab was split & the other one was broken completely off.

fix motorcycle abs plastic parts

To repair the cracked side was simple enough, it jut needed cleaning up and having plenty of glue applied. For the other side that was completely broken out I put a standoff with a washer in the hole & gave it a good coat of cement, permanently attaching it to the air box. You can also buy ABS plastic sheet & use that to fabricate repair patches, replacement tabs & even custom parts that can be glued together using ABS pipe cement. Once you are done & the glue is dry it can be filed, sanded or even painted over just like any normal plastic.

Hopefully these two tips about cheap fake cad plating & abs plastic repair will help someone out, until next time.

Peace Y’all


Clean Inside of Sockets & Wrenches

Clean Inside of Sockets & Wrenches

Here’s a quick random tech tip for you. Although this one is mainly aimed at restorers & customizers it will be of benefit to anyone who values a neat and clean appearance on their project vehicle. When it is time to reassemble your motorcycle make sure that you clean the grease out of your sockets and box end wrenches. When appearances count you really don’t want the old grease & dirt that is inside of your tools dirtying up your clean shiny fasteners. Sure on chrome plated or stainless nuts & bolts it’s more of an inconvenience having to go back and clean them but with zinc plated, cad plated or even painted hardware the dirty old crap stuck in the recesses of your tools can stain the surfaces beyond cleaning. Not to mention that grit from dirt or metal shavings can sometimes be suspended in the old grease and scratch even stainless fasteners when you tighten them down.

Clean Inside of Sockets & Wrenches

So even if all you do is just twist up a rag & stuff it through the wrench, it will make a big difference. I think in the future whenever I finish a big greasy dirty project on an engine or an off-road vehicle, I’ll try to remember to run all of the tools used through the parts washer & clean them inside & out.

How I got reminded of this…

<Honda C70 Passport Restoration>
My last big project was the resurrection of an old ATV for use as a hunting & farming vehicle. It was filthy nasty & greasy even after being washed thoroughly. When I was done all of the tools were wiped off and returned to the tool box without a second thought. Then I used them to disassemble my crusty little C70 Passport, but today when I started putting it all back together with everything cleaned & painted the grease & dirt marred a couple of the bolts so I began wiping the wrenches out after that.

Today I’d also like to apologize to my regular readers for my reduced post output over the last few months since my shoulder injury. Things are getting better now and there is a ton of material saved up, so look for a lot more good stuff to come, including some classic four wheeler tutorials, product reviews, and the return of the Website of the Month category to active status. Still with so much going on there’s no way that I can fit every cool random event into this blog so why don’t you join me on Facebook, follow along on Instagram or on Twitter

Don’t forget the Psyco Youtube channel!

Peace Y’all!


The 20 Foot Restoration

Finally started the repairs & upgrades to the old TS185. It was in dire need of new steering head bearings and brakes. A set of matching dual sport tires wouldn’t hurt either, along with a thousand other little things. So the day before yesterday I pulled it all the way down to a bare frame.

<81 ts185 before>

This is not going to be a show quality restoration by any stretch of the imagination. You may have noticed that the title of this post is The 20 Foot Restoration. If you’ve never heard that term before it describes a vehicle that looks really good from a distance of 20 feet or more, but when you get up close you can still see the dings & other imperfections.

If the skid plate had been removable I probably would have left the engine in the frame for all of this as it runs excellent. But the skid plate is an integral part of the frame, and the area between it and the engine was packed with a mixture of red clay mud & two stroke oil. Plus there was some damage to repair.

<ts185 skid plate damage>

After getting it cleaned up reasonably well, I took some body hammers to it, straightened it up some,  and the welded all of the broken bits back together. Then I hit it with the wire brush & sandblaster before shooting a coat of rattle can primer.

<motorcycle frame on clothes line>

All of the frame bits & pieces are painted with some some cheap spray on truck bed liner, while parts such as the shock bodies etc. are being done in brake caliper paint. I disassembled the shocks & dropped the springs into a bucket of metal rescue to soak overnight. they’re not perfect but they look a lot better.

<oem ts185 shocks repainted>

After 2 days of hard work this was my stopping point last night, this morning I am going out to detail the engine as much as I can without actually taking it apart. and will continue the reassembly of this poor old thing.

<fresh painted TS185 frame>

<The VJMC>

Metal Rescue Reviewed!

Mission Main Street Grants

For this ‘Psyco product review let’s checkout Workshop Hero’s Metal Rescue
rust remover. In the past I have always used good old phosphoric acid for removing rust. In fact I have a 15 gallon tank of the stuff carefully stored away for cleaning old gas tanks & stuff like that. It really removes the rust quite well but it is also toxic, smelly and will corrode the base metal while removing the rust. To use it requires rubber gloves and eye protection.
Last year at the VMA swap meet in Eustis Florida, I bought a gallon of Metal Rescue from a vendor and brought it home, then I poured some out in a small container & dropped a couple of extremely rusty parts in it and left them overnight. The next day they were a little better but not as good as I hoped so threw them into the acid tank and stuck the Metal Rescue on a shelf under the workbench until last month (January 2015).
I’m in the very beginning stages of ruining a wonderful dirtbike by restoring it, so I decided to try the Metal Rescue on some of the chrome bits that really needed cleaning up. First I got a good bucket large enough to hold the parts with a good fitting lid to seal it up and poured the entire jug of rust remover into it.

<RUSTY TS185 HEAT SHIELD>
After waiting a day I opened it up and this is what I found, meh give it another day.

<METAL RESCUE  1 COLD DAY>
This is a picture of the same after 3 days, I am not a happy camper at this point.

<is this stuff gonna work?>
So I pick up the jug to look for a way to file a complaint and read the part of the instructions that says; “For best results, use at room temperature (68°F or 20°C) or above. Metal Rescue™ works optimally at room temperature (68°F or 20°C) and above, so it may require heating in cold temperatures.” Looks like using it in an unheated shop in January is out of the question unless you live closer to the Equator than I do or on the opposite side of it.
Determined to get my money’s worth out of this product I carried the bucket into the house and put it in the laundry room to warm up. When I checked on it the next day 90% of the rust was gone and on the fifth day of soaking the heat shield looked like this!

<Metal Rescue heat shield>

<Metal Rescue heat shield>
The rust was completely removed from both sides and I was very impressed. It probably would have helped a lot if I had read the instructions first. Since then I just keep this bucket of Metal Rescue in a safe place in the house. It is chemically safe with no hazardous ingredients and if you take care to ensure that no hazardous substances get into it, Metal Rescue can be safely disposed of in most sewer systems but check your local laws first.

<rusty ts185 headlight ring>
To give you an idea of how much I like this product, I bought some more and put it into the bucket with what I already have. With the solution at room temperature it took less than 24 hours to clean up this headlight ring to the condition that you see here. Plus I was able to leave it assembled with all of the plastic parts & springs while it soaked something you would not dare do with acid.

<Metal Rescue headlight ring >
The instructions do warn that if you leave plain steel parts in the Metal Rescue
too long that it will turn them dark after removing the rust. Plated parts don’t seem to be affected by this. The screws in the picture below illustrate this. Since I am going to be re-coating these screws it’s not an issue for me, but if you are restoring something that calls for a natural metal finish you should be aware of this.

<metal rescue screws>
What’s the bottom line, is it worth 25 -30 bucks a gallon? Yes, especially when you consider that if properly stored it can be used over & over combined with the fact that it is biodegradable and contains no VOCs, solvents, acids, bases or hazardous ingredients. Just be sure you read the dadgum instructions on the jug first. It really does work much better when it is warm.
Peace Y’all

Gords Garage Blog The February 2014 Website Of The Month

Gords Garage Blog has one of the best subtitles I have ever read, “I am not a professional and I try things at home.” The is probably one of the most mechanically inspirational blogs I follow. If you are into metal working and motorcycles you need to go check this guy out. At the time of this writing he is just putting the finishing touches on a fantastic looking CB160 cafe racer. Gord has a well equipped home shop including machine tools and welding equipment along with a lot of talent & imagination so you are sure to find some good ideas for your next project if you look. Click here to visit Gord’s Garage.


Google+

Use the Right Tool for the Job! A Tech Tip & Product Review Combined!

It is time for me to make a confession of my own ignorance. For over two decades I have not been using the correct screwdrivers to work on my beloved old rice grinders. Even during the time I worked as a dealership mechanic I destroyed countless fasteners by using the wrong screwdrivers. I did find by experience, that the really high quality & expensive Snap On brand could usually remove those annoying cheesy easy to strip cheap ass Japanese Phillips screws. But even then the heads still looked mangled for some reason.  Day after day I cursed the engineers at Honda, Kawasaki, Yamaha & Suzuki for sourcing such horrible fasteners to hold such fine machinery together.

Fast forward a couple of dozen years and one day while wandering through a motorcycle show, I stop at a VJMC display and pick up a copy of their magazine.  When I finally slowed down enough to read through it a couple of weeks later I saw a really great article on the difference between Japanese Industrial Standard screws & Phillips screws as used here. It was a real eye opener, no wonder these screws were so difficult to remove. The angles of the sides and the shape of the center are just different enough to cause these two different styles not to be interchangeable.

I jumped onto the internet to research these JIS screwdrivers & found the two most commonly available brands to be Vessel & Hozan. I decided to order a 4 piece set of Hozan screwdrivers for about $25 USD.

Hozan JIS screwdrivers

Hozan JIS screwdrivers

These screwdrivers have hard plastic handles, this bugs some people but most of my screwdrivers have hard handles it  is what I’m used to. Plus they are a lot easier to clean than cushion grips. The distinctive shape keeps me from confusing them with my regular Phillips head screwdrivers which is important. They will probably bugger up a Phillips screw the same way a Phillips screwdriver buggers a JIS screw.

Even though I’ve only used them a few times I am really impressed with how much better they fit & grip the screw heads on a few dirtbikes that I am working on. And the best part of all is that the screws still look good when I am done. This is very important if you are doing restorations or building show bikes.

Save yourself a lot of trouble, learn from my mistakes and get yourself a set JIS screwdrivers. You’ll be glad you did!

Oil Sump & Strainer Cleaning

Alright! You’ve got your latest barn/field/junkyard find home, it still had good compression, so after cleaning the carbs, topping off the oil and putting in fresh gas it actually fired up and ran okay. Yeehaa! now comes the hard part, do not immediately go running in the house to scour the internet looking for the thousands of dollars worth of parts & accessories you need to restore or customize your new to you machine, there is one more thing you must do to be sure that you don’t need to tear the engine down to bare cases, or perhaps just throw the whole damn thing in the trash. Most vintage Japanese & British machines have an oil sump (oil pan to some of you) strainer, that has probably never even been looked at since the machine left the factory. For this lesson we are going to remove the oil sump (pan) from my personal 1980 Honda CB650 and see what we find inside. After a few minutes running time  & a valve adjustment this old thing has less the 8 p.s.i. difference in compression from the lowest to highest cylinder, I can live with that, if there is nothing wrong in the bottom end. Lets have a look shall we.  First if you have a lift put it up on the lift securely.

1980 Honda CB50 on Harbor Freight Motorcycle lift

Let the serious work begin!

The mufflers are off of mine because I am planning on binning them anyway, it is not necessary to remove them for this job on this motorcycle.  On some bikes it may be required, refer to your service manual for details.

Locate the oil drain plug,

Honda CB650 oil sump drain plug

the location of the drain plug & oil pan bolts

and remove it with the appropriate wrench and drain the oil into a catch pan.

Honda CB650 Drain Plug Location

be sure to catch the aluminum sealing washer.

Since this involves changing the oil you might as well go ahead & change the filter too. On these old air cooled Hondas the filter is a cartridge in this housing on the front of the engine.

Honda SOHC Four oil filter housing

Oh no! this bolt has pliers marks on it. Not cool.

Remove the filter and housing, be sure to move the catch pan so that it catches the oil from the housing.

removing the oil filter bolt

removing the oil filter bolt

Now move to the bottom of the machine and begin loosening the bolts on the sump. The CB650 has 10 bolts that are all the same size & length, so all I have to do is don’t lose any. If you motorcycle has different size or length bolts holding the sump on be sure to note which bolts go into which holes.

the motopsyco hard at work

the motopsyco hard at work

Before you completely remove the last bolt and thus the sump be sure you slide the drain pan back into place beneath the engine.

Before you rush to dump the oil pan set it on the bench and have a good look at the goo stuck in the bottom of it. This will tell you a lot about the health of your engine. Believe it or not the crappy looking mess in the picture below is actually what you hope to find.

inside the CB650 oil pan

inside the CB650 oil pan

This one has a thick coat of clutch dust & what ever dirt that got into the engine & settled out of the oil, what I don’t see are any pieces of gear teeth or metal shavings that indicate an serious problem with the engine or transmission. Now take a magnet & swish it around in the muck to see if it picks up anything. Mine came back clean this time. This is no 100% guarantee that all is well with the transmission etc. but it does make me feel better about buying the parts needed to get it ride-able.

<cb 650 oil sump craftsman magnet tool>

Now it is time to inspect & clean the strainer screen.

location of oil strainer Honda CB650

location of oil strainer Honda CB650

While you are down ther3 have a peek up into the engine to see how everything looks.

<inside the bottom of a Honda engine>

this all looks good in here

On a CB650 slide the drain pan back under the engine & pull down on the strainer, it should slide out.

remove CB650 sump strainer

just pull it straight down.

Once you get it out carefully inspect the screen and if it is damaged or loose replace it. If it looks good wash it out in the parts washer.

1980 CB650 oi sump screen

Inspect the strainer & its o-rings if you have any doubt about their condition, replace them.

Now you just have to clean everything up inspect & replace all gaskets & o-rings as needed, and reassemble everything in reverse order installing a new oil filter & fresh oil. NOw you know that you have one less thing to worry about.

Peace ‘Yall

Why Can’t I Let Dead Dragons Lie?

let dead dragons lie

What I see anytime I see an old Japanese classic left to rot…

Here we go again, I knew this old Honda was bad news the first time I saw it. Years of abandonment & sitting out in the weather had taken a severe toll on every single piece of it, how often do you see a rust hole in the top of a gas tank?

<really messed up Honda Tank>

To make matters worse it is a 1980 model the first year Honda started using that sway backed horse looking frame designed to get the seat closer to the ground in hopes of getting more people into riding and thus increasing sales. And yet here it is sitting on my lift as I am evaluating its potential as a custom possibly a cafe racer. The S.C. inspection sticker on the fork is dated 1988, and this was probably the last time it was on the road as S.C. did away with inspections soon after. The carb float bowls were completely gummed up and one slide was frozen in its bore. But the residue cleaned out okay and corrosion was minimal leading me to suspect that it was pre-ethanol gasoline in the carburetors!. It actually fired up and ran after a fast & furious carb cleaning. Heck I even wire brushed the original spark plugs and stuck them back in as they all 4 spit great big blue sparks during my initial testing.

"<a

It actually was kind of anticlimactic, this ancient corroded cobweb covered corpse fired right up and ran like a Honda. I felt like some  necromancer in a fantasy story that had prepared a powerful magic spell to reanimate the dried bones of a dead dragon only to have it sit up, yawn and say, “well that was a nice little nap,” before I could cast my spell.

<1980 Honda CB650 4 SOHC>

It did smoke a little but there were no strange noises, not even a cam chain rattle. Since the engine is very rough looking cosmetically and I like to be as close to 100% sure about my motorcycles as possible,the next step in this evaluation is to pull the engine from the frame & take the head off and have a look inside. If all looks fixable I start renewing this bike in earnest beginning with an engine overhaul.

<CB 650 standard rear wire b4>

Although I try to kid myself that I am still evaluating this thing, I did purchase a set of wire wheels that I spotted on Ebay at a good price, & to crank it up I bought a new Shorai LFX battery for it. Experience tells me that I should wind up with around 3-4 thousand dollars in a motorcycle that might be worth 2 grand at the most. :O

Shorai LFX  the best motorcycle battery money can buy.

Shorai LFX the best motorcycle battery money can buy.

Help here I go again 🙂

Another Junkyard Dog from the Bicycling World!

Hey I had a bike just like this as a kid, well almost.. mine was a Murray and didn’t have the awesome rat trap springer fork, or the motorcycle muffler chainguard but at least it had the same frame. 😉

a seriously vintage bmx bike! a Free Spirit MX-1

I am planning to restore this one one day but for now it will continue to reside in a place of honor hanging from the rafters of my shop. Thanks to my buddy Kevin for keeping this unusual vintage bicycle out of the shredder for future generations to enjoy.

Peace Y’all