I was invited to be a Guest Blogger over at the Clark Heintz Tools blog, so I sat down and wrote for them what I hope is a nice informative article on one of the most vexing problems anyone can have when working on a motorcycle or bicycle. Click here to go check it out.
There is even a picture of the infamous old Honda oil filter bolt showing just exactly what you might have to do to remove one…..
If you like the post let them know, if you don’t let me know.
It is time for me to make a confession of my own ignorance. For over two decades I have not been using the correct screwdrivers to work on my beloved old rice grinders. Even during the time I worked as a dealership mechanic I destroyed countless fasteners by using the wrong screwdrivers. I did find by experience, that the really high quality & expensive Snap On brand could usually remove those annoying cheesy easy to strip cheap ass Japanese Phillips screws. But even then the heads still looked mangled for some reason. Day after day I cursed the engineers at Honda, Kawasaki, Yamaha & Suzuki for sourcing such horrible fasteners to hold such fine machinery together.
Fast forward a couple of dozen years and one day while wandering through a motorcycle show, I stop at a VJMC display and pick up a copy of their magazine. When I finally slowed down enough to read through it a couple of weeks later I saw a really great article on the difference between Japanese Industrial Standard screws & Phillips screws as used here. It was a real eye opener, no wonder these screws were so difficult to remove. The angles of the sides and the shape of the center are just different enough to cause these two different styles not to be interchangeable.
I jumped onto the internet to research these JIS screwdrivers & found the two most commonly available brands to be Vessel & Hozan. I decided to order a 4 piece set of Hozan screwdrivers for about $25 USD.
Hozan JIS screwdrivers
These screwdrivers have hard plastic handles, this bugs some people but most of my screwdrivers have hard handles it is what I’m used to. Plus they are a lot easier to clean than cushion grips. The distinctive shape keeps me from confusing them with my regular Phillips head screwdrivers which is important. They will probably bugger up a Phillips screw the same way a Phillips screwdriver buggers a JIS screw.
Even though I’ve only used them a few times I am really impressed with how much better they fit & grip the screw heads on a few dirtbikes that I am working on. And the best part of all is that the screws still look good when I am done. This is very important if you are doing restorations or building show bikes.
Save yourself a lot of trouble, learn from my mistakes and get yourself a set JIS screwdrivers. You’ll be glad you did!
For this random tech tip I am going to talk about one of the best tools that you absolutely must have in your toolbox, a notepad & something to write with. Some mechanics and owners even go so far as to keep actual log books of the work they do. These are wonderful people to do business with & buy motorcycles from, and if it suits your personality I highly recommend that you do the same. For the rest of us, myself included, who are not quite so anal, a small note pad or note book is essential to write down the occasional part number or measurement.
the ever useful notebook
I have even sketched out an assembly or written down re-assembly directions for things that I have taken apart. Even if you have an eidetic memory, sooner or later you will likely miss some small detail or another, but the act of writing things down helps you to remember them better, and prevent mistakes in re-assembly, parts ordering & custom fabrication.
A good cheap calculator is another great item to have for doing quick calculations & conversions. If you are a machinist or a designer you will probably have a scientific calculator but for the vast majority of us, a simple little calculator is all you need for things like figuring out what size shim to use when adjusting valves, or how much further a part can go before it hits the wear limit. Here I must confess to overkill, since my day job is working in the engineering department of a local industrial equipment manufacturing company I own multiple scientific calculators, it’s just how I roll.
And last but not least you probably have one of the greatest, & most handy mechanical tools right there in your pocket. A smartphone with a camera has become one of my favorite ways of documenting progress on a job or a project. Take a picture before you start, take another one for each part you remove. Then if you need to refer back to your pictures to remember which way the thinga-ma-bob fits into the doohickey, you have pictures to refer back too.
By the way, here is a quick update on my Honda CB650 project bike. Originally purchased to be modified in the “cafe racer” style I have since changed my mind and am now currently pursuing an “urban scrambler” style. This is going to be really cool so stay tuned!
Got the airbox & other non- essential stuff out of the way!
This is sort of a combo how to and product review. I will admit that my review is a little biased because I have been using this product for over 20 years and have always been satisfied with the results. I wont repeat the instructions word for word but I will give you a few tips to help you get better results. First empty your tank and remove the petcock and filler cap if it is bolted to the tank.
Remove the Ninja’s locking fuel cap
The next step is critical to getting good results especially if working with the tank from a 2 stroke engine. You must completely degrease the inside of the tank with a good industrial degreaser. Do not use dish liquid because it often contains oils to protect skin. Be prepared to wash it more than twice if needed to get the oil out.
Wash & degrease tank thoroughly
Now open up the kit and get out the bottle labeled “A” wash & cleaner. Use duct tape or a blocking plate to block all of the holes in the bottom of your tank. I like to use a piece of metalized tape first and then cover it with duct tape.
Kreem Kit Part A Use proper precautions for mild acid.
The instructions say to use warm water and I agree it does help the acid work much faster. Please note the standard kit shown here is for smaller tanks. Normally for a 5 gallon tank like this I would buy the larger size, but I had some left over from a previously restored tank, that I added in after using this up according to the instructions. The cleaner part A can be saved and re-used a time or two.
Warm water is recommended to mix with cleaner
After the tank is full seal off the top and let it sit for at least the minimum time given in the instructions. Since this was an old tank with some rust inside I let it sit overnight. At this stage some people will put in rocks or nuts & bolts and shake the tank to help remove thick rust. If you need to do this I recommend that you use steel nuts & bolts so that you can retrieve them easily with a magnet. Some fuel tank designs make it difficult to remove rocks after you are finished cleaning out the rust.
Next remove all tape from the openings rinse the tank well until the water comes out clean. and then thoroughly dry the tank on the inside. Since I had plenty of time I placed the tank in a hot sunny location to air dry. In the winter time or if you are in a hurry use a hair dryer or a hot air gun to speed up the process.
fuel tank drying in the sun
I do need to warn you about one thing if you are trying to fix a tank with a nice paint job or if you are coating a new tank as a preventative measure you want to be very careful with this stuff, especially in the next two steps.
Seal up all the holes again and get out part “B” the conditioner. This bottle contains MEK which can remove paint faster than tequila removes panties. If you have a nice paint job & spill this on it, you wont have a nice paint job anymore, so be careful. I am re-painting this tank so I don’t really care if I spill some. After sealing the tank back up shake all around the inside of the tank & the carefully drain it out protecting your paint as needed.
This is highly flammable & can destroy paint so be careful.
Since the petcock on this one bolts into place before going to the next step I put two screws in the bolt holes to keep the threads clear. To me this is just much easier than cleaning out the holes afterward.
I like to put bolts in these holes to keep them clear
Now you are ready for the bottle of fuel tank liner. All the same warnings about paint damage apply to this bottle as well.
Kreem Part C liner
Here is a shot of how I use the metal tape first & then cover it with duct tape to seal the openings in the tank. It works well for me, but I make no garuntee that it will work this well for everyone.
Red Green is absolutely right about this stuff! (Duct tape that is)
Then pour in the whole bottle of liner, and then seal up the filler hole as I did in the next picture.
pour in Kreem Tank Liner
then seal up the filler hole with duct tape
Then spend the next 30 minutes or so slowly rotating the tank end over end and sideways until you are 100% certain that the entire inside of the tank has been covered with sealant. Next (and this is very important) open the tank back up and drain the excess sealant back into its original bottle. Do not leave it in the tank as it will greatly increase drying time. If too thick it may skin over on the top and take nearly forever to dry all the way through, causing you to have problems later. I usually save the excess to use on the next project. I am usually able to do a lawnmower tank or two with the leftovers.
Like I said if you follow the instructions in the kit and the hints that I gave here you should be able to tackle this job yourself at home. Just give yourself a couple of days if your tank is rusty, and be sure you drain the excess sealant out of the tank and give it time to dry really well. This stuff aint cheap at approximately $50 a pop (November 2012 price) so you want it to work right the first time. I have used other tank sealers with varying degrees of success, but I always come back to the original Kreem brand. Plus it is usually in stock on the shelves in most motorcycle dealerships. Besides have you priced a new gas tank lately? It’ll give you a coronary!
This tech tip is for all of the people who are just starting to wrench on their own motorcycles, although I have met a few old timers who may not know it. All of the big four makers do this on most of their machines. I don’t know about HD or the current European brands but all of the top Japanese motorcycle companies do it. They put punch marks on the various components that mount to shafts with splines. Shift lever, decompression levers, drum brake levers etc. almost always have punch marks indicating the correct alignment of the part to the shaft. Here is an example below from a Honda drum brake.
So now you know one more thing to look for when you start to tear into your own machine, and should your atv or motorcycle not have punch marks like this you can always add them before taking it apart if you need to. After all anything that makes it easier to reassemble your parts and get your machine running in top form is a great thing.
I’ve been wanting one of these for a long time. For years I used a wooden table or a chain hoist to lift motorcycles up for repairs when I just could not bear to get down on the floor to work on them. As I’ve gotten older the combination of a weaker back and a fatter wallet has made this purchase a lot easier to justify. So when the September issue of my favorite motorcycle magazine arrived on my Kindle with a coupon to purchase this lift for $299 I bought a print copy ASAP & clipped the coupon.
Ironically enough it took me 2 weeks to purchase this from either of the 2 nearby Harbor Freight stores. Unfortunately this led to my first real negative experience with a company that I have enjoyed doing business with for years. Last Saturday I went to my closest store in Florence S.C. and they were out of stock, so I called the store in Dillon an hour drive from here and they were also out, but told me they were expecting a shipment on Thursday. Yesterday, I was in Florence and they were still out, so I called the Dillon store and gave them the item number and was informed they had some in stock. So I gassed up my van and rolled up the interstate to that store, imagine my shock when I handed the clerk my coupon and was told that they were out of stock. When I mentioned that I had just called and had been informed that they were in stock. Then she went back to the computer and “found” one for me. Probably just a human error but if you are using a coupon to buy one I would verify stock in your nearest store before driving very far to pick one up. Don’t mention the coupon until you get there.
The shipping guys helped me load it in my van with the forklift. This worked out for me okay but if I had to do it again I would have taken a trailer for easier loading and unloading. If you have a long bed pickup truck that’s the best thing to use.
lift in crate in my Astro van
Since the completed crate was far too large and heavy for my beautiful assistant and I to remove from the van I simply opened where it was and slid the contents out into the door of my barn.
motorcycle lift crate open
I am not going to do a step by step walk through of the assembly because in all honesty the instructions that come with it are perfectly adequate to help you get it together. I will touch on a couple of things that I think you should know about. First I got all of the parts laid out and read the instructions from beginning to end.
Harbor Freight Motorcycle Lift Table w/ parts & instructions
Harbor Freight Motorcycle Lift Table oil fill plug
One of the things that you are instructed to do is to check the level of oil in the lift cylinder. The fill plug is in the location shown in the picture below.
Be sure to use a decent grade of jack oil. If you do not have some at home go ahead and pick some up at Harbor Freight while you are there. The best way to fill a jack cylinder like this is with a squirt can. Mine turned out to need a pint of oil to fill it.
oil I used for my Harbor Freight Motorcycle Lift Table
The instructions seem to want you to install all of the parts and accessories before you check the oil and raise the lift. I personally installed the wheels, then filled up the jack and raised the table all the way up to install the wheel vise, tie downs, & the ramp. You should do whatever seems safest to you.
Installing accessories on my Harbor Freight Motorcycle Lift Table
Here it is altogether.
my fully assembled Harbor Freight Motorcycle Lift Table
After double checking the assembly of the table I lowered it back down and drove the Minimum Ninja up on it so that it could receive some long overdue TLC.
Look Y’all it’s the Minimum Ninja!
Yesterday after strapping the bike down I raised the table to its maximum height and left the motorcycle sitting on it with the safety bar properly installed. When I went back this afternoon it was still all the way up. A lot of people criticize the design of the wheel vise but I think that it is okay. Unlike the larger vises I am certain that one can perform most fork and front wheel service without removing it. When I was a dealership mechanic most of the time the wheel vises from our heavy duty air lifts spent most of their time lying under the workbenches because they got in the way. Plus my bike still has a centerstand 🙂
Kawasaki Ninja 250 on my Harbor Freight Motorcycle Lift Table
Don’t forget to recycle the crate! It actually has a couple of large pieces of usable plywood, I know that you can always find a use for a good piece of wood around the house or shop.
Recycle this crate you know you want to.
This will be a long term review. Over time I will publish new updates or simply update this post as I get some miles and years put on this thing.
As for the Minimum Ninja, it will receive its own pages here covering the updates and repairs as I make them.
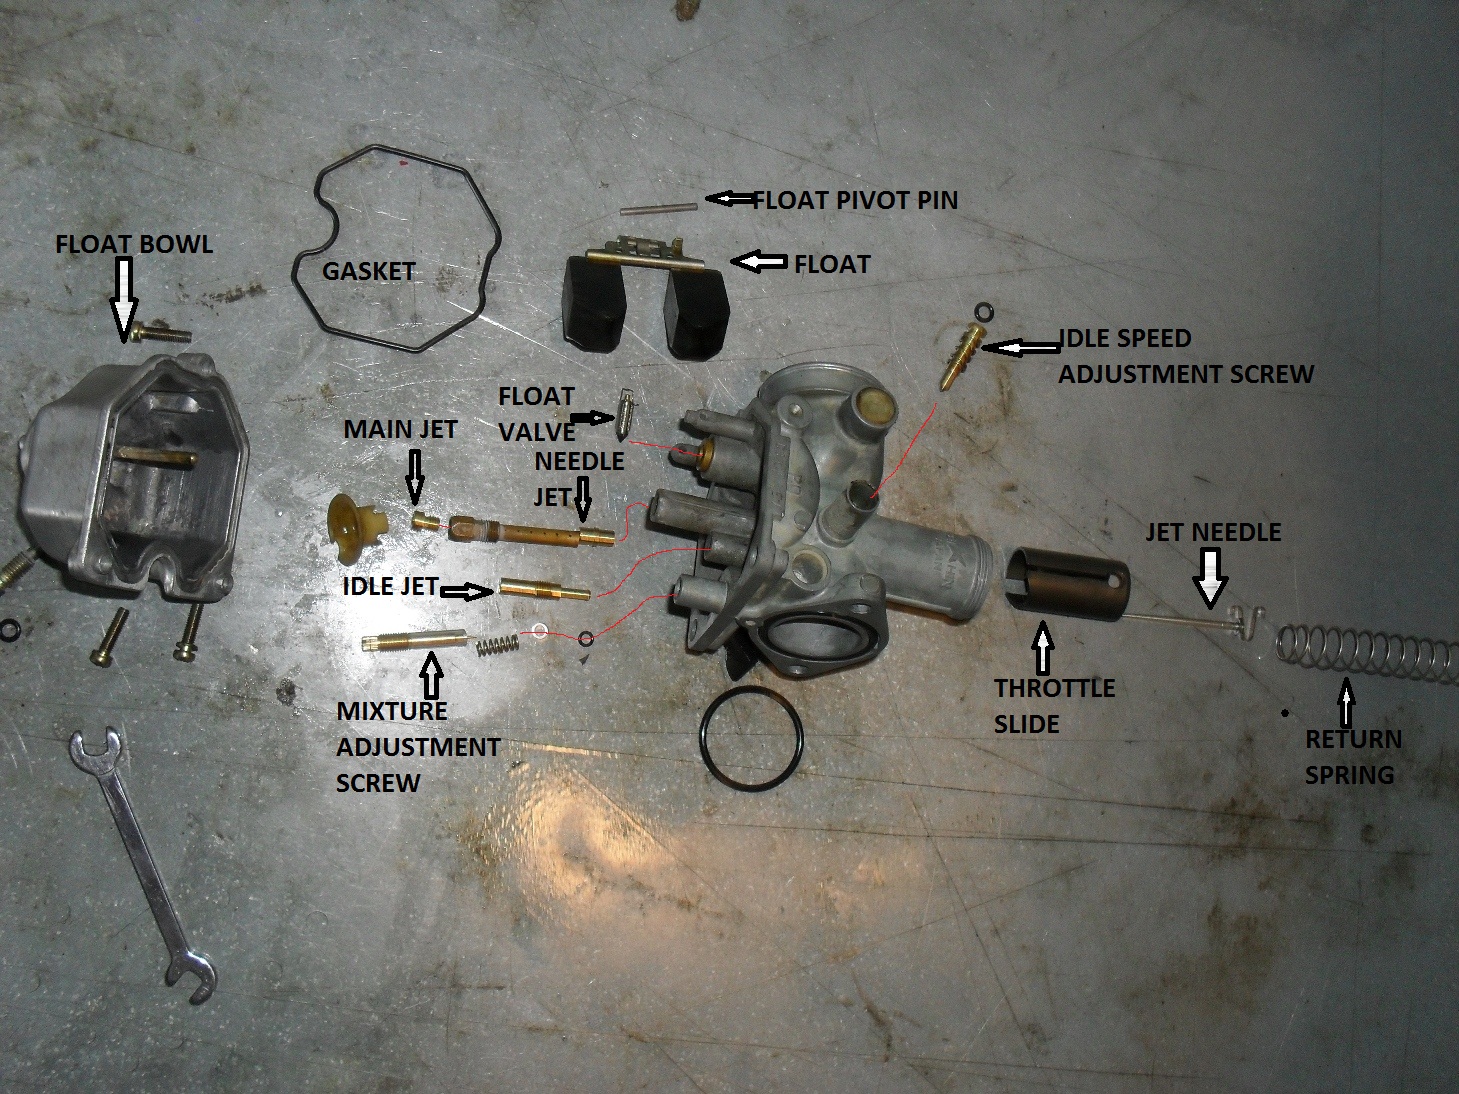
Here is an exploded view of the carburetor with all of the key parts labeled. Everything has been cleaned or replaced and is now ready to be re-assembled!
The red lines indicate which hole the various parts go in.
The first thing you want to do when you pull the carburetor body out of the parts washer is to take a compressed air gun or a can of spray carb cleaner and blow out all of the holes and passages in carburetor body. In general if you spray cleaner into any port on the body it should come out somewhere else. This is to get all of the passages completely clear. Do wear some eye protection while you are doing this.
mixture screw, main jet & idle jet
In this picture I have already re-installed the needle jet, main jet holder & jet, and the idle or slow jet as some like to call it. The mixture adjustment screw is leaning up against the carb so you can see how the spring, washer, and o-ring fit over it in that order. This screw goes into the large hole on the right side of this picture. To install it pick up the carb with one hand, and hold it upright, with your other hand take the assembled mixture screw components and place them up into the hole and turn the screw until it has engaged the threads and will stay in. Return it to the workbench and turn the screw all the way in until it just touches the bottom. Do not tighten it! Do you remember how many turns you have to back it out to reach it’s original position that it was in before you removed it? I told you to write it down in lesson 2. If not check your service manual for the initial starting position, and be prepared to tweak it a little til you get a smooth transition from idle to accelerating.
Now it is time to re-install the float. There is usually a small wire retainer over the float valve that slides over a matching tab between the floats. Holding it together place the float valve into the brass ringed hole shown on the left side of the picture above. Then you should be able to slide the retainer pin in from one side to hold it into place, like this.
carburetor floats installed
Don’t forget to put the little plastic shroud back on in the same way it came off.
Normally I wish vile and unspeakable torture on people whom make the mistake of using any type of gasket sealers on any type of fuel system assembly, but there is always an exception to every rule. In this case the fit of the float bowl o-ring into its groove on the float bowl was just not good enough to hold it into place so I applied a very thin film of a gasoline resistant, Permatex product. A small amount of Permatex 1 or similar product. Use just barely enough to hold the gasket in place. After all you don’t want it squeezing out and stopping up your nice clean carburetor do you?
carburetor float bowl gasket
Of course if the gasket will stay in place by itself long enough to get the float bowl screwed back into place I never put any kind of adhesive on it. but sometimes life just doesn’t work that way.
Once you have the float bowl back on it’s time to reassemble the slide. If you are replacing the needle aka the metering rod, be sure you put the tiny little e clip on it in the same groove that the original one was in on the old needle. Push the needle in through the hole in the center and instal the retainer as shown.
metering rod & slide
retainer clip and needle nose pliers
This picture shows the retainer installed in the slide, exact positioning is not important just be sure you don’t block the slot on the side that the throttle cable goes through.
Now go bolt the carburetor back to the engine (remove the plug from the intake first if you used one), hook up the air cleaner hoses, new gas filter etc. This is the time to be sure the air filter is clean also.
Now back to the slide it only fits into the carb one way so if it does not smoothly slide all the way to the bottom something is wrong. This shot shows how the slide has a notch for the idle speed adjustment screw.
xr100 carburetor slide and spring
Now reverse the steps from lesson one to reinstall the slide to the end of the throttle cable under the top of the carburetor and then slide it into place and tighten the cap down by hand. Guess what? It is time to re-connect the gas tank and fill it with fresh fuel. I consider installing a new fuel filter mandatory and so should you.
motorcycle fuel filter on Honda XR
Once you have the engine up and running you may need to set the idle speed using the idle speed screw as indicated here.
XR100 idle speed adjustment screw
Let the engine warm up thoroughly for a few minutes before making any final adjustments to either the idle speed screw or the pilot mixture screw. If you need to adjust anything make changes in very small increments.
At the end of the last class we ended with the carb sitting on the bench and the intake port in the head plugged to keep out dirt & small critters. Now let’s pull off the vent hoses and turn it upside down on the bench like this.
Take note of the pilot mixture adjustment screw that I have labeled here for you. I will be giving you a tip about it later in the lesson so be ready to refer back to this picture if you need to. Please remember these are not in the same place on all carburetors. I have seen them on the top and on the side depending upon the make and model. Some late model machines have them hidden under aluminum caps to keep you from tampering with them, but if you have a real problem you can remove the caps to repair it. Just be sure to replace them especially if you have to pass emissions inspections in your state. As usual I recommend you consult your handy dandy service manual for your motorcycle just to be on the safe side, because some carbs have more than one aluminum plug and you don’t want to remove the wrong one. Trust me I know….
Of course this bike has none of those annoying issues so let’s go ahead and take the screws out of the float bowl and look inside.
EWWW!
Now I am a fairly environmentally conscious guy, I grow organic veggies, the shop that I work in is powered by solar electricity, drive reasonably efficient vehicles etc. but you will never convince me in a million years that today’s gasoline is good for the environment. Once the lead was removed there really was not that much left to improve. There is no way fuel that will rapidly break down into this toxic and corrosive sludge as fast as the fuel made in this day and time, can possibly be good for the environment. Just think of what it is doing to your vehicles as they sit in the driveway right now.
Let me get out of rant mode and get on with the lesson; here’s a shot of it with the float removed. You should be able to push the pin out to one side with a small punch and lift the float and float needle (float valve) out of the bottom of the carb.
So when someone tells you the float is sticking this is what they are talking about. Sticking floats are usually caused by either a piece of trash getting under the point of the float valve, or if the motor has been sitting by gasoline evaporating, and gluing it into place with a coat of gunk like you see here.
In this next shot I have removed the jets and the mixture adjustment screw. Even if you have a service manual handy, before removing the mixture screw, turn it all the way in slowly and count how many turns it takes to go all the way in. Write the number down somewhere, and then remove the screw along with the spring the washer and the o-ring that are in the hole under it.
You’ll probably have to dig for the o-ring using a piece of wire or a small pick like I did above.
At this point all of the metal parts are ready for a good long soak in the parts washer or carburetor cleaner until tomorrow. In fact the longer the better. Gather up some supplies.
If you have an air compressor and a parts washer you may not need the spray carb cleaner. If you don’t have a compressor it is mandatory even with a parts washer or a dip bucket of carburetor cleaner. For this bike I did pick up a carburetor overhaul kit. If your o-rings are all still in good shape and you can get all of your jets spotless you may not need it, but it is often difficult to clean the idle jet good enough to work again even with all of the right tools. If it’s my own bike, and I am broke that week, I might chance it, cause hey it’s part of the price I pay for this hobby. If it is your bike, you are getting new parts, because if it does not work, then I would be working on it for free and that would just piss me off. You would probably be upset at me too.
Here’s a teaser shot of everything laid out on the bench after cleaning, be sure to come back for the next lesson!
Hello everyone and welcome to this multi-part lesson on the basics of carburetor cleaning for single cylinder motorcycles. The cadaver we will be resuscitating in this lab is an 02 Honda XR100.
“barn fresh” xr100
Believe it or not this bike would still run with the choke on even with the dead gas and clogged jets, gotta love a Honda! This will be a general step by step guide to repairing carbs, so I will not be giving you the actual specifications as they vary so much from year to year on some bikes. As I’ve said before you need to obtain the specific information for your exact bike from a reputable source like say a service manual. For this first post let me show you how to remove the carburetor from this bike.
First let me say that it is possible to pull the carb from an XR100 without removing the bodywork, but A; you need to clean or replace the air filter and B; if it’s been sitting long enough to need the carburetor cleaned you need dispose of any fuel in the tank and clean it out before re-starting the bike after you finish the carb.
Now take off the side covers. This picture shows the location of the air filter cover on the XR100
Next look under the rear fender and remove the 2 nuts holding the seat on. Then pull it up and rearward to remove it.
I like to put the nuts and any spacers back on the studs like this so they will not get lost. In fact whenever possible I do this for all nuts and bolts as it keeps them from disappearing.
Now go the the fuel switch, valve or petcock, whichever terminology you use for it and turn off the flow of gas to the carburetor and disconnect the fuel line. Be prepared to cut it off with a knife and replace it if necessary.
Remove the rubber strap that holds down on the rear of the fuel tank and the two bolts at the front of the tank.
It is not required that you remove the shrouds like I did for this photo, I simply removed them so that I could show you the location of the bolts at the front of the gas tank.
After setting the gas tank aside in a safe location it is time to disconnect the throttle cable. On some models it attaches to an arm on the side of the carb but on simpler ones like this it is attached directly to the carb slide. Unscrew the cap as indicated by the screwdriver and pull the slide out.
This next shot is a little fuzzy but it indicates how the throttle cable is retained in the slide, and the following picture shows the slot in the side of the slide that allows you to remove it from the cable.
Now all you have to do is to compress the spring and push the end of the cable out of its hole, past the end of the slide, pull it out through the slot and then through the big hole at the top.
Here’s the removed and disassembled slide, jet needle, and return spring laid out for you to see.
Loosen the clamp holding the rubber hose from the air box to the carb and then remove the bolts attaching it to the engine and pull it out.
Yes I’m using the obstruction wrenches again. Two tools that I feel are must haves for any serious cycle mechanic are obstruction wrenches of decent quality and some extra long screwdrivers of the finest quality money can buy (i.e. Snap On etc.) Inexpensive wrenches are often okay but cheap screwdrivers will drive you bleeping crazy, by stripping out the soft metal heads on Japanese motorcycle screws.
Here’s a shot of the carburetor on the workbench. I like to use the red toolbox tray shown to help me organize the parts as I disassemble the carb, and to keep the parts from disappearing into the wormhole that exists behind my workbench. No part that falls back there is ever seen again, so I try to keep them from rolling of of the back edge. No dear reader I am not going to move the bench to look for them either. In my shop I coexist peacefully with all matter of snakes and spiders both harmless and venomous, and that is their territory and I stay out of it.
Don’t’ forget to protect the engine by plugging the intake hole while the carburetor is off.
I’ll show you the rest later, don’t forget to bookmark this page or to sign up for the email notification of updates on the right side of this page. Click here for part two!
The slightly dark picture above shows an ATV that I recently re-installed the hub on. With a new cotter pin in the castle nut. Do yourself a big favor, and no matter what never ever re-use a cotter pin on any thing. Whether is a motorcycle, ATV, automobile, or any other application. They are there to prevent the sudden disastrous failure that could result from a nut coming loose on a critical component. If you really must perform an emergency road or trail side repair and re-use one to get home do not forget to change it ASAP before using the vehicle again. Isn’t your ass worth the small amount of pocket change these things cost?
Yes I practice what I preach, here is the cotter pin assortment that I keep on hand, a couple of sizes need refilling but that’s okay the piece of mind is worth it.
Motorcycling and ATV riding is risky business anyway, but if you insist on having a gnarly bone grinding crash, at least let it be because you were doing something stupid and fun, and not that the wheel fell of because you were too cheap to replace a 39 cent cotter pin.