Dirtbike Carburetor 101 Part Two!

Welcome back everyone,

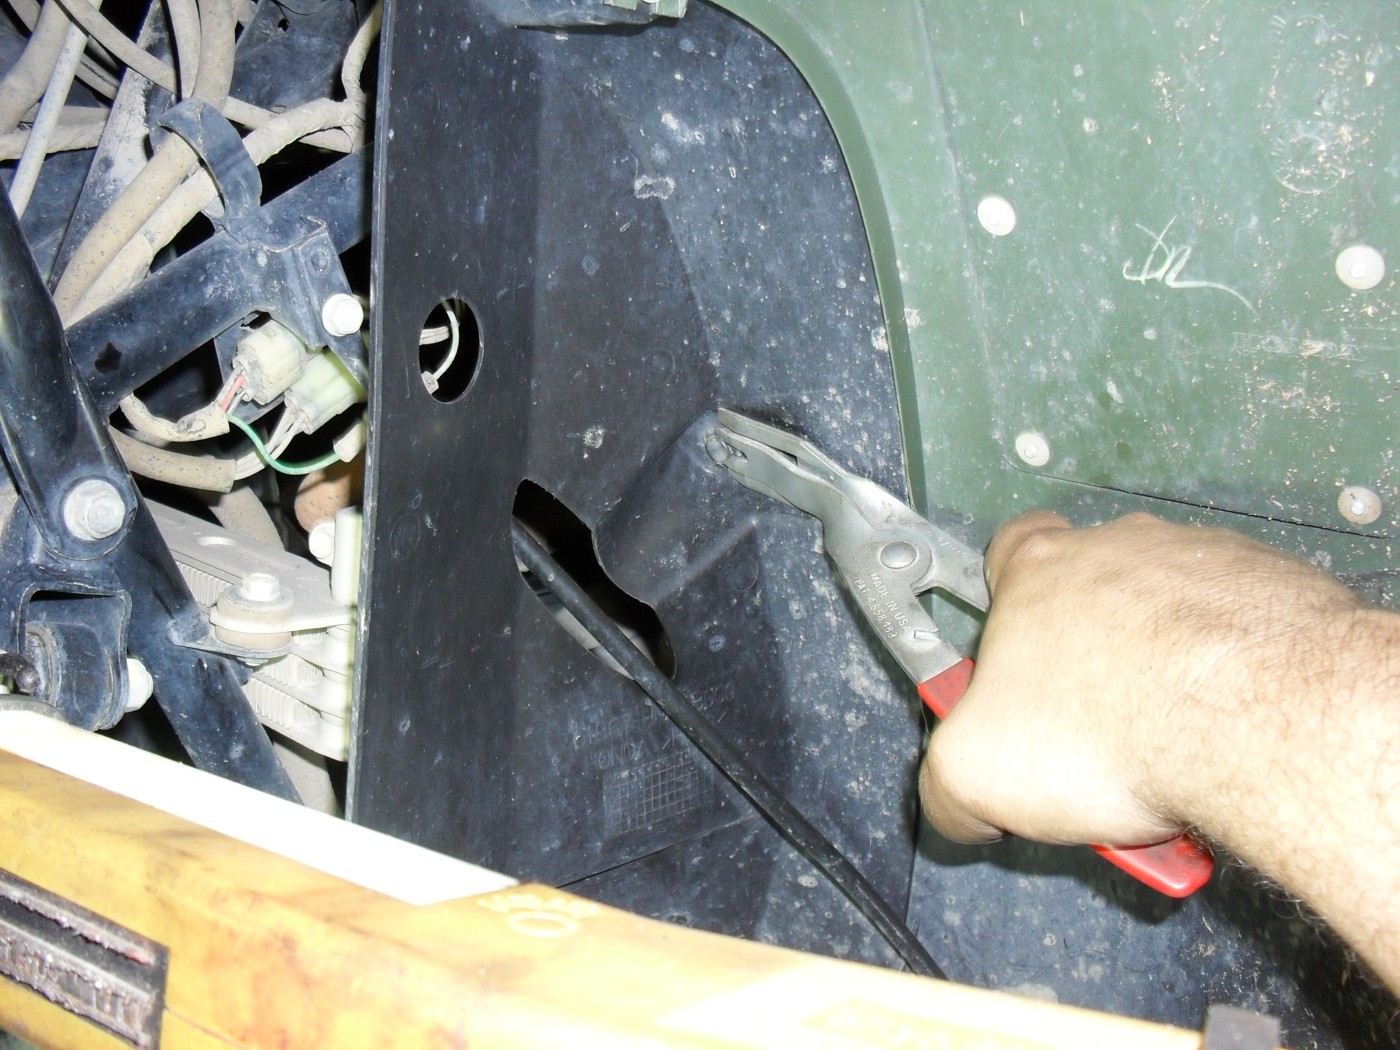
At the end of the last class we ended with the carb sitting on the bench and the intake port in the head plugged to keep out dirt & small critters. Now let’s pull off the vent hoses and turn it upside down on the bench like this.

Take note of the pilot mixture adjustment screw that I have labeled here for you. I will be giving you a tip about it later in the lesson so be ready to refer back to this picture if you need to. Please remember these are not in the same place on all carburetors. I have seen them on the top and on the side depending upon the make and model. Some late model machines have them hidden under aluminum caps to keep you from tampering with them, but if you have a real problem you can remove the caps to repair it. Just be sure to replace them especially if you have to pass emissions inspections in your state. As usual I recommend you consult your handy dandy service manual for your motorcycle just to be on the safe side, because some carbs have more than one aluminum plug and you don’t want to remove the wrong one. Trust me I know….

Of course this bike has none of those annoying issues so let’s go ahead and take the screws out of the float bowl and look inside.

EWWW!

Now I am a fairly environmentally conscious guy, I grow organic veggies, the shop that I work in is powered by solar electricity, drive reasonably efficient vehicles etc. but you will never convince me in a million years that today’s gasoline is good for the environment. Once the lead was removed there really was not that much left to improve. There is no way  fuel that will rapidly break down into this toxic and corrosive sludge as fast as the fuel made in this day and time, can possibly be good for the environment. Just think of what it is doing to your vehicles as they sit in the driveway right now.

Let me get out of rant mode and get on with the lesson; here’s a shot of it with the float removed. You should be able to push the pin out to one side with a small punch and lift the float and float needle (float valve) out of the bottom of the carb.

So when someone tells you the float is sticking this is what they are talking about. Sticking floats are usually caused by either a piece of trash getting under the point of the float valve, or if the motor has been sitting by gasoline evaporating, and gluing it into place with a coat of gunk like you see here.

In this next shot I have removed the jets and the mixture adjustment screw. Even if you have a service manual handy, before removing the mixture screw, turn it all the way in slowly and count how many turns it takes to go all the way in. Write the number down somewhere, and then remove the screw along with the spring the washer and the o-ring that are in the hole under it.

You’ll probably have to dig for the o-ring using a piece of wire or a small pick like I did above.

At this point all of the metal parts are ready for a good long soak in the parts washer or carburetor cleaner until tomorrow. In fact the longer the better. Gather up some supplies.

If you have an air compressor and a parts washer you may not need the spray carb cleaner. If you don’t have a compressor it is mandatory even with a parts washer or a dip bucket of carburetor cleaner. For this bike I did pick up a carburetor overhaul kit. If your o-rings are all still in good shape and you can get all of your jets spotless you may not need it, but it is often difficult to clean the idle jet good enough to work again even with all of the right tools. If it’s my own bike, and I am broke that week, I might chance it, cause hey it’s part of the price I pay for this hobby. If it is your bike, you are getting new parts, because if it does not work, then I would be working on it for free and that would just piss me off. You would probably be upset at me too.

Here’s a teaser shot of everything laid out on the bench after cleaning, be sure to come back for the next lesson!

exploded view!

Click here to continue this lesson!

Honda Recon 250 pg.2

The next order of business is to dis-connect the negative cable from the battery as shown here.

Remember any time you are working with any vehicle with a negative ground system (which is practically everything) always dis-connect the negative battery cable first and re-connect it last when you are working on the electrics.
The next 2 pics will show how I use the door panel tool to remove the plastic retainers from the bodywork. First you wedge up the sliding pin in the center enough to get the forks of the tool started under it.

Afterwards you can slide the tool into place as shown and pull the clip right out.
Of course you can just use a couple of screwdrivers or a pair of wire cutters to remove the clips. Don’t forget to look for clips or screws in hidden places like this.

To get the fuel tank out you first need to remove the handle for the fuel switch.

Once you have the tank out be sure to note the position of the various vent hoses and take note of the routing. If you pinch them closed during re-assembly your four wheeler may not run correctly, or may stall going up hill.

Once all the plastic is off it’s time to get down to the nitty-gritty. Now remove the foot pegs. This will save you lots of needless foul language and bleeding. Plus on some models you can’t get the engine out with them in the way.

Remove the foot brake and shifter after you get the pegs off and then drain the oil so it won’t be sloshing out all over the place when you lift the engine. It’ll take some weight off too.

Do take a little time now to put some penetrating oil on all of the exhaust system nuts and bolt that you can reach and let them soak a few minutes.

Then remove the plastic covers from the sides of the engine and the muffler & header as well. While I was doing this the head of one of the screws stripped out so I got out my extractor set to remove it. Normally I am a fan of inexpensive tools especially for the hobbyist but there are 2 things that I recommend that you buy the absolute best in the world even if you have to save up for it. The first is a good set of screw extractors and the other is a Phillips screwdriver set.

85% of the time I don’t even have to use the extractor because the left handed drill bit will walk the broken screw right out.
Back to our engine now it’s time to remove the carburetor and then unhook all of the other cables going into the engine. Leave the throttle and choke cables attached to the carburetor unless you plan to remove it to work on it also,

Be sure to loosen the clamps over the drive shaft boot!
The last item to get to is the reverse lock out cable located at the bottom rear of the engine under this little metal cover.

Now unbolt the 2 motor mounts on either side, carefully remove the spacers and slide the engine forward and tilt it as need to make the frame look like this.

Finally here’s a shot of the engine sitting on the workbench waiting to be completely disassembled… starting tomorrow.
Peace Y’all

Honda Recon 250 Tear Down pg.1

Hey Everybody welcome back!
I am going to step away from the pedal powered world for a little bit and start posting a few things to help you out with the care & feeding of your ATVs & motorcycles as the mood strikes me (and as people bring me guinea pigs to feature) Yes, I reserve the right to write about anything I please but this new category for repair and maintenance will be a continuing work.
The first patient will be this 2005 Honda Recon 250. Recons are my favorite ATV. They are big enough to do a little work, but small enough to fit down a tight trail. Plus they are tough, reliable, and simple.

It doesn’t look all that bad but has had a lot basic service work deferred until now. 5th gear is stripped out. Since the transmission is inside the engine that means a complete engine overhaul is needed to fix it. I have decided to document the process here on my blog for you. This will not be a complete step by step but I give you a lot of useful information that will be helpful for simpler regular maintenance chores.
Since none of the brakes were operational at all the first order of business was to adjust the rear brake cable adjusters shown here.
Neither the owner of this atv or his 16 year old son whom is the main rider were aware that as the rear brake shoes wear down you can adjust the wing nuts shown in the picture to maintain brake operation until the shoes are fully worn. Instead they just rode it without any brakes at all. Not cool…
If you have to do any kind of major work on any powersport vehicle you should have a lift table or some safe means of raising it up high enough to save your back while working on it. Not having a lift table I use my engine hoist to pick it up and set it on stacked 6 x 4 timbers to place it at a comfortable working height.

Once it was up and secure with the parking brake locked. I set up a clean table and laid out a few basic tools that will handle most of the work and took some pics for you.

Here you see some Motion Pro tee handle wrenches, a couple of screwdrivers, sockets, wrenches, WD40, and a door panel removal tool.
Okay the door panel tool is optional but it works really well to get the plastic bodywork retainers off of a Honda ATV.
Two other recommended tools are a parts washer and a telescoping magnetic pick up tool. No explanation needed for these two I hope.

There is one more tool that you should have if you are contemplating any kind of service work on any type of motorcycle or ATV, a good service manual, preferably a factory one if you can afford it. If I did not already own one for this model of four wheeler I’d be buying one. Regardless of what anyone tells you a good service manual is absolutely essential to performing any major service to any motorcycle or ATV.
Tomorrow we’ll start removing the body work and gas tank in preparation to remove the engine.
Peace Y’all