A Tale Of 2 Valve Spring Compressors

I love cheap tools sometimes. My own personal collection is a mixture of top name brands and some of the cheapest shit you can find that actually works. Surprisingly sometimes the cheap stuff is better than the expensive stuff in some applications. It doesn’t happen often but occasionally it does. Most of the time you get what you pay for though and here in a tale of 2 valve spring compressors I’m going to show you a great example of this principle in action. As I started to tear down the head for the CM400 I am overhauling I realized that none of the valve spring compressors that I already own would work, 2 or 3 of them were for side valve engines, one was your typical auto parts store V8 compressor & the last one is a homemade thing especially made to work on old Honda 50-200cc dirtbike engines. Of course none of them would work, what I needed was one of the large C-clamp style tools with multiple adapters like all the shops that I used to work at had. So I came inside, fired up the computer and went shopping.

<cheap chinese spring compressor>

Of course I did not start out looking for the cheap stuff, my first search was for a genuine Motion Pro Valve Spring Compressor
but it is a bit pricey at around 100 bucks or so not including the Motion Pro Adapter and Bore Protector Set That being said if you got the money to throw around or if you are running a full time professional shop it is the best one to get.

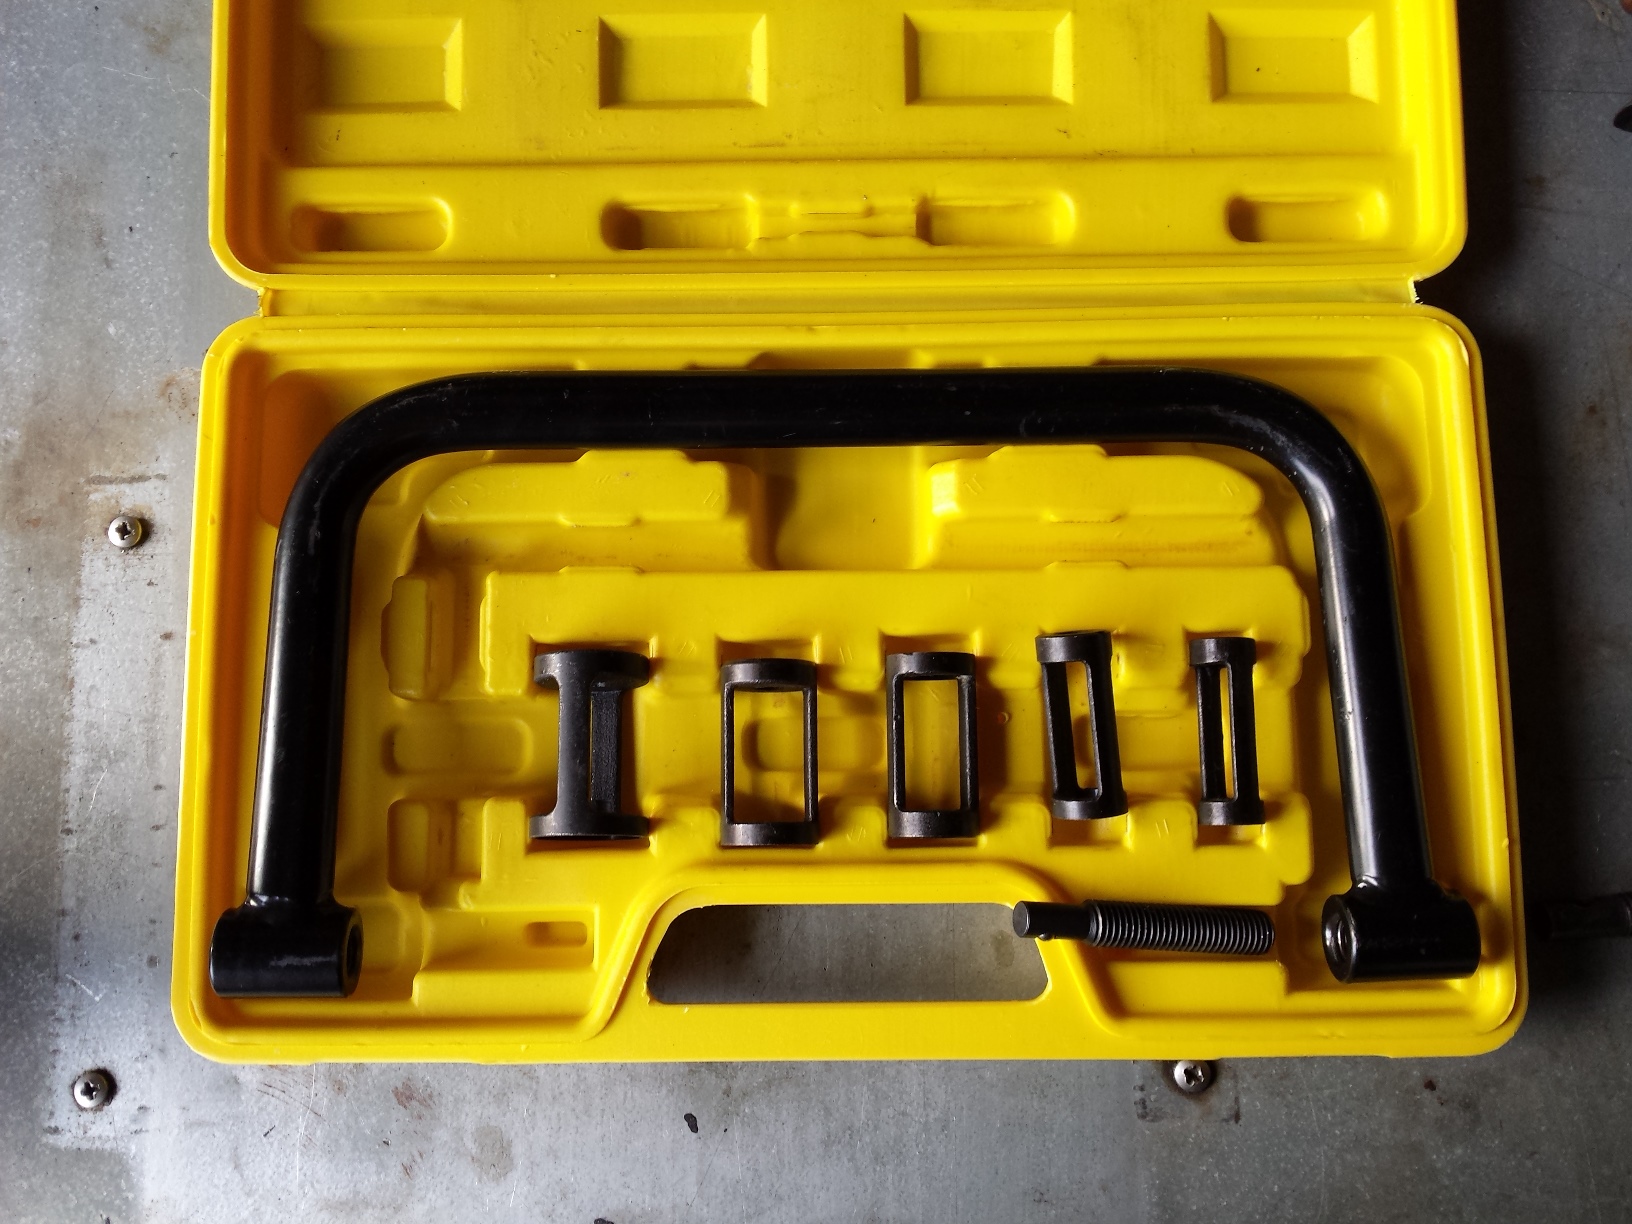
Being in an experimental state of mind (okay that’s bullshit I am just a cheap bastard sometimes) I decided to try out this one that is all over ebay & Amazon for around $30 dollars shipped. It came in a nice molded plastic box with plenty of adapters for different size valve springs.

<valve spring compressor cheap junk>

<cheap tool bent>

Unfortunately the cheap thin wall tubing that it was made of almost immediately began to flex and fail without budging the valve spring in the slightest. All of the compressors of this style & price range had very mixed reviews on the various merchant websites where they are sold apparently they work on some engines with weaker springs but on this head it did not work at all and was in fact a complete & total failure.

<Have your balls ever fallen out?>

Have your balls ever fallen out?

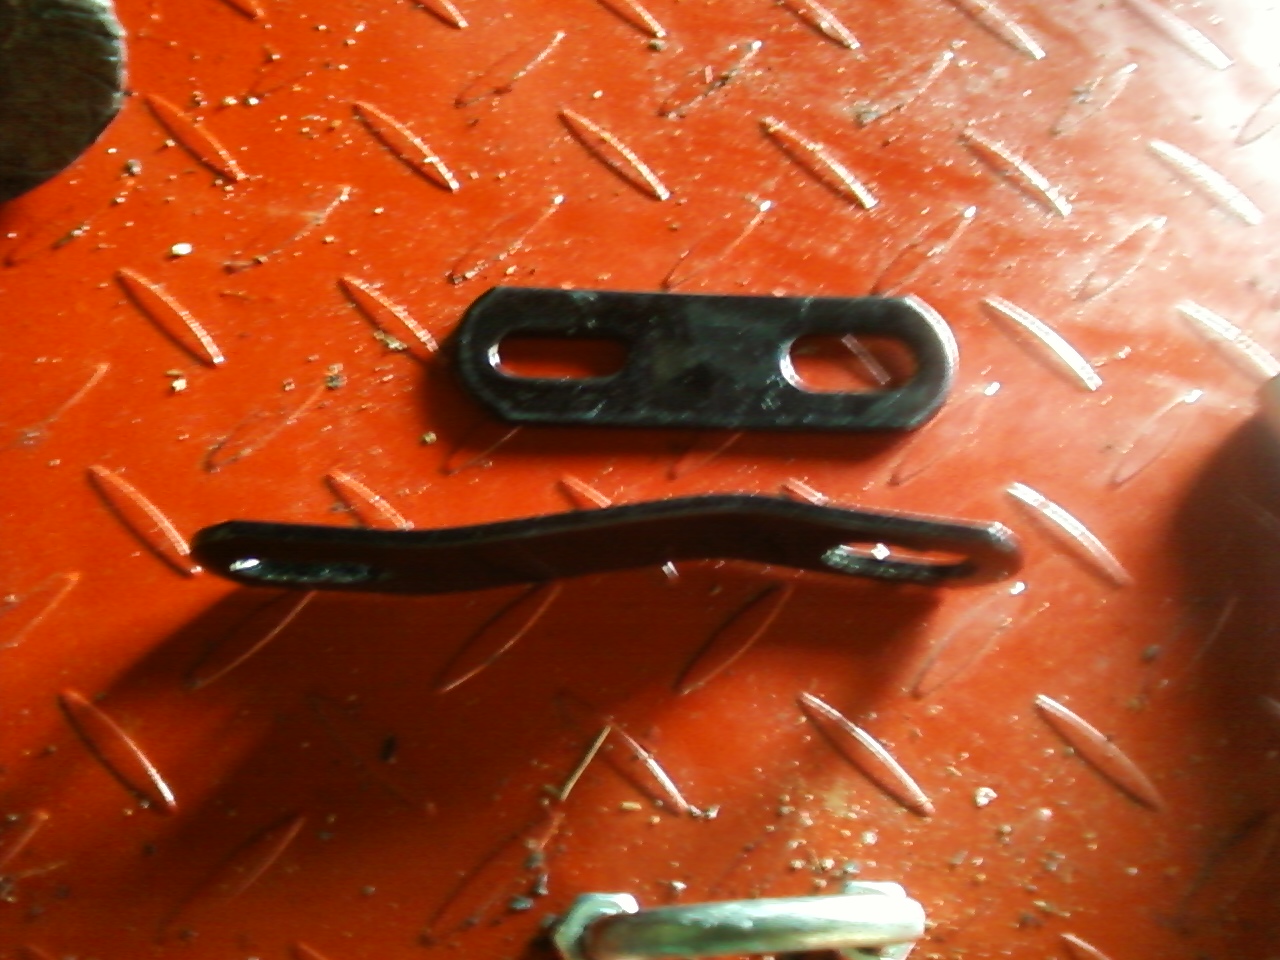
To add insult to injury one of the balls that retains the adapters to the tools popped out of its socket

<valve spring compressor failure>

As you can see here this Stark valve spring compressor is now permanently bent and no longer fits back into it’s slot in the case. Back for a refund it went!

Enter the $46 OTC 4572 Large Valve Spring Compressor in it’s no frills cardboard box. Fancy blow molded plastic cases are nice, but really don’t make much difference if the tools inside don’t work. In this case the manufacturer decided to save money on the packaging and not the tool.

<good tool in a plain wrapper>

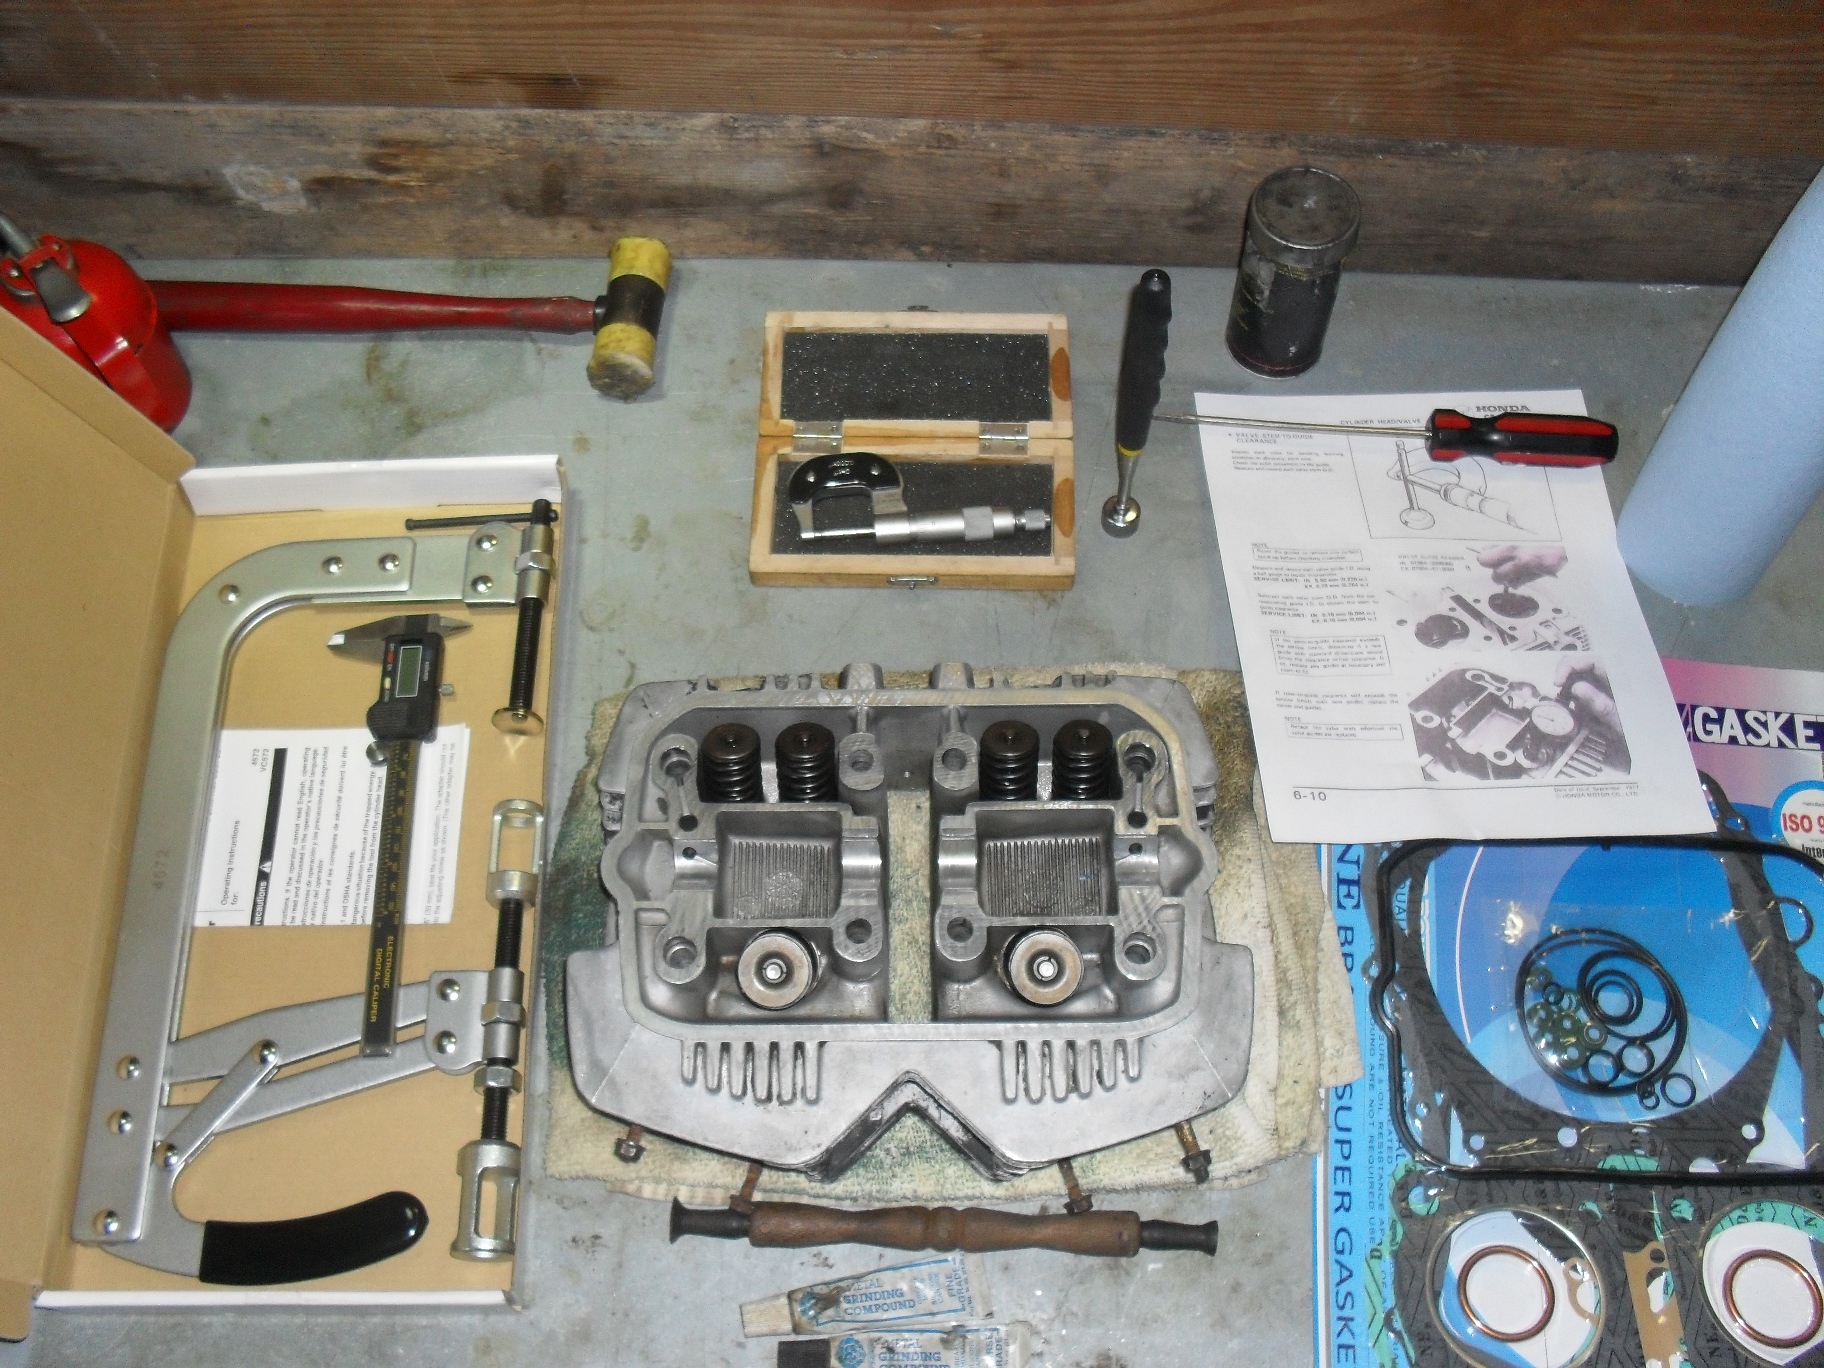
When I opened up the box there was a surprisingly heavy well made tool inside. It was very similar in style, metal thickness, and finish to the more expensive tools I have used in the past at various shops where I have worked. There were two other cost cutting measures one being that it only comes with two adapters for different size springs and that it only had a cup style tip for the clamping screw instead of including an interchangeable ball style tip, which actually works for better in most valve spring removal applications Below it is laid out with the rest of the tools that I normally use when it’s time to lap a set of valves.

<valve lapping tools>

Here is a shot of it in place ready to compress a valve spring. At this time I’d like to point out that you do NOT compress the valve springs by pushing on the large handle with the rubber hand grip. To get your initial setup pull the handle open to get the tool in place around the head and then push it closed. Then you adjust the adapter and the clamping screw until the tool is in the correct place. Then you turn the t-handle on the clamping screw to compress and release the springs. To move on to the next valve spring, first release the tension on the spring by retracting the clamping screw, and next you release the handle, move the tool to the next valve, close the handle, and once again use the clamping screw to compress the spring.

<OTC valve spring tool in action>

Repeat as needed until you have removed & reinstalled all of the valves as needed.

<OTC valve spring compressor>

Below you can see a fully compressed valve spring with the valve keepers removed.

<inexpensive valve spring compresser that works>

The bottom line? The OTC 4572 Large Valve Spring Compressor is worth the money. It may lack a full range of spring adapters and accessories, but if you don’t need all of those things this is a solid well made tool that will get the job done.

A Quick look at Harley’s Street 750

<HD Street 750>

I took a quick trip to Charleston S.C. this past weekend, mainly so could spend the gift certificate from Low Country Harley Davidson that I won at the Rockabillaque bike show, and so the Mrs. & I could have a nice romantic lunch at Gilligan’s restaurant in Monck’s Corner on the way. Low Country is a very well set up dealership with a large bike showroom that actually takes precedence over the boutique gift & t-shirt portion of the store. Yes the other merchandise is housed in an impressively sized store with a very upscale appearance, but it is clear that the bikes come first when you walk in.

There was one bike in particular that I wanted to check out, Harley’s Street 750 & 500 models. They had one of each with the 500 sitting at the front of the showroom and the 750 off to one side on display in front of a Christmas tree, at the entrance of the boutique.

<750cc of liquid cooled power>

Unfortunately, it was pretty well being ignored as most customers seemed to head straight to the baggers. Yet even with the improvements that created the liquid cooled “Rushmore” line of motorcycles the fact remains that this is the most advanced engine that HD has released since the V-Rod or the short lived Buell 1125. With liquid cooling and overhead cams it steps firmly into the modern age of motorcycling. I do realize that all of my fellow Japanese iron riders will yawn with boredom at the thought of a mere 57 rear wheel hp (as measured by Cycle World here), but when compared to other mid size machines with a similar design focus, based on unique or classic styling, beginner friendliness, and character it compares very well. Bikes such as the Triumph Bonneville, Moto Guzzi V7, and Honda’s new series of 700cc machines such as the NC700 have similarly modest horsepower. The folks that buy these machines are not after barn burning power, but unique styling combined with ease of use is the name of the game.

If these bikes were available through the rental program, I would rent one and try it out, perhaps I can snag a demo ride on one somewhere. After throwing a leg across it and sitting on it I really liked my first impression. Even though it seems small compared to all of the big bikes in the showroom, for a genuine vintage rider like me it seems perfect.

<the Motopsyco on Harley's Street 750>

the Motopsyco on Harley’s Street 750

Let me be totally 100% honest with you, I really do not like to ride cruiser or touring style motorcycles. Chrome don’t thrill me & I thoroughly despise floorboards, forward controls, and infotainment systems on motorcycles, after all when I ride a motorcycle I expect it to entertain me without any outside help. The street 750 &500 models will probably be available in other colors soon enough but the murdered out appearance of the current model really turns me on, as do the mid controls and the bikini fairing reminiscent of the 77 XLCR.

<Harley's Street 750>

Harley’s Street 750

I have the feeling that I could live with one of these in bone stock form at least through the first summer. But as soon as the wrenching season hit it would wind up with my laptop plugged into the first aftermarket injection controller I could find. Then I would have to dig up a wrecked CBR/GSXR something or another and con one of my machinist friends into helping me swap the forks & wheels onto it, along with some taller shocks & lower handlebars.

Yes I know the target market is beginners who are planning to move up to a big twin from Milwaukee, not nutcase rat/brat/cafe racer fanatics like me. This little twin is really cool, and I think it’d be fun to cut it up and make it into something KUSTOM! The only thing I wouldn’t change is the color scheme.
Peace Y’all


The GTC Torque Converter for Minibikes & Go Karts Installation and Review

Here’s what came in the box. I ordered it from GoKarts USA mainly because it was listed as being a direct bolt on fit to directly replace the cheesy jackshaft plate & tensioner that this minibike came with. Despite what is said on some of the forums around the internet, this is a good quality unit that is made right here in the good old U.S.A. Yeah sure it’s got a couple of imported components in it, but suck it up sunshine that’s just the way the world is, we’re all on one rapidly shrinking planet and the market place is making it smaller everyday despite the best attempts by idiot politicians and knuckle dragging nationalists to stop it. Still it’s nice to see something made here that is of good quality and is price competitive. The backing plate is especially well machined & finished to the point that it is almost a shame to cover it up with a belt guard.

<contents of the GTC kit box>

Now this is not going to be a full complete step by step set of installation instructions, just an overview with a few tips. If have lost your kit instructions or have purchased a second hand unit without instructions please click here to get a set from the GTC website.  As always you may click on any picture here for a larger view.

First you have to remove the original plate with the factory clutch & intermediate sprocket.

<Baja MB165 jackshaft chain tensioner>

Make sure you remove all of the spacers from the end of the crankshaft, if you are doing this to an older engine oxidation may cause the spacer to look like an integral part of the crankshaft. If you don’t remove it the drive pulley won’t line up and you’ll be scratching your head for a few minutes like I was.

<baja minibike crankshaft spacer>

This tab is no longer used and will have to be flattened or removed for the torque converter to fit.

<remove this tab>

The kit comes with longer bolts to mount the plate if needed.

<GTC kit bolt>

This particular installation just reused the stock bolts

<GTC mounting plate on Baja minibike>

A picture of the driven shaft with the snap ring and washer installed.

<driven pulley shaft GTC torque converter>

Here it has been started through back of the mounting plate.

<installing the driven shaft>

Next get the chain sprocket, key & spacer,

<sprocket,spacer,key>

sprocket,spacer, & key

and slide them onto the driven shaft as shown here.

<This is what drives the rear wheel>

The next shot shows the driven pulley with it’s associated hardware, slide it all into place and install the nut finger tight at this time.

<GTC driven pulley>

Here is the driving pulley & the belt. When you cut the tie wrap to install it take not of how the various parts & pieces fit together so you can re-install them correctly.

<torque converter drive pulley & belt>

I should have cleaned up the screw threads in this hole before I got this far, be sure to learn from my mistakes. BTW your engine must have an existing tapped hole in he end of the crankshaft or you cannot install a torque convertor. Be sure to check this before you spend your money as a few of the Honda clone engines are missing this feature.

<baja minibike tapped crankshaft>

The other drive pulley parts

<gtc drive pulley parts>

Stick the belt into place & begin assembling the drive pulley onto the end of the crankshaft.


<drive pulley parts on crankshaft>

Now that you’ve gotten everything assembled it is time to tighten it all down.

<GTC torque converter Baja minibike>

You really need to use a torque wrench and tighten the bolts & nuts to the torque specified in the instructions. Even a cheap one is more than good enough for everything the average home mechanic will ever do. If you over tighten the nut on the driven shaft it will pop the snap ring loose from the other side. Sure GTC could redesign the shaft to eliminate the snap ring but are you prepared to pay an additional 20 or 30 dollars for the kit to cover the cost of the additional machining and wasted material? Just use a torque wrench and you won’t have to worry about it.

<use a torque wrench dammit>

I did this install several months ago and have been driving this thing around the farm at least two or three times a week. While it did not transform my otherwise nearly stock MB165 into a 50 mph speed demon it did bump the top speed up enough to be much faster than a stock Baja minibike. Perhaps on a smooth surface with the governor removed it would but it is already able to outrun it’s own steering and stability out here in the deep soft sand & mud where I live.

<Baja heat warrior torque converter>

Four months ago when I installed this it was purely out of curiosity to see if it would really be an improvement, and it really is. The initial low speed engagement is much smoother than with a factory clutch allowing it to be driven at a lower speed than was possible with the clutch, while still increasing the top speed. The belt has proven durable and still looks fine after four months of hauling my big 200+ pound ass around the farm, down the dirt road, through the woods.  And when it does eventually wear out the belt is a little over half the price of a factory clutch. So is this worth spending the extra $200 buck on? If you are serious about actually riding your minibike, the answer is yes especially since the GTC TC2 is a direct bolt on that does not require engine mounting spacers to fit a stock Baja frame. Granted at this price it should come with the plastic belt guard but that really is my only complaint. At this time I’m running mine without the guard for a cool but possibly dangerous open primary look, but I don’t let kids ride it either.

Here’s a little video of the completed minibike so you can see how it works.

Peace Y’all


If you really enjoyed The GTC Torque Converter for Minibikes & Go Karts Installation and Review please visit our sponsor by clicking an ad below.

Ultimate Addons Mounting System for Phones

Who is looking for a way to safely mount their smartphone to the handlebars of their motorcycle, bicycle or atv? Initially when I first decided to add navigation to my motorcycle, the first thought was to find a mount for the Garmin Nuvi that I use in the old van, but quickly realized that my smartphone has some seriously good navigation apps installed on it and has the added advantage of always being with me. Keeping in mind the price of my phone and the importance of the data that it contains, any mount purchase would need to be secure, strong, & waterproof, with excellent vibration & impact resistance. After a quick bit of internet research I decided to try one of the Buybits Ultimate Addons mounts, and placed an order with Amazon. At $69.99 plus shipping from the U.K. this is not a cheap product (although it is not the most expensive either, price as of 8-9-14).

As usual my order arrived quickly and was well packaged with no transit damage!

<happy little fedex box>

Opening it up and viewing the contents I found the protective case, handlebar mount & power cord. Please note that if your motorcycle or atv is not equipped with a DIN (Hella) style power outlet you will need to install one in order to use the charger, here’s a link to the item I used.

<ultimate addons cellphone mount>

The protective case is a very impressive design, thick plastic with a generous amount of rubber inside both to cushion the phone & seal out the water. Please note this case is not for weight weenies, but if you don’t mind carrying around a few extra ounces in order to keep your device safe & dry it is worth it. A great and pleasant surprise to me was to find out that there was a viewport for the camera, the touch screen worked well, and the case is engineered well enough that all operation functions of the phone could be controlled just as if the phone were not in the case at all.

The handlebar mount itself had me worried a little bit after seeing the relatively bombproof looking case that attaches to it, the mount looked small and while not flimsy looking it seemed like it should be larger and heavier looking to hold up this big case & my oversize $500 phone. In engineering we all know that well designed products can be much stronger than they look, but the barbarian living in my head doesn’t always see that, so for my initial testing I strapped it to the rattliest, roughest riding pile of junk in the shed, a Baja MB165 minibike. My minibike is a frightening concoction, of assorted used parts loosely assembled together and then blessed (cursed?) with a couple of speed enhancing modifications including a CVT drive.

<cell phone mount on minibike>

If this don’t kill it nothing else will.

After bouncing around a little while around the field, up & down the dirt road a time or two, and at least 50 laps around the house it didn’t fall off, or even come loose. I even shot a short video that I didn’t post any where but if enough of you want to see it I can add it to this page later. An S4 in this mount actually  makes a decent video if you can get the orientation right. This was more than enough of a test to convince me the mount was going to hold up just fine. So now it was time to check the water resistance of the case so I fastened it to the front rack of this ATV and took it out to play in the rain, at night.

<ragged out p.o.s. brute force>


<Ultimate addons mount on atv rack>

After all of this I opened up the case and found that my phone was completely dry and safe, and while I still would not actually submerge it in pond or anything like that I am now convinced that this case properly installed and closed will keep your phone dry and safe during any rain storm you are going to encounter out on the road or trail. After all the Brits who sell this product obviously know all about riding in the rain.

It is a large bulky case, and yes in bright sunlight the screen can be hard to see, but if any of you have a touch screen phone that is easy to see in direct sunlight, I want to see it, because at this time such a phone does not exist. The charger is easy to install, but if you are cutting off the plug and hard-wiring it to your vehicle be sure to connect it to a switched circuit or install a separate power switch as the charger has an LED that is always on whenever power is present. I just installed a DIN outlet so that I could unplug it. It would have been nice if the mount were taller and had more adjustment for position. They do make one one but I admit to being a cheapskate especially when dealing with products that I am not familiar with.

Here’s a shot of it attached to the bars of my main ride with navigation open, ready for me to go get lost & then find my way back home. Having used this mounting and charging set up for a few hundred miles on four different vehicles I am happy with it.

Bottom Line: The Ultimate Addons Mounting System for Phones is well worth the cost, I’d recommend this product to anyone.

Peace Y’all


Joe Rocket Ballistic Revolution Jacket & Ballistic Pants (7.0) A ‘Psyco Product Review!

Hello again everyone,

A couple of weeks ago I tried on a Joe Rocket one piece suit but it just did not fit, so I decided to try one of the two piece outfits and quickly settled on the Ballistic Revolution jacket & the Ballistic pants, for three reasons, one if not getting a one piece suit I wanted to get a 3/4 length coat to prevent unintended exposure of my midriff section to freezing cold & fast moving asphalt, two the pants were the only ones I could find in the lower end of the price range with a true short inseam of 30″, and three the price was right. Yes unfortunately the price does matter, but the general consensus found in my research is that the Joe Rocket stuff will save your skin as well as anything else if you are comfortable wearing it. I am comfortable in this outfit, but quite frankly I hope to never test it’s protective abilities.

<Joe Rocket textile suit>

I like Hi-Viz colors!

Since the vendor that I bought the Survivor suit from was out of stock on the pants, I went over to good old reliable denniskirk.com and ordered this set. I placed my order on a Wednesday or Thursday (CRS* kicking in sorry) and the following Monday it was delivered, plus it was a dollar cheaper too.

Some folks might be put off by the high visibility colors shown here but this jacket is available in other color schemes & solid black. As for me I want the drivers of the cages that attempt to kill me to admit that they were deliberately trying to murder me without being able to soothe their consciences by saying, “I didn’t see him.”

I bought this outfit with my own funds and paid full retail price & plan to keep it as long as it works. What this means for you is that I don’t owe anybody any favors so if it screws up, I will tell you the whole truth about my experiences. So far I have worn this outfit while riding in temperatures ranging from 28°F (-2°C) to 72°F (22°C) and I am happy to report that once I got in and get everything zipped up & buttoned down it was actually reasonably warm & comfy for my 30 mile commute in the wee hours of the morning. Yesterday was unseasonably warm for December and as I was leaving the office I was worried that it would be too hot with the liners in place but it was okay once I got moving. Leaving the front zipper 1/3 the way down resulted in the wind entering the front of the coat with a sort of parachute effect that separated the fabric from my torso, greatly aiding my comfort. Whether this was by design or just a result of my particular riding style/body shape combination I do not know. As a package so far it works well, but getting into it and out of it is a little more involved than a one piece or plain leather jacket & pants or chaps combo.

This outfit is supposed to be water resistant but I have no plans to put that to the test. When I get caught out in the rain I’ll come back & let you know how it does.

Now lets talk about the individual pieces, the Ballistic Revolution jacket is a really good example of bang for the buck. It has CE approved armor for  your elbows & shoulders. There is a foam spine pad but it is just that a dense foam pad. It can be easily removed & replaced with an approved spine protector if you so desire. Joe Rocket calls their exterior shell fabric RockTex which is similar to most other heavy duty abrasion resistant synthetics. It has five outside pockets. With the liner in you have four interior pockets including a nice vertical zippered pocket on the left side, that is just the right size to hold something small like a Walther PPK in it. Anything the least bit larger has to go somewhere else. Once you take the liner out there is only one pocket inside, and I wouldn’t put much in it.

The 2xl size fit my large frame well and the sleeves were the right length and large enough in diameter so that my arms fit inside and I could still bend them. Being a 3/4 length means that it is adaptable to a variety of motorcycle riding positions and it is easy enough to get in an out of. It is not perfect and I have a couple of quibbles, first the velcro style closure for the neck leaves something to be desired. I guess this comes from being built to a price point, but the neck closure needs to be redesigned with either a larger tab to give the hook and loop fabric they currently use a larger gripping surface or to switch to a stronger grade of material for this one spot since it is the only one where the velcro actually has to hold something in place as opposed to keeping a flap closed. It would also be nice to have the good inside pockets without the liner installed. It’s too early for me say anything about the long term quality or durability but right out of the box I am impressed.

These pants that I ordered are the Ballistic 7.0 size 2xl short. Joe Rocket list the short inseam as being 30″ which means that with my boots on they are just barely off the floor when I am standing straight up. When the liner is in you have to be very careful zipping the leg closures down or the zipper will catch the fabric of the liner & jam. When the weather warms up & I remove the liner this problem will be resolved but for now I am just being very careful not to jam the zippers. Walking around the house it feels as if the knee pads are way to low but once I sit on the bike they cradle my knee & shins perfectly. There was no problem putting these pants on over my triple e wide work boots. As with the jacket there are a couple of relatively minor complaints, the biggest complaint is the fact that you really have to be careful of the liner & storm flaps when zipping up the pants as the zippers will grab them and jam pretty easily if you are not careful. If you know you are going to be needing your wallet or house keys etc. you need to transfer them to the pockets of these pants or your coat. They could have put in a zipper to reach into your street clothes but that would have been one more potential entry point for cold air or rain so it’s no big deal, until you get to the gas station and have to unzip your coat and pants to get your money out.

<Joe Rocket Ballistic Revolution>

So far my impressions are great and I would feel comfortable recommending that you try the jacket, the pants, or both if you are in the market for protective gear. Just purchase from a reputable vendor with an easy return or exchange program just in case it really doesn’t fit you well.  If by some chance either piece falls down on the job I will be sure to come back here & let you know all about it.

Peace Y’all

(*Can’t Remember Shit)

Good & Cheap! The Harbor Freight Motorcycle Rear Wheel Stand

I’ve had this for a couple of weeks now and so far so good! What prompted me to buy this thing was believe it or not a craigslist ad. Some guy had a used one that he was trying to sell for $30, but it turns out a new one is only $35 bucks at the regular retail price (in October 2013) and since it is getting nearly impossible to find a motorcycle with a center stand on it I decided to try this one out. I wanted one with the paddles on it so that I could use it for the greatest variety of motorcycles possible.

<Motorcycle swingarm rear lift & stand>

Haul Master Model 65620

Here is how it came from the store, bubble wrap & packing tape.

<Motorcycle swingarm rear lift & stand>

It only took my lovely assistant a minute or two to unwrap it and put it together for me.

<Motorcycle swingarm rear lift & stand>

According to the paperwork that was taped to it it is rated at 1000 pounds capacity! If you have a thousand pound motorcycle don’t bring it to my shop, I don’t want to deal with it. It is obviously cheap and looks it. The only thing that really concerns me is the wheels are kind of lightweight looking but I guess as long as I don’t throw it against the wall or smack the wheels with a hammer they will be okay.

<Motorcycle swingarm rear tire lift >

For the first test lift I stuck it under just the kind of motorcycle it was designed for, a 2005 Kawasaki Ninja. Easy enough, to use and stable even outside on the grass.

<ex250 ninja on harbor freight swingarm stand>

An inexpensive motorcycle on a cheap stand!

<Motorcycle swingarm rear lift & stand>

Some exhaust systems can interfere with universal paddle stands. This is why most people whom have a single motorcycle, and race teams use stands with spools but for me there is no telling what I will be working on next so the most universal fit possible is what I am after.

<Motorcycle swingarm rear lift & stand>

A shot of the ground clearance with this bike.

If you have a vintage bike with round swing arm tubes this stand will work on those as well, if you have enough clearance around the exhaust system, such as the high mounted mufflers on this 1971 CL450.

<Motorcycle swingarm rear lift & stand>

Lets try this out with an old motorcycle.

Properly adjusted it is sturdy enough that I feel safe using it to work on motorcycles with.

<Motorcycle swingarm rear lift & stand>

If your vintage bike has low exhaust pipes this stand probably won’t work for you.

Just for shits & giggles I took a picture of it holding up an old dirt bike too.

<Motorcycle swingarm rear lift & stand>

It worked great for this old dirt bike.

Let’s be honest here, it is cheap, and as far as looks and finish go, it is not in the same ball park as some of the really expensive stands  out there, but to me function is king. It has turned out to be safe & useful so I really don’t care if the paint fades or if the rubber coating on the paddles gets a crack or two in it, just as long as it holds up motorcycles like it is supposed to. And if it ever fails at that job, I’ll be sure to come back here and let you know what happened.

Peace Y’all

I Rode a Segway (& I Liked It!)

<Segway PTs parked at bridge>

Segway PTs parked at bridge on Asheville Greenway

Yes I know the Segway is a nerd toy, but I have wanted to try one ever since they appeared on the scene a few years back. Hey it’s got two wheels & a motor. In fact it has two motors. Sure it’s not as cool as this but it is a whole lot more accessible.

<double engine triumph>

Ok, this is sexier than a Segway, but a whole lot harder to start & turn.

I guess I’m just an oversized heavily muscled nerd who is also a redneck motorcyclist, because I really enjoyed riding this thing on a recent tour around Asheville N.C. This foray into a pleasant couple of hours of geek enjoyment began as I was trying to use up my Marriot Rewards free hotel stay before it expired, so I booked a room at the Courtyard in Asheville & started checking on the internet for tours & guides & saw the Moving Sidewalk Tours website. After checking the very reasonable prices I booked two Segway PTs for the tour, one for me & one for my beautiful, patient, long suffering partner in life. Of course this led to her asking me that question that women have been asking men for thousands of years, “you want me to do what?”. I have invited her to write her own opinion at the end of my review, so be sure to read it too.

Segway Riders

The world famous Heck’s Angels lol

At the beginning of the tour there is a short class to get you acclimated with the operation of the machine. Once you put aside all of your preconceived notions & the instincts that you have developed riding all other two wheeled transportation, the controls become very intuitive.

In one way a Segway is like riding a horse, when you first learn to ride & you step up on the platform it will wiggle & dance under you a little bit. If you are nervous it will reflect that by being a little jiggly when you are trying to be still or start to maneuver. It feels like it is alive under your feet, but quickly settles down once you relax. The simple truth is that it is almost impossible to fall off of one without being really stupid. Just lean your whole body forward to go, & back to stop. For turning you tilt the handle bars in the direction you wish to go. After a few turns around the parking lot our group was ready to go. Our guide Wes was very considerate and the first leg of the tour was down a quiet residential street full of older homes before we ventured uptown to the tourist, shopping, & entertainment district.

One of my preconceived notions about these machines is that they were toys to be used on skating rink smooth surfaces. They handled pavement, sidewalks, & bike trails with aplomb even though these were the street going version, a few bumps and jolts didn’t upset them at all.

All in all this is a great machine, especially for a city dweller who works & shops within a few miles of home. Sure the top speed is only about 12.5 mph or so, but the view standing up on the platform above everything else on the street or sidewalk is terrific. The range is rated at 24 miles & I am inclined to believe that unlike some electric vehicles that it is an honest number.

Now I just got to try one of the off-road versions somewhere! Perhaps the company should send me one for a long term evaluation. 😉 I swear I’ll take good care of it and let everyone in the world know if it’s any good or not.

Peace Y’all

And Now It’s Time For Mrs. Psyco’s Opinion!

After my initial shock that we were going to be riding on these contraptions, I said to myself they can’t be that hard to ride so I made up my mind that I would try. Then we meet the other couple that was going to ride with us and they were much older than we are and they said it was so easy, so I was really ready to go. But when I stepped on it, it went to wiggling and I tried to get off but I couldn’t keep it still, so I said help me I can not do this, I want to get off. So Wes helped me off and I looked back at Floyd and I saw that he had it figured out. I decided to try again and after trying several times and being  told to relax and not to hold on so tight I finally got it. It took me between five and ten minutes and then I was on my way loving it and feeling so carefree. What a rush!

Thanks to Moving Sidewalk Tours for an enjoyable afternoon.

Mac Four Into One Exhaust for Vintage Motorcycles.

This is the first time I have purchased a Mac exhaust system for one of my motorcycles. In the past I have purchased a few from Kerker, Vance & Hines, Yoshimura etc. Never really gave Mac products much thought as high performance was always the ultimate goal, and I, like so many young men thought they just made cheap replacement systems for oddball old Jap bikes. Fast forward a few years & now my favorite thing to do is customizing oddball old Jap bikes such as this CB650 here. Performance & sound are still important, just not nearly as important as they use to be. Bang for the buck & good availability mean a lot in this day and time & that is two main things that Mac has going for them. Lets get started installing a set shall we? For this ratty old scrambler conversion I picked out a plain black 4 into 1 system with a shorty muffler.

First thing to do is remove the old exhaust and set aside the parts that you may be re-using. One of my favorite things about this system is that it uses the o.e.m. finned exhaust flange that to me, are very important to the looks of an old air cooled engine.

original Honda CB650 exhaust flanges

original Honda CB650 exhaust flanges

I had actually pulled the stock pipes off a couple of weeks ago and just stuffed the ports with rags to keep the critters out.

<cb650 exhaust ports>

the mud daubers around here, love to nest in motorcycle engines

Lets look at what comes with the new Mac exhaust system.

Mac exhaust hardware

Mac exhaust hardware

As you can see in addition to the muffler this set came with new split collars, muffler clamp & bolts, and 2 different hanger bracket. not shown in this picture is the new center stand stop that comes with it.

The split collars were joined together by a small strip of metal that was left when they were sawed in two. Resist the urge to break them apart.

new Mac split collars

new Mac split collar

After you place the o.e.m. exhaust flanges on your new head pipes carefully spread the collars open just barely enough to go over the pipes and then squeeze them back together so that you only have one piece to hold in place while you position the flanges & start the nuts.

split collars on Honda exhaust

split collars on Honda exhaust

I always use plenty of anti-seize compound on exhaust studs and so should you.

anti-seize compound on exhaust studs

Have some mercy on the next person to remove he exhaust system on your scoots …

Here’s a shot of the pipes in place, I had to pull on the pipes a little to persuade them into place, nothing major just a little tugging & spreading. After you get the pipes in the ports and the flanges back on do not tighten the bolts all the way down until you get the entire system installed.

<Mac Performance Motorcycle Exhaust>

Mac shorty muffler

Mac shorty muffler

Put the clamp on the muffler and slide it into place and then get your hanger bracket and figure out which one you need to attach the muffler to the passenger foot peg bracket.

exhaust hanger brackets

exhaust hanger brackets

The enclosed instructions said to use the short bracket for a CB650C (custom cruiser model) which is what this bike started off as, but in my case it did not fit. I don’t know why and it really does not matter that much to me. The longer bracket worked just fine, I bent the dog leg into it so that it would support the muffler at its natural resting point on the head pipe instead of pulling it in toward the bike. Now tighten all of the bolts attaching your new exhaust to the motorcycle to the correct final torque.

The process of tightening the clamp & muffler mount does bring me to my one major pet peeve with darn near every major motorcycle accessory manufacturer doing business in America. Here I am working my way through this install with the 3 wrenches that will disassemble 90% percent of motorcycles existing in the world today a 10mm, a 12mm & a 14mm, and I have to stop what I am doing and go get a 1/2″ wrench to install the last 2 bolts. I realize that when some of these products were first created back in the ’70s & early ’80s metric hardware was a little more “exotic” and not as cheap and easy to find as the “standard” stuff, but here in 2013 there is no excuse whatsoever to still have standard fasteners on accessories for European & Japanese motorcycles or for that matter modern Harleys & Triumphs too. It would only take a little effort & I for one will be eternally grateful.

On the other side of the bike install the new center stand stop, unless of course you are planning to remove the stand.

<center-stand stop>

After I got it all on, it looks the part & sounds great too.

Mac 4 into 1 On Honda CB650

Mac 4 into 1 On Honda CB650

With this system I get to retain the center stand, have easy access to the oil filter & I have a little cash leftover too!

Did I mention that it has a mean sounding growl too! Click this link to have a listen.

Peace Y’all

9-1-113  Just a quick update on one minor problem that surfaced after 3-400 miles of road time. The rivet holding the baffle in became loose, allowing the baffle to rattle inside of the muffler until it got hot and expanded. My solution was to tack weld the baffle into place & repaint, but one could just drill out the rivet & replace it with a bolt & nut, if by some chance you have the same problem too.

Riding a CRF150! A Psyco Used Bike Test Ride!

The last week or two I’ve had the privilege of having a really nice super clean late model Honda CRF150 visiting my stable for a tune up & fresh front inner tube. Since this model is still in production and seems to be the replacement for the venerable old XR200, I though I would take it for a spin. Plus it been years since I’ve had the chance to ride an “adult size” off road motorcycle.

left side view Honda CRF150

left side view Honda CRF150

One thing needs to be totally clear to anyone looking at one of these, they are play bikes first and foremost not motocrossers. The power is low, the front tire is a 19″ etc. Yes I know they get raced in the mini class but those are usually heavily modified. There is a version with the smaller wheelset for the more advanced young riders. I got to admit though with the right suspension mods and tires this thing would make one heck of a trainer for flat track or supermoto racing. If anyone has tried it send me some information, I’d like to see your set up.

Like most of us out here on the east coast I was a woods rider when I was riding dirtbikes on a more regular basis so that is how I am evaluating this bike. Nothing like running a slalom course through a bunch of Loblolly pines while bouncing over tree roots and sliding around in the leaves and pine needles. Did I mention there were a lot of thorns too? Nothing like having completely fixed and  immovable objects to possibly crash into with a motorcycle that you don’t own to get your blood flowing!

a Honda CRF 150 in the briar patch

a Honda CRF 150 in the briar patch

In the woods almost everything was just fine. Right away I could tell the suspension was definitely not set up for shall we say a “bulky” man to ride and if I tried to sit down and ride the forks would bottom out with surprising regularity. The engine has enough grunt and is geared right but chassis just isn’t up to the task of dealing with 235 pounds of fine middle aged stud sitting in the drivers seat.

a large man on a small motorcycle

a large man on a small motorcycle

Still it was a fun ride as long as I remembered to stand up on the pegs going into the rough stuff.

<standing on the pegs for picture>

As long as I kept the revs up and remembered that I could not power wheelie over fallen logs & stuff like that I had a really enjoyable couple of hours threading it through the woods and around the cornfields.

through the woods on a CRF150

through the woods on a CRF150

pine tree slalom

pine tree slalom

Then I decided to hit the dirt roads and see how it felt in the sand & the gravel at (relatively) high speed. This one wearing the original Pirelli tires and on the long sandy stretches of it was nice and stable, even holding the throttle pinned in fifth gear. The only problem was that at wide open throttle in high gear you may may be going fast enough to get hurt if you crash, but you are definitely not going fast enough to get an experienced rider’s heart rate up. When I got to the loose gravel sections though I was kinda glad to be going slow as the front end felt busy. There was never any imminently dangerous or unstable feeling, it was just a little twitchy as the rocks slid around under the tires.

Did I forget to mention the most important advantage that this and an increasing number of other modern dirtbikes have over the old ones?

magic-button-crf150

magic-button-CRF150

Yep that little magic button on the handlebar to fire it up for you. What a wonderful thing for us old guys who have had our crash damaged knees replaced with not quite as good as original equipment parts. The engine is your typical cold natured Honda & wants a good warm up before it will idle, other than that the fueling and throttle response was excellent. Shim under bucket valve adjustment means that you will seldom have to actually adjust the valves unless you are extremely cruel to your equipment or if you modify or overhaul the engine. Just feed it right, oil it, and keep the battery charged when you are not riding it and it will probably last for decades.

Normally I would recommend this bike to anyone whom has just outgrown their 80 or 100 but is not ready to move on up to a 250 class machine or to a lady of petite stature. How ever there is one other class of folks who could benefit from either this bike or it’s CRF230 stablemate. I am talking to all of you parents out there, when you get your kid an off road motorcycle, get one of these for yourself so that you can ride with them. Do it! Going trail riding on a regular basis with you child is the most fun the two of you can have. Don’t take my word for it, just ask my daughter.

Peace Y’all

Use the Right Tool for the Job! A Tech Tip & Product Review Combined!

It is time for me to make a confession of my own ignorance. For over two decades I have not been using the correct screwdrivers to work on my beloved old rice grinders. Even during the time I worked as a dealership mechanic I destroyed countless fasteners by using the wrong screwdrivers. I did find by experience, that the really high quality & expensive Snap On brand could usually remove those annoying cheesy easy to strip cheap ass Japanese Phillips screws. But even then the heads still looked mangled for some reason.  Day after day I cursed the engineers at Honda, Kawasaki, Yamaha & Suzuki for sourcing such horrible fasteners to hold such fine machinery together.

Fast forward a couple of dozen years and one day while wandering through a motorcycle show, I stop at a VJMC display and pick up a copy of their magazine.  When I finally slowed down enough to read through it a couple of weeks later I saw a really great article on the difference between Japanese Industrial Standard screws & Phillips screws as used here. It was a real eye opener, no wonder these screws were so difficult to remove. The angles of the sides and the shape of the center are just different enough to cause these two different styles not to be interchangeable.

I jumped onto the internet to research these JIS screwdrivers & found the two most commonly available brands to be Vessel & Hozan. I decided to order a 4 piece set of Hozan screwdrivers for about $25 USD.

Hozan JIS screwdrivers

Hozan JIS screwdrivers

These screwdrivers have hard plastic handles, this bugs some people but most of my screwdrivers have hard handles it  is what I’m used to. Plus they are a lot easier to clean than cushion grips. The distinctive shape keeps me from confusing them with my regular Phillips head screwdrivers which is important. They will probably bugger up a Phillips screw the same way a Phillips screwdriver buggers a JIS screw.

Even though I’ve only used them a few times I am really impressed with how much better they fit & grip the screw heads on a few dirtbikes that I am working on. And the best part of all is that the screws still look good when I am done. This is very important if you are doing restorations or building show bikes.

Save yourself a lot of trouble, learn from my mistakes and get yourself a set JIS screwdrivers. You’ll be glad you did!