Late in 2023 I picked up an old 1978 Yamaha SR500 and started working on it and chronicling the build over at my YouTube channel. As a result of such extensive posting on YouTube this blog has been kind of ignored to remedy that situation I’m going to start sharing my videos here. I hope you enjoy them as I have a lot of videos in this series to share with you. In addition to the SR500 I have a 1983 Honda Interceptor 750 that I bought cheap and got running extremely well also. As of today 8/7/24, the Interceptor is as done as I want it but work on the Yamaha continues.

Tag Archives: Honda

May 2023 Motorcycle Updates
Just thought I’d post a line or two about what’s happening with the bikes around here.

On Saturday May 20th my little Street Cub project from my last post took a best in class award at the 2023 VJMC National Rally. We had a great time at the rally which was held in Eufuala Alabama this year.
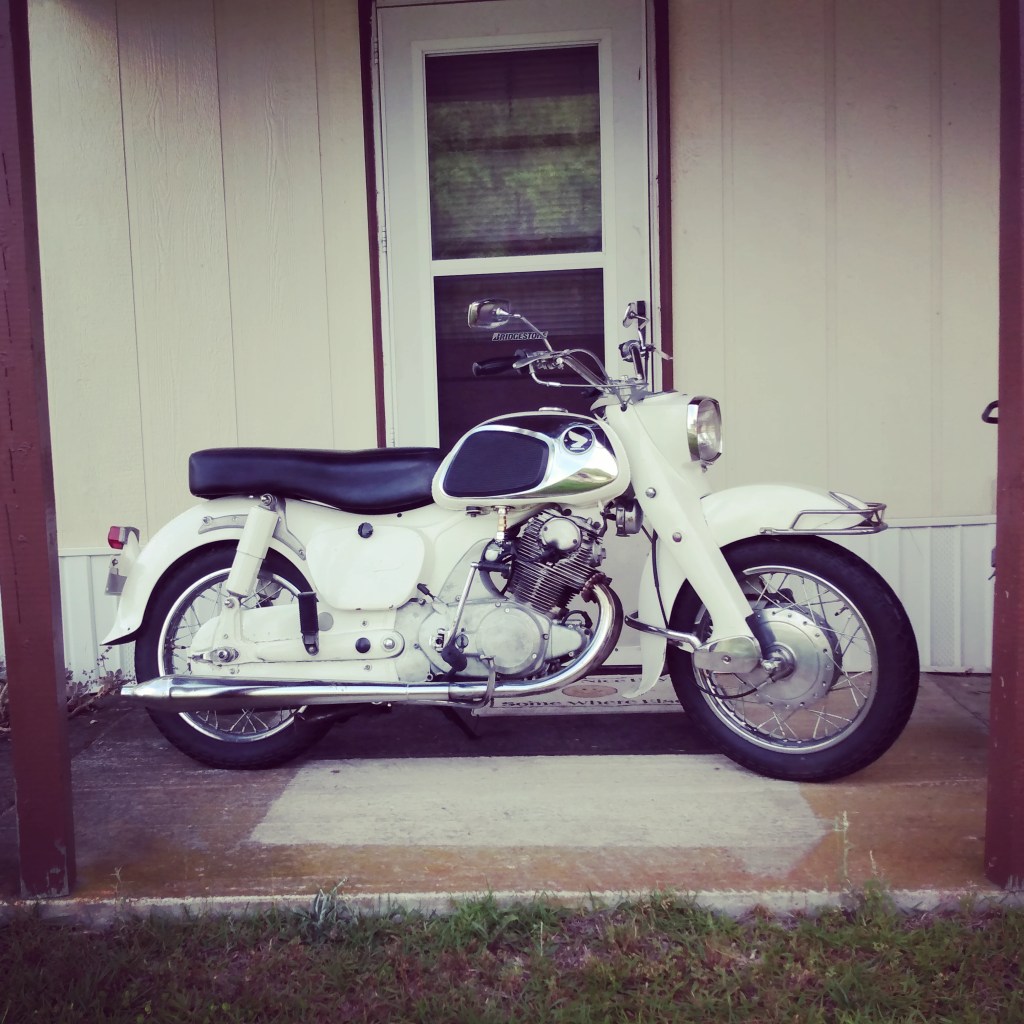
A few months ago I finally got my hands on a nice early Honda Dream. This is a 1962 model CA77 It would actually start but wouldn’t idle or charge a battery. I went ahead and installed a VM22 Mikuni carburetor on it and got it running well. The original ignition switch fell apart so I rewired it with a modem switch and a solid state regulator – rectifier and now it’s extremely reliable. One day I plan to take care of the cosmetics but it’s fun to ride like it is. It’ll never be purely stock again but it will be very nice one day. I’ll tell you more when the time comes.

At the Fast Lane swap meet during Daytona bike week this year I snagged this ratty old Honda Interceptor to keep my Royal Enfield Interceptor company. It was dirt cheap because it had no title but after a thorough carburetor overhaul and a new fuel pump it ran good enough that it was worth it to go through the “barn find” title process. The paperwork finally came through this week so it’s time to get it safe and ready for the road.
That’s it for the day, thanks for reading!
Share this:

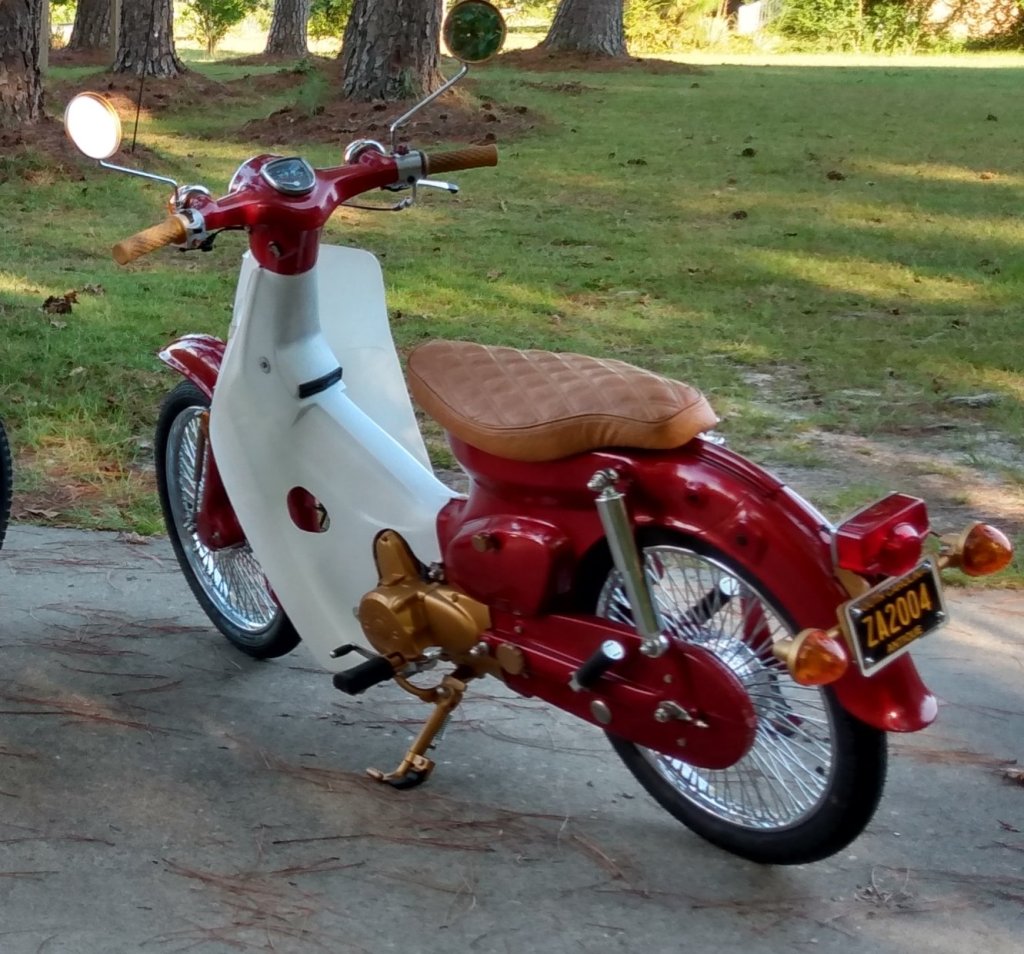
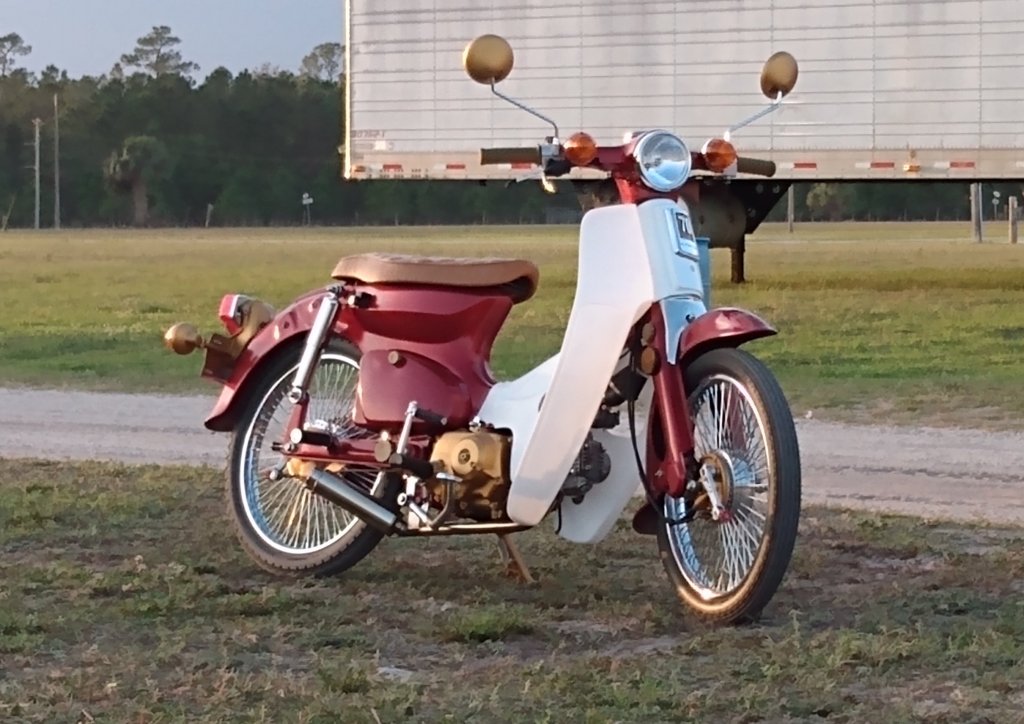
An American StreetCub
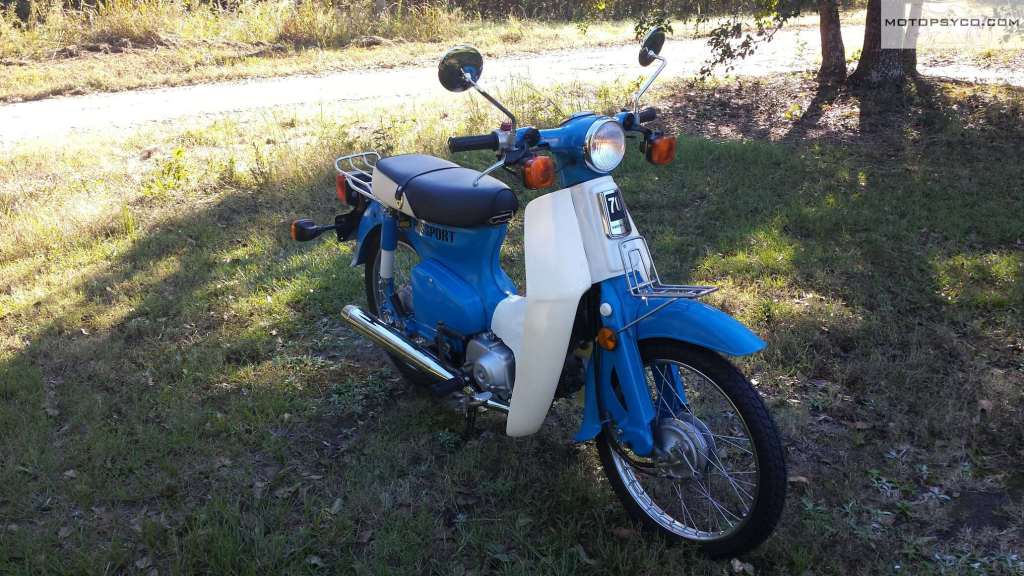
A few years ago I found and restored a 1982 Honda Passport C70 to absolutely pristine condition. The only modification that I did was to change the paint color from Honda’s original Angel Blue to a slightly darker Ford blue. Everything else on it was pure stock and it was an excellent runner. I sold it to pay for my new shop air compressor and while I’m glad to have the compressor I sure did miss that C70 and kept my eyes open for another fixer upper.
Two or three years ago I caught up with an old friend that I hadn’t seen in a while, like myself he’s a collector of projects and things to tinker with, and he just happened to have this Monza Red 1982 Honda Passport sitting in a shed behind his garage. It was crusty & neglected but the engine turned freely. As a bonus it even came with a title!
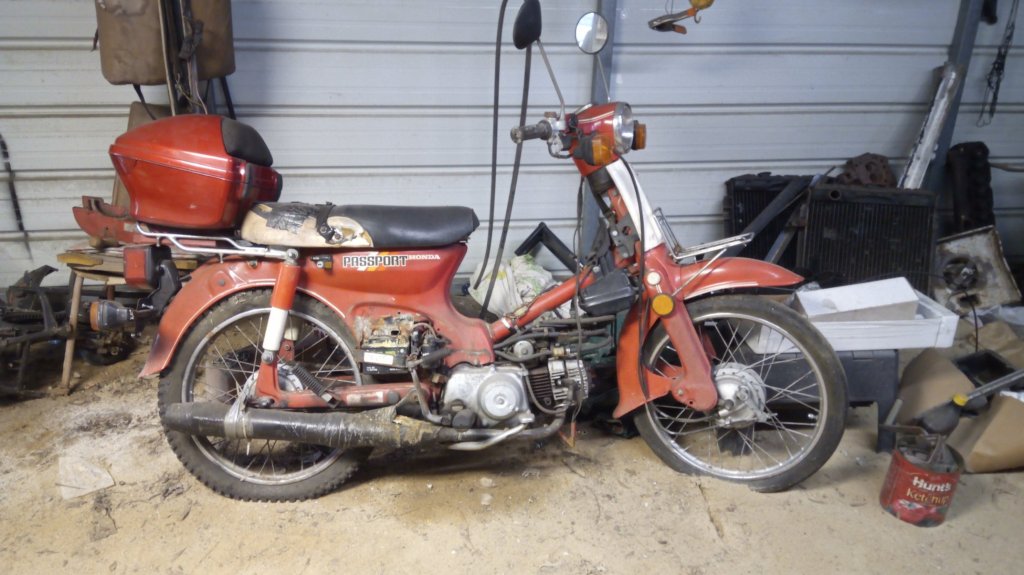
After cleaning the carburetor it would fire up as long as it was sprayed with carb cleaner or starter fluid. It had just enough compression to run and ride but not enough to start without some help. Time to get to work!
I started following several Southeast Asian Instagram accounts promoting the streetcub customs based on the Honda Cub, Super Cub, and Trail models. There’s so much creative craziness going on over there that it was inspiring. The vast majority of custom Cubs in the Orient are stripped down choppers with bobbed rear fenders and minimal bodywork, but there a lot of really cool looking full fender bikes too.
First step was to rebuild the tired old engine, this particular Passport had been abused as a moped for years before my buddy got it and then it spent a few years sitting in his shed. Restoration was not even contemplated for this old machine and I did want more power than could be had from the standard engine so I rebuilt it using an 88cc kit sold by CMS in the Netherlands.
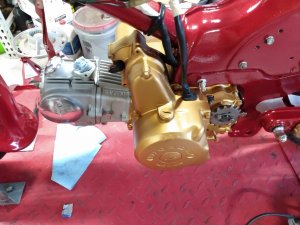
Then using an AFR gauge I re-jetted the carburetor for maximum performance and installed a stainless steel exhaust from a Japanese company called Wirus Win. It has a great look and sound with decent performance now.

Some Paint & Bodywork
It was going to be red, there was never any doubt about that. There was also never any doubt that it would not be the original Monza Red because it just didn’t have the pop that I was looking for. The color chosen was Firethorn Red Pearl from TCP Global in a single stage urethane. I consider myself to be a decent painter but am especially proud of how this bike came out. This paint job has never been buffed and the shine you see here is how it laid down straight out of the gun.
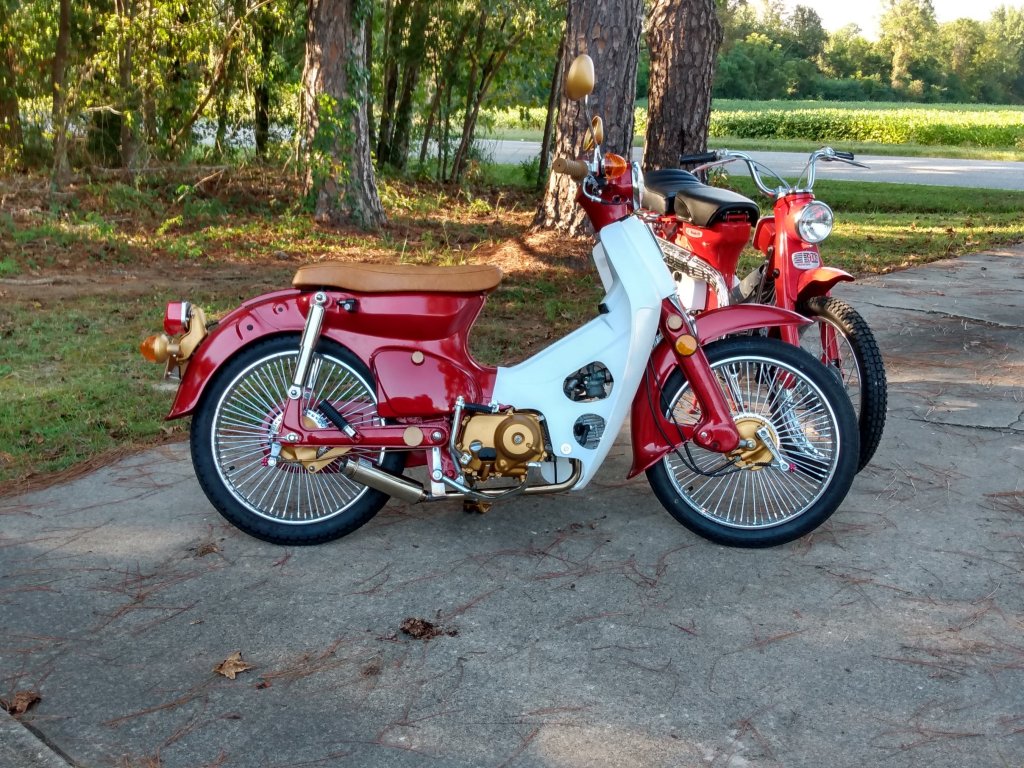
The leg shield is a new aftermarket piece, for it I mixed a couple of spoons full of dry pearls into some urethane clear for a nice sheen to enhance the plain white plastic. A couple of different shades of rattle can gold highlight the engine & a few small parts here and there.
Bought a Few Cool Pieces
After the paint there are 2 other parts that really stand out; one is the brown custom seat, two are the chrome plated 72 spoke wire wheels, both of which came from Ebay. I also wanted to get rid the dangly eighties style turn signals and have old looking round signal lights mounted on the handlebars not hanging under them on the ungainly looking original stalks which are clearly an afterthought. The rear license plate & light bracket were modified to accept turnsignals from an old CB350 I had laying around. The taillight itself was new but I have no idea what it fit. I did have to 3d print a new gasket for it using a flexible material known as TPU95.
3D Printer Go Brrrr!
At the time I had just gotten my first 3d printer and I really wanted to do some cool stuff for this little motorcycle so I did. Almost all of the black rubber grommets and frame plugs were replaced with parts printed from black TPU95.
All of the fork, frame and swing arm plugs are of my own design and were printed out, painted & installed during final assembly. Side cover knobs were made to match the style of the frame plugs and look really cool. These little frame and for plugs on the original bikes don’t match each other and this has always irked me as it gave them the appearance of having been designed piecemeal.
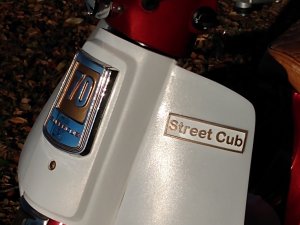
The “StreetCub” emblem on the front was designed and printed in white plastic with the lettering & outlines highlighted with gold paint.
More Than The Sum of Its Parts
Overall the final product makes me very happy and last year it scored a first place trophy as best motorcycle at a large car truck & bike show that happens every year in my home town of Hartsville S.C. I’m convinced that a lot of people don’t realize just how heavily customized it is, but it always attracts favorable attention everywhere I take it even at Daytona Beach Bike Week.

One of the big selling points of Honda Cubs & Passport was their practicality and relative comfort. I think I killed that with that with this one. The seats not very well padded, the exhaust is nearly loud enough to be annoying and without the luggage rack you can’t haul your groceries home with it. But it’s got miles of style and when we were eating supper at the campground in Florida I looked up and saw the evening sun sparkling on the gold pearl in the paint and the chrome gleaming I knew that I had done the right thing with this little 1982 Honda Passport. Originally its form followed its function but now form is the most important thing and its main function is looking good.
Share this:

Project 333 Epilogue
I apologize that I never came back with the finished pictures of Project 333 but I did finish it along with a few others that I haven’t told you about yet. When I started that project at the beginning of 2020 I had no clue of the craziness that was about to overtake the world in a few months.

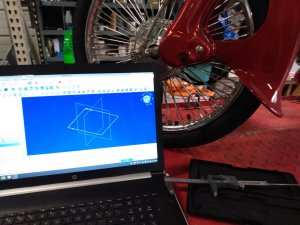
Let me say if you need an engine for a custom project like this I highly recommend the Piranha 140cc engines they’re powerful and reliable. It was very easy to install and wire up. The single biggest issue I had was that I wanted to feed the carburetor from the stock air intake so I had to purchase the correct adapter to orient the carburetor to reach the stock Honda C200 air intake. It wasn’t a perfect fit but it was good.

Here you can see how much I had to move the carb.
Some cheap control switches and a reasonably priced reproduction seat from Ebay worked out great. I just built a complete custom wiring harness and made the whole thing 12 volts dc so that I could run a lithium battery and LED lighting.
A drag pipe was sourced from Beatrice Cycle for a mean and meaty sound!
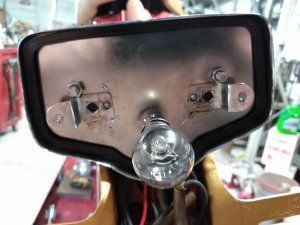
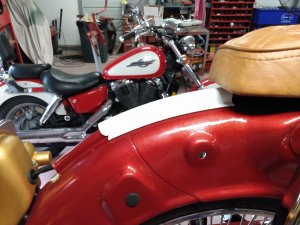
At the rear I added a hot rod “Model A” taillight.

Hot Rod style taillight on 64 Honda Project 333
In the end this build ended up being a ton of fun to ride, and with it’s clean vintage looks really turned heads too. It was a great little neighborhood blaster that accelerated quickly up to it’s maximum speed of 45 mph. Some motorcycles just really do become more than the sum of their parts and this was one of them.
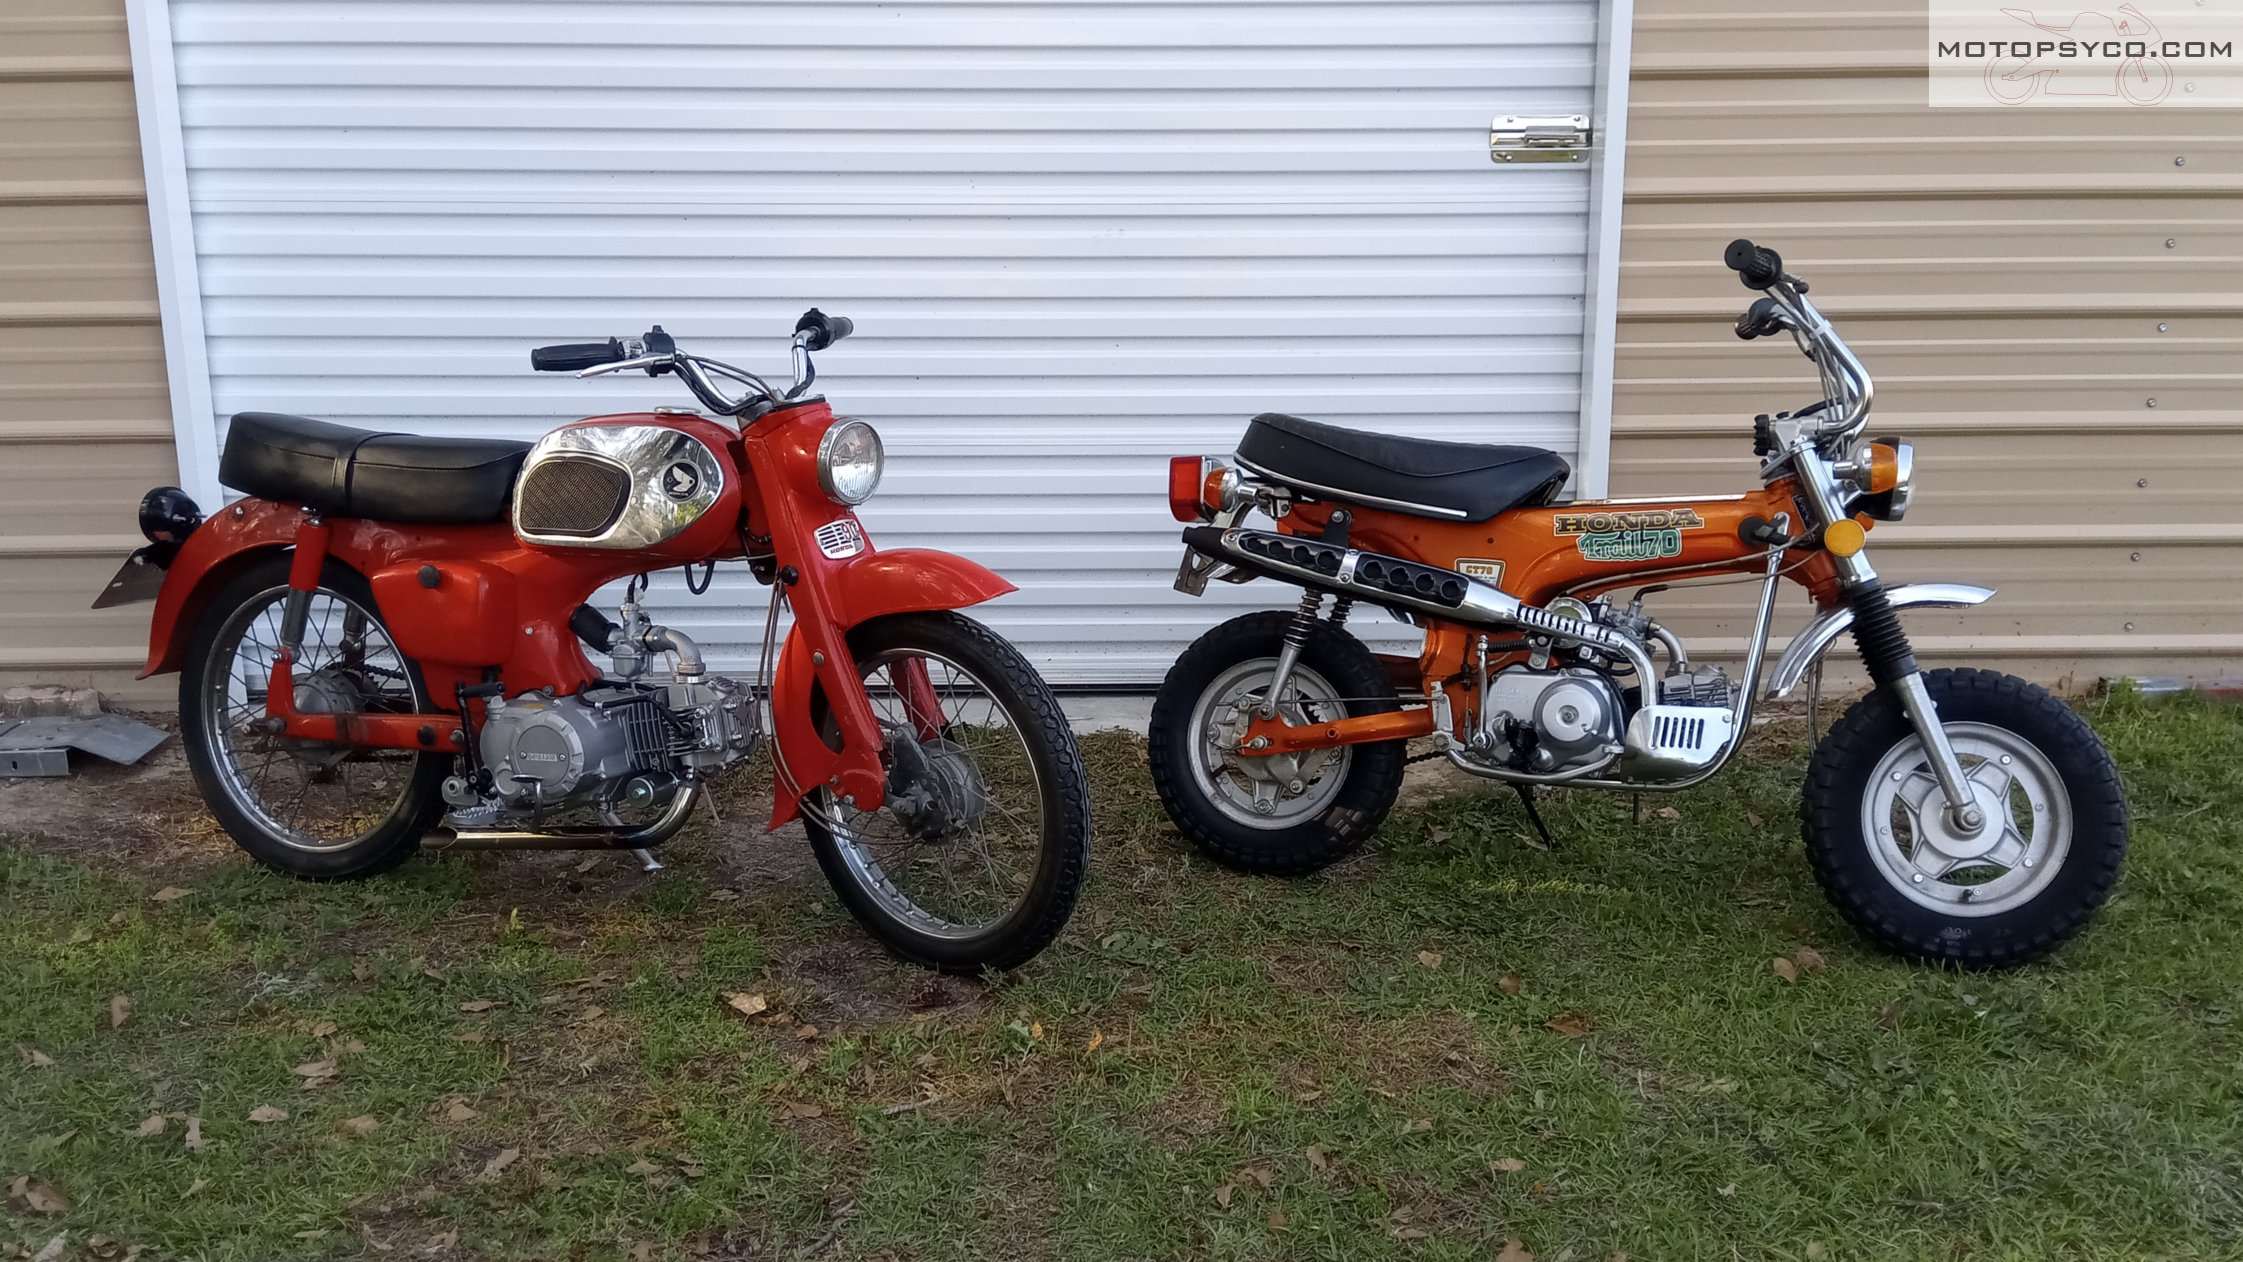
Project 333 next to a pure stock CT70 that I finished,
Too bad that the 2020 Barber Small Bore Festival was canceled. I was just going to save it for 2021 but wound up trading it for a 1998 Triumph Adventurer 900. More on that later.

1998 Triumph Adventurer future custom project.
The whole corona virus episode really threw everyone’s plans for everything for a loop. Unlike a lot of people my employment situation did not change, being employed in an essential industry I never missed a single day of work and was never told to work from home. Between that and working on other peoples motorcycles I’ve been busier than ever before.

Motopsyco World HQ
One great blessing is that we finally sold our previous home and moved into a new place that has a much bigger house and shop. So I’m writing my first blog post of 2022 from my new office in Hartsville, S.C. and look forward to the coming year.
Share this:

Project 333 Honda C200
It’s just a little evil.

In case you’re wondering dear reader, I have not stopped working on bikes but have been steadily cranking them out. Between my day job & a shop full of projects both mine & other peoples, there just hasn’t been time to sit down at the keyboard & document everything. That is about to change with this little Honda C200 . A lot of cool things have happened; including me purchasing the second brand new motorcycle I’ve ever owned a Moto Guzzi V9. On a sadder note the Suburban Assault Scrambler CB650 has gone on to its next owner but not before proving itself on the dyno by putting out the most horsepower per cc at a show last March. In case you’re wondering it cranked out an honest 50 rear wheel horsepower.

Sometime in all this there’s been a bare crankcases up rebuild on a CB400F Honda, a complete mechanical refurbishment of a Suzuki DR350 and a few others too numerous to write about. It’s all been a blast and there are plenty more on deck waiting for me to get started on them.

This particular Honda C200 is one that I acquired from a friend; it’s in fair condition with nothing but light surface rust & dings but is missing a few parts and hasn’t been run in several years. Most importantly of all it came with a title. I generally don’t have much trouble getting titles for old bikes without one but it is an extra bit of expense & time.

Restoration is not in the cards for this particular 1964 Honda C200. I’ve proven that I can do a show winning 100% stock restorations and I will do a few more later but this build is going to be about me getting back to my rat bike roots. The goal for this one is to have it done & ready in time to cruise around at the Barber Small Bore Festival organized by MNNTHBX the first weekend in June.

The stock 90cc Honda C200 engine has been placed into my parts stash to make room for a Piranha YX140 engine. In addition to being much more powerful than the original pushrod engine it also has an electric start and a semi-auto clutch on the 4 speed transmission. This engine is available with a manual clutch if you want it but I didn’t for this build. You can probably go faster with the manual but I know how to build up the revs and launch a semi-auto so I’m not too concerned with that. There’s a lot more to this little bikes new purpose in life than just blasting down the 1/32 mile drag strip.

I’ll tell you more about YX140 engine in my next post. The pushrod engines in the Honda C200, CA200, & CT200 engines have the same mounting bolt pattern as the later CT70s, Z50s, and other common pit bikes so you don’t need any special adapters & spacers to put them in like on a later overhead cam 90cc Honda. That being said you still have to modify your frame by grinding some clearance for the protrusions on the rear corners of the engine before it will bolt in.

Goodbye for now, I’ve got to get my wiring run and fire this thing up. Once that is done I’ll come back and tell you all about it.

Share this:

The Honda SL100K2
Well I finished The Honda SL100K2. It looks really good and I’m very happy with the way all the cosmetics turned out. It really did wind up making me work much harder that I really wanted too but I wound up with a brand new looking old motorcycle that would start on the first kick.

It fought me all the way to the bitter end, I thought I had it running perfectly but then the very last part that I had not replaced yet crapped out on me. The original stator worked well at first but after I let the bike sit for a month or two between the VJMC National Rally and the Vintage Honda Rally at the Copperhead Motorcycle Lodge it quit on me and killed the battery.

First I tried a reproduction stator from eBay but the wiring colors didn’t match and the appearance of the wiring plug and sheathing didn’t match the original so I put it on the shelf and ordered a N.O.S. replacement from David Silver Spares & put on it. If anyone in the Continental U.S. would like to buy the reproduction stator from me, I’ll take $50 shipped just to get rid of it.
In the end I accomplished my goal to perform an award winning restoration from one of the biggest turds to ever come into my workshop. This little Honda SL100K2 picked up an Award of Merit at the 2019 VJMC National Rally and another at the 2019 Vintage Honda Rally.

What’s next for this little machine? Well that’s up to the new owner as I sold it during the Barber Vintage Motorsports Festival in October of 2019. I’ve got several new projects in the works and needed some money for them. So keep your eyes open for the next Motopsycho project bike.
Share this:

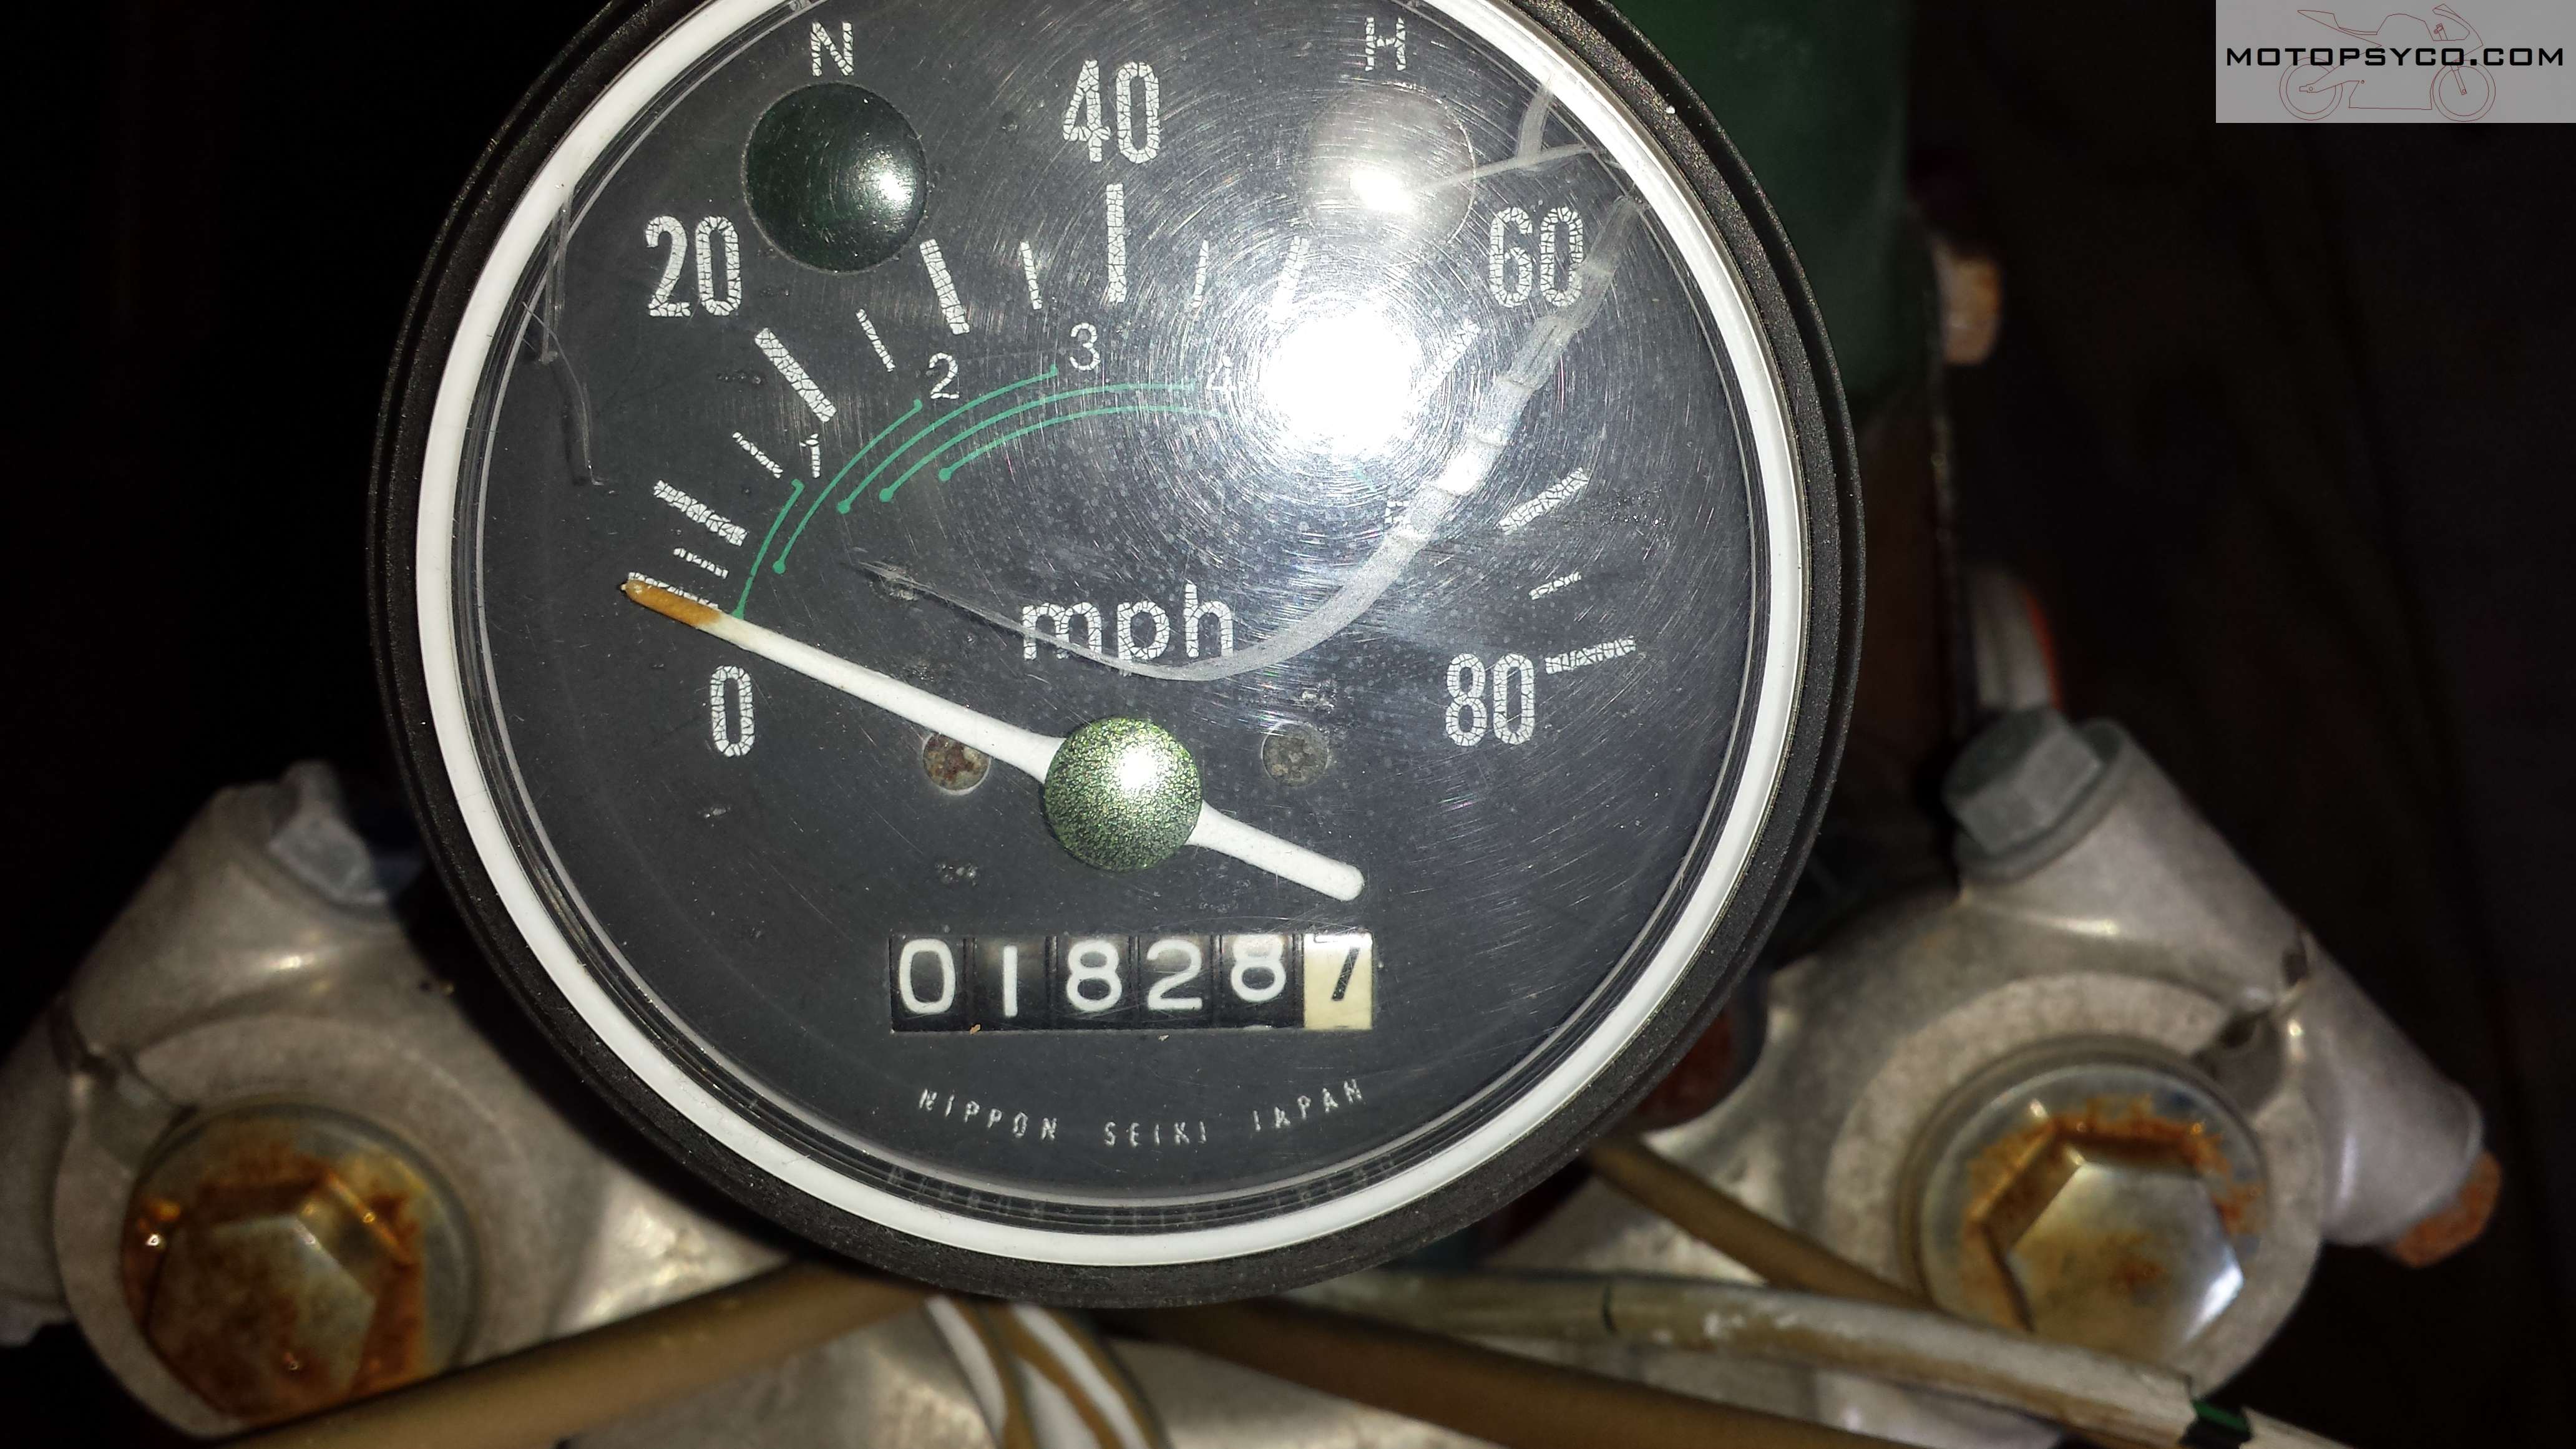
SL100 Speedometer Restoration
We’ve all seen it before, maybe even on our own bikes, beautiful paint, shiny new chrome, highly polished aluminum and dull faded out hazy looking gauges. Granted for custom bikes it’s pretty easy just to swap in a new speedometer, heck it might even be cheaper than fixing your original. I decided to perform this speedometer restoration for 2 reasons; to keep the original correct low odometer reading on this bike and I had never attempted speedometer restoration before and really wanted to try it. Sure I did make a couple of mistakes along the way but overall I am very pleased with the results. Next time I do this it’ll be even better.
Disassembly
On some instruments the bezel that surrounds the face and mechanism is crimped to the base with a metal ring that has to be carefully removed & re installed to access the inside of the gauge. On this little Honda the bezel was a one piece plastic part that appeared to have been either over-molded onto or permanently glued around the base of the mechanism. The first step after removing the chrome trim on the bottom is to cut away the plastic that is folded over the metal part of the gauge. Cut it all the way around so that you can carefully pull the gauge straight out of the housing. Initially I just tried cutting it part of the way around thinking that it would make it easier to re-seal when I put it back together, big mistake as I bent the thin aluminum gauge face when I tried to pull it out and had to carefully straighten it out. Slice it loose all the way around pull the gauge straight out so you don’t damage it.

After getting it apart, carefully grasp the needle where it’s attached to the shaft & pull it straight up and off then set it aside in a safe place. On this particular bike 2 screws held the face plate on to the speedometer. There are also 2 tubes that the neutral & high beam lights shine through that have little rubber boots that are glued to the back of the face plate, cut these away carefully.
Cosmetic improvements
For some more popular motorcycles speedometer restoration is easier because ready-made gauge faces are available for them, what I did for this one was to visit my local screen printing & graphics shop and had them scan the old face in and print me a new one on a vinyl decal that was stuck into place over my dirty faded speedometer.

Since the speedometer needle was very faded I gave it a quick shot of white paint. After the white paint dried a little bit of red was applied to the tip of the speedometer needle. One very important thing to remember especially with magnetic drive speedometers & tachometers is that too much paint will make the needle heavier causing it to be slower to respond and affect the accuracy of the gauge. Use the absolute bare minimum of paint necessary to make the needle look good again.

The clear plastic lens on this one was a little hazy & had a lot of scratches on it so I spent about 15-20 minutes polishing it with toothpaste & a damp paper towel. This removed the haze & a lot of the scratches. It’s not perfect but it looks really good.
Reassembly
I assembled the face plate to the speedometer carefully lining up the light tubes to the back of their respective lenses sealing them in place with a small amount of my favorite adhesive/sealant, Automotive Goop. Since all of the existing nuts and washers were rusty they were replaced with new hardware at this time.

With a little careful work, on the third try I was able to slide the speedometer needle back into place so that when viewed head on at rest the needle indicated exactly zero miles per hour. Just use a little patience and take your time when doing this and everything will be okay.
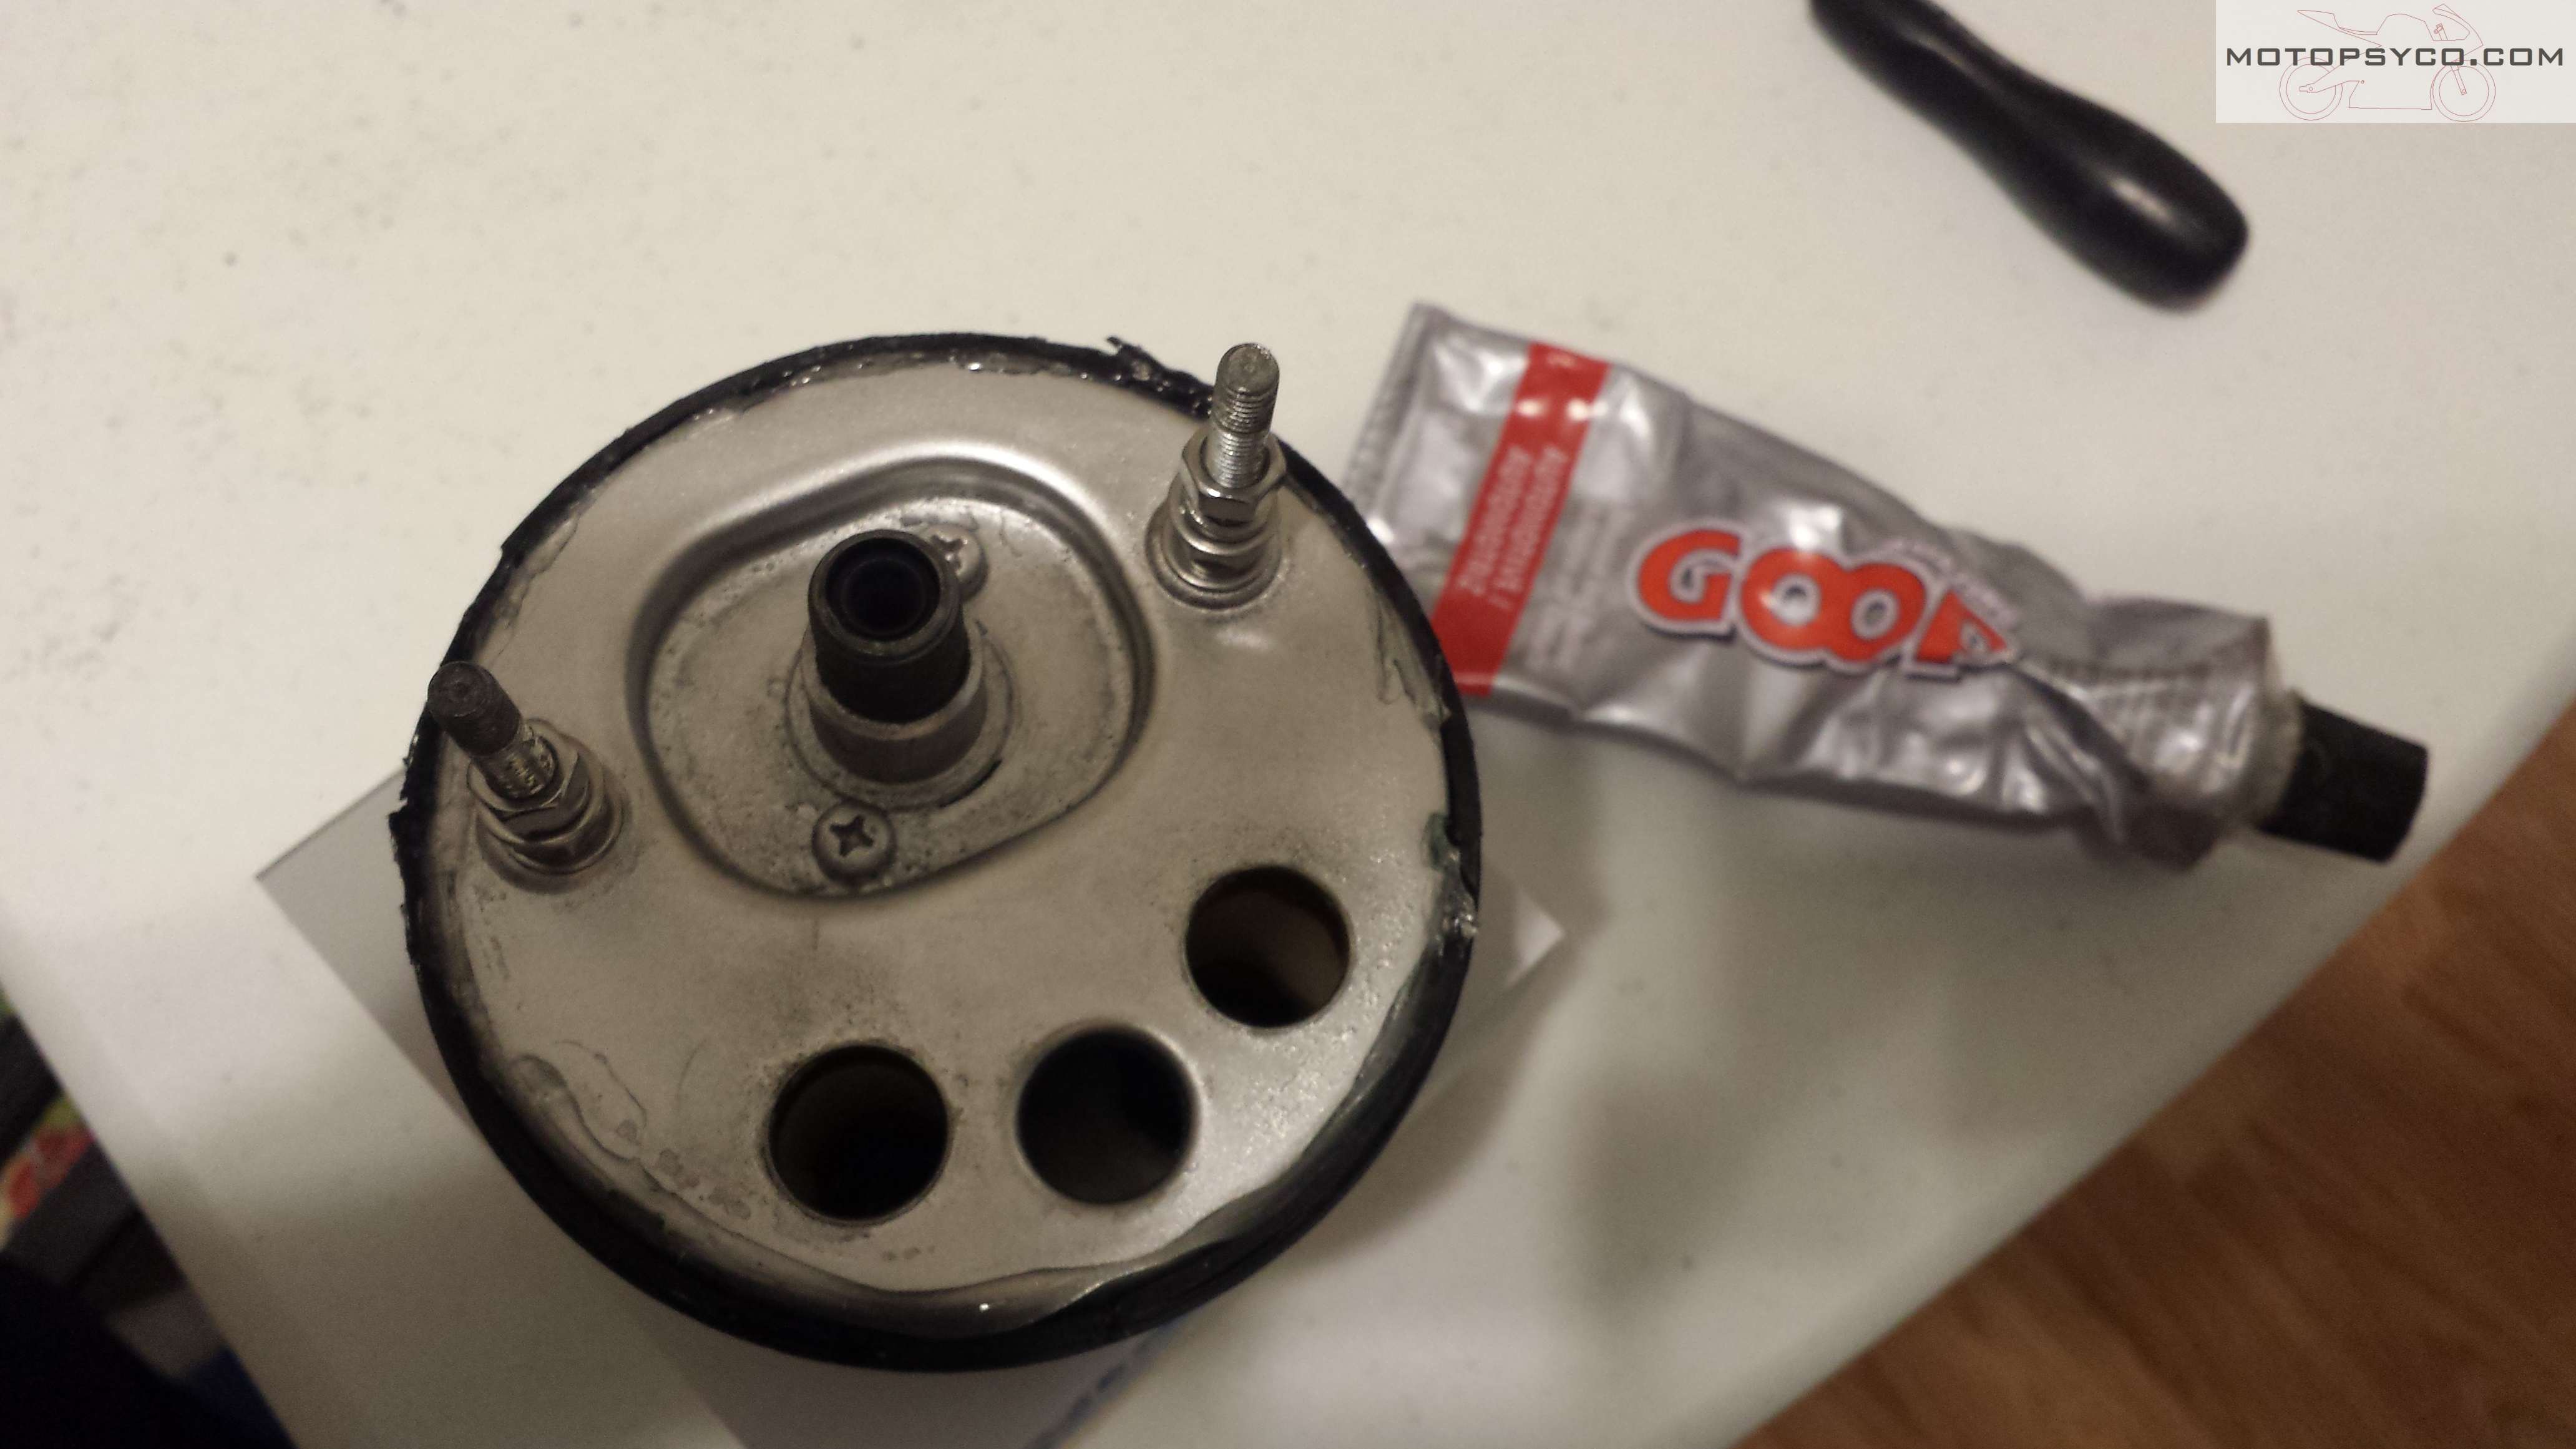
Next I made sure everything was as clean & dust free as possible inside & out and dropped the speedometer into the bezel. When I cut it loose I left enough plastic so that it snapped back into place. Then I took a good look at it and since I was satisfied with the way everything looked it was time to pull the gauge back out of the bezel just enough so that I could run a thick bead of the Goop adhesive all the way around it and then snap it back into place for good, then it was time to reinstall the chrome beauty ring on the bottom.

Conclusion
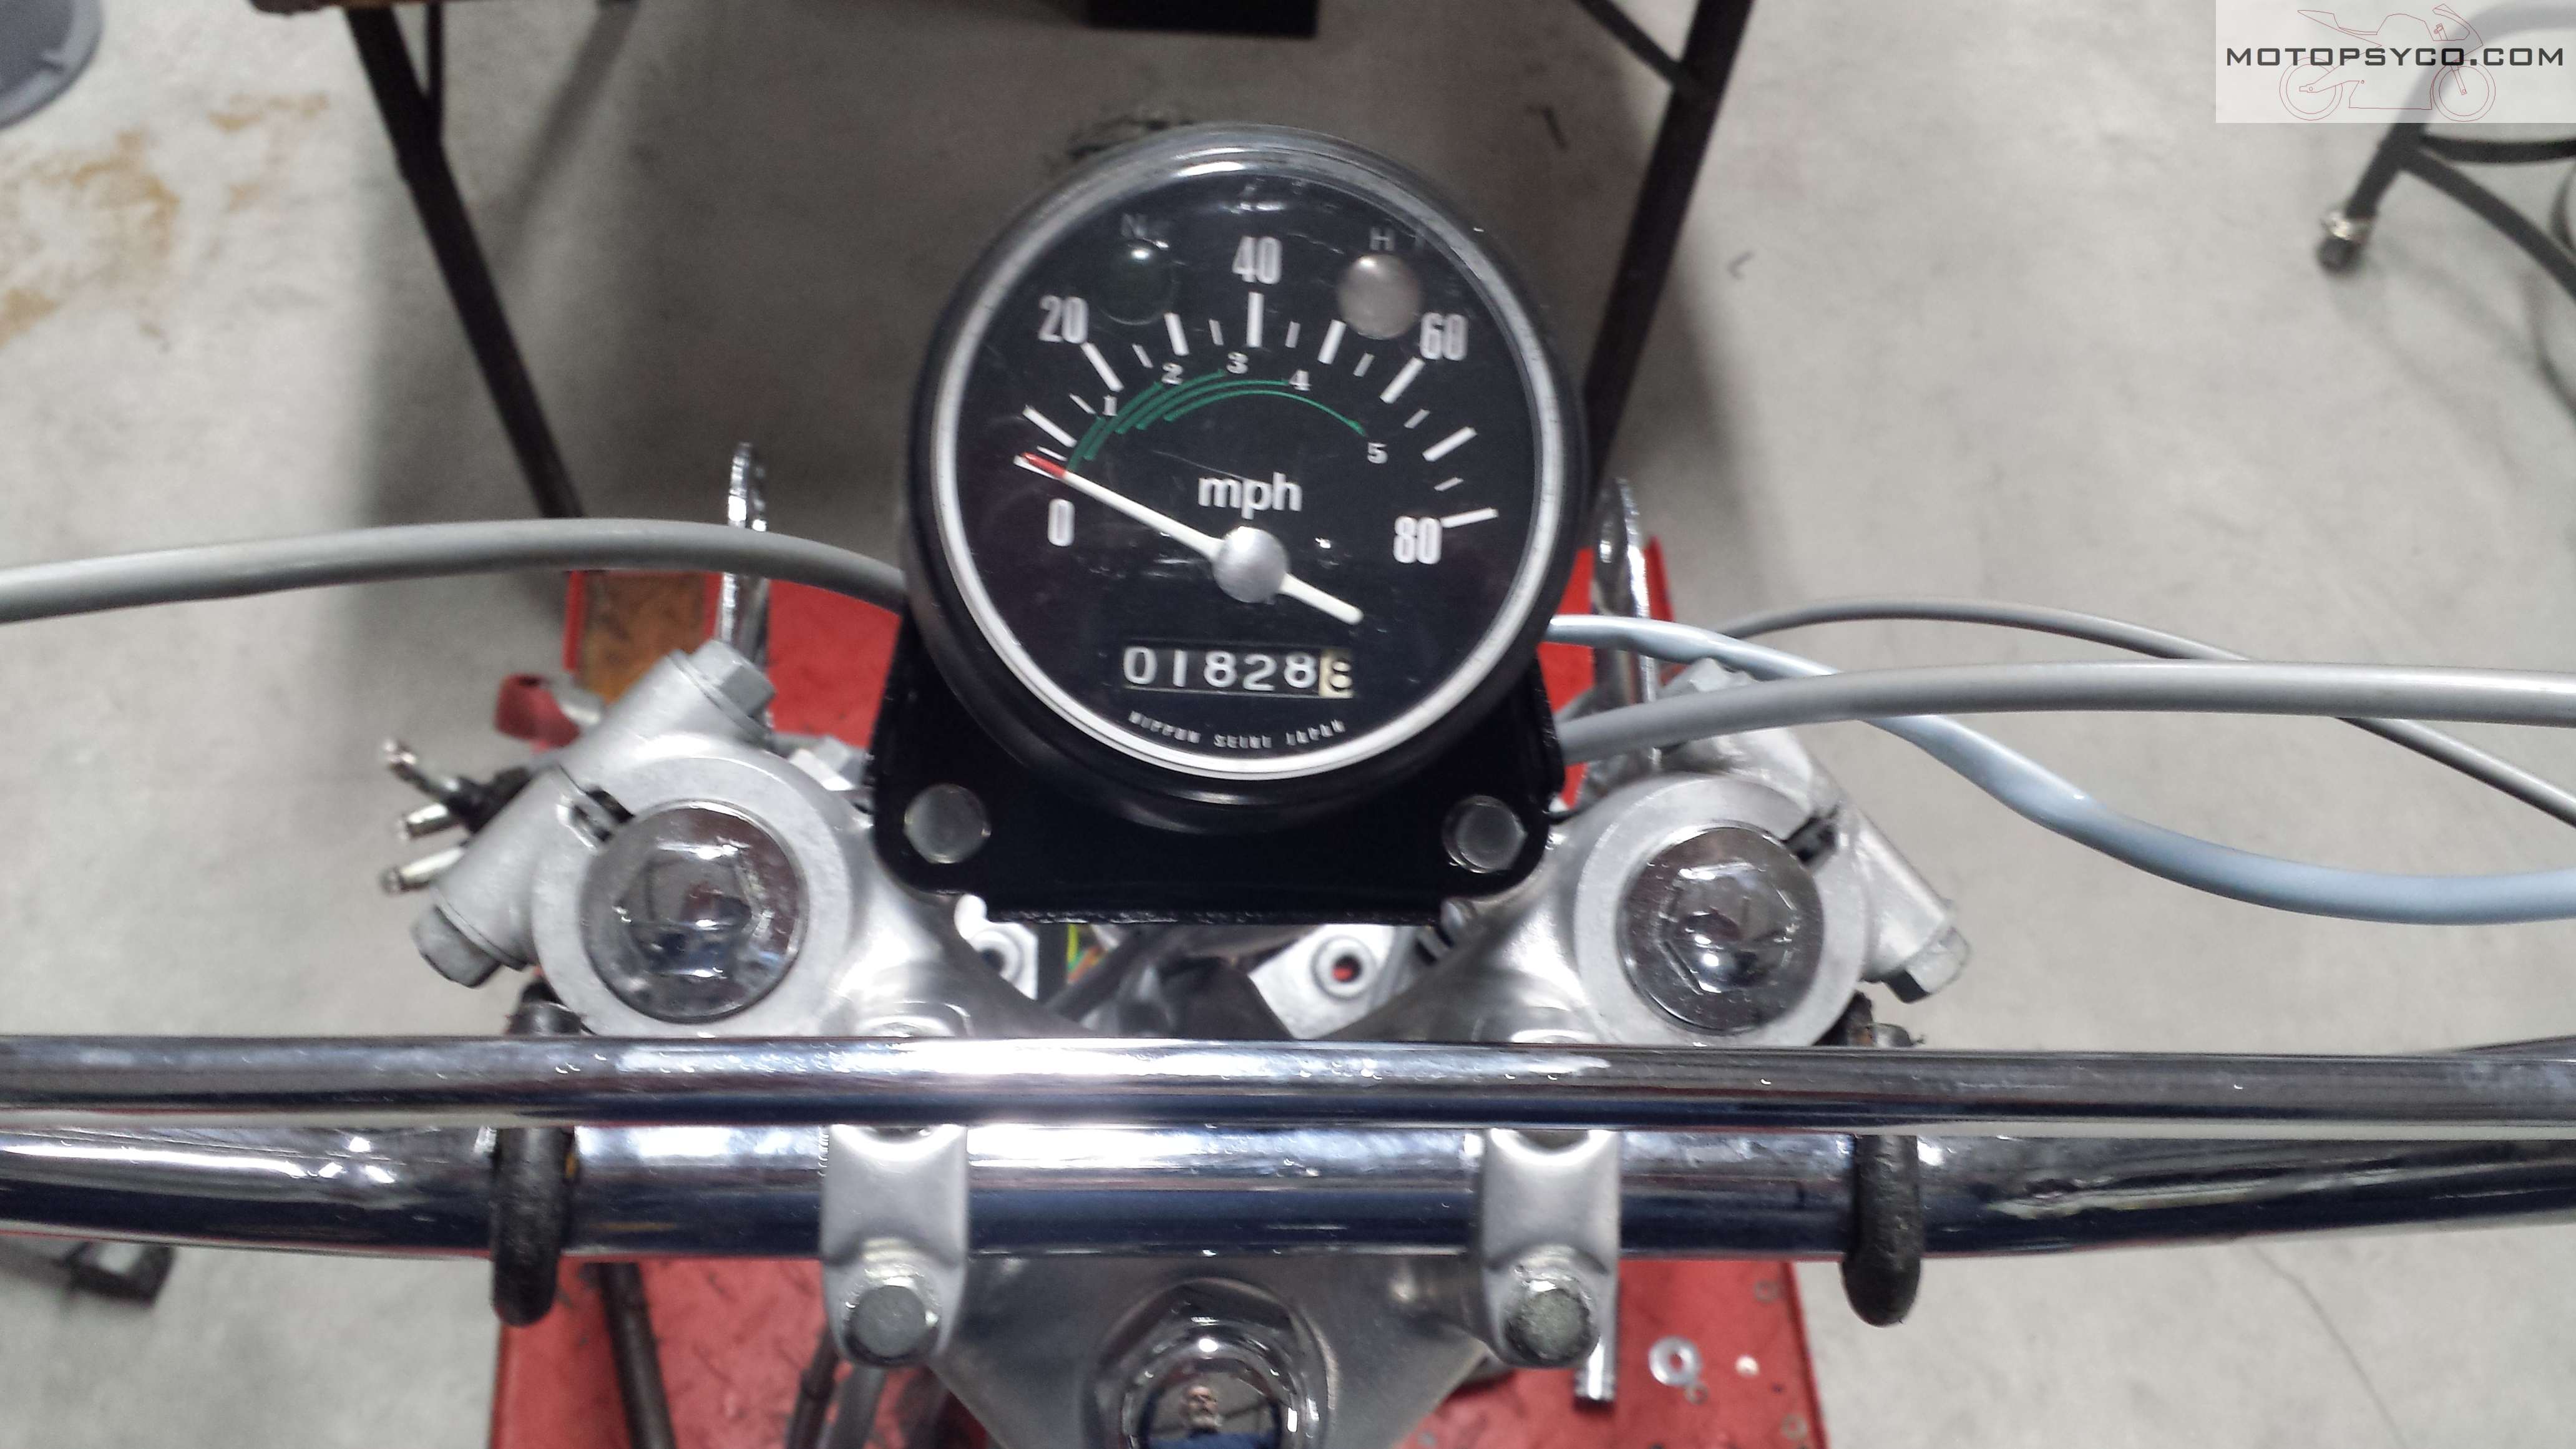
Here’s a picture of the finished assembly mounted on the bike. Even if you never plan to do speedometer restoration yourself at least you know how it can be done. There are a few specialist repair shops out there that do nothing but repair & rebuild gauges. In fact if your gauges are inoperable you should find one of them to do your repair & restoration for you. If they’re just faded & ugly you can do them yourself as I’ve shown here or you can send them to me and I’ll do it for you for a very reasonable price.
Share this:

Drilling Handlebars for Wiring
A lot of old motorcycles like my old 1972 Honda SL100K2 have their switch gear wiring inside of the handlebars for a nice neat clean appearance. I was actually able to locate a couple of sets of genuine Honda new old stock handlebars but the cheapest set I saw was over $150. Plus a lot of the NOS parts I find tend to have some shelf wear or corrosion on them so I just went ahead & bought a set of nice new reproduction bars without the wiring holes for $50. So this post is going to be about drilling handlebars for wiring. Whether you are try to do an authentic restoration or a sleek custom the basic procedure is the same

The first step is to determine where the holes & slots should be. These Thailand sourced bars had holes pre-drilled for the switch housing locating pins but they were in the wrong place. Since I was replacing the old but non-original bars I taped them together wile I measured and marked the locations for the new holes and slots. Pay attention to detail while doing this so that you don’t make any mistakes or remove excess metal from your handlebars. A prime example of this is visible on my old handlebars. The left side only needed a hole large enough for the single horn wire but whoever installed them cut a large slot instead. Watch for little things like that.
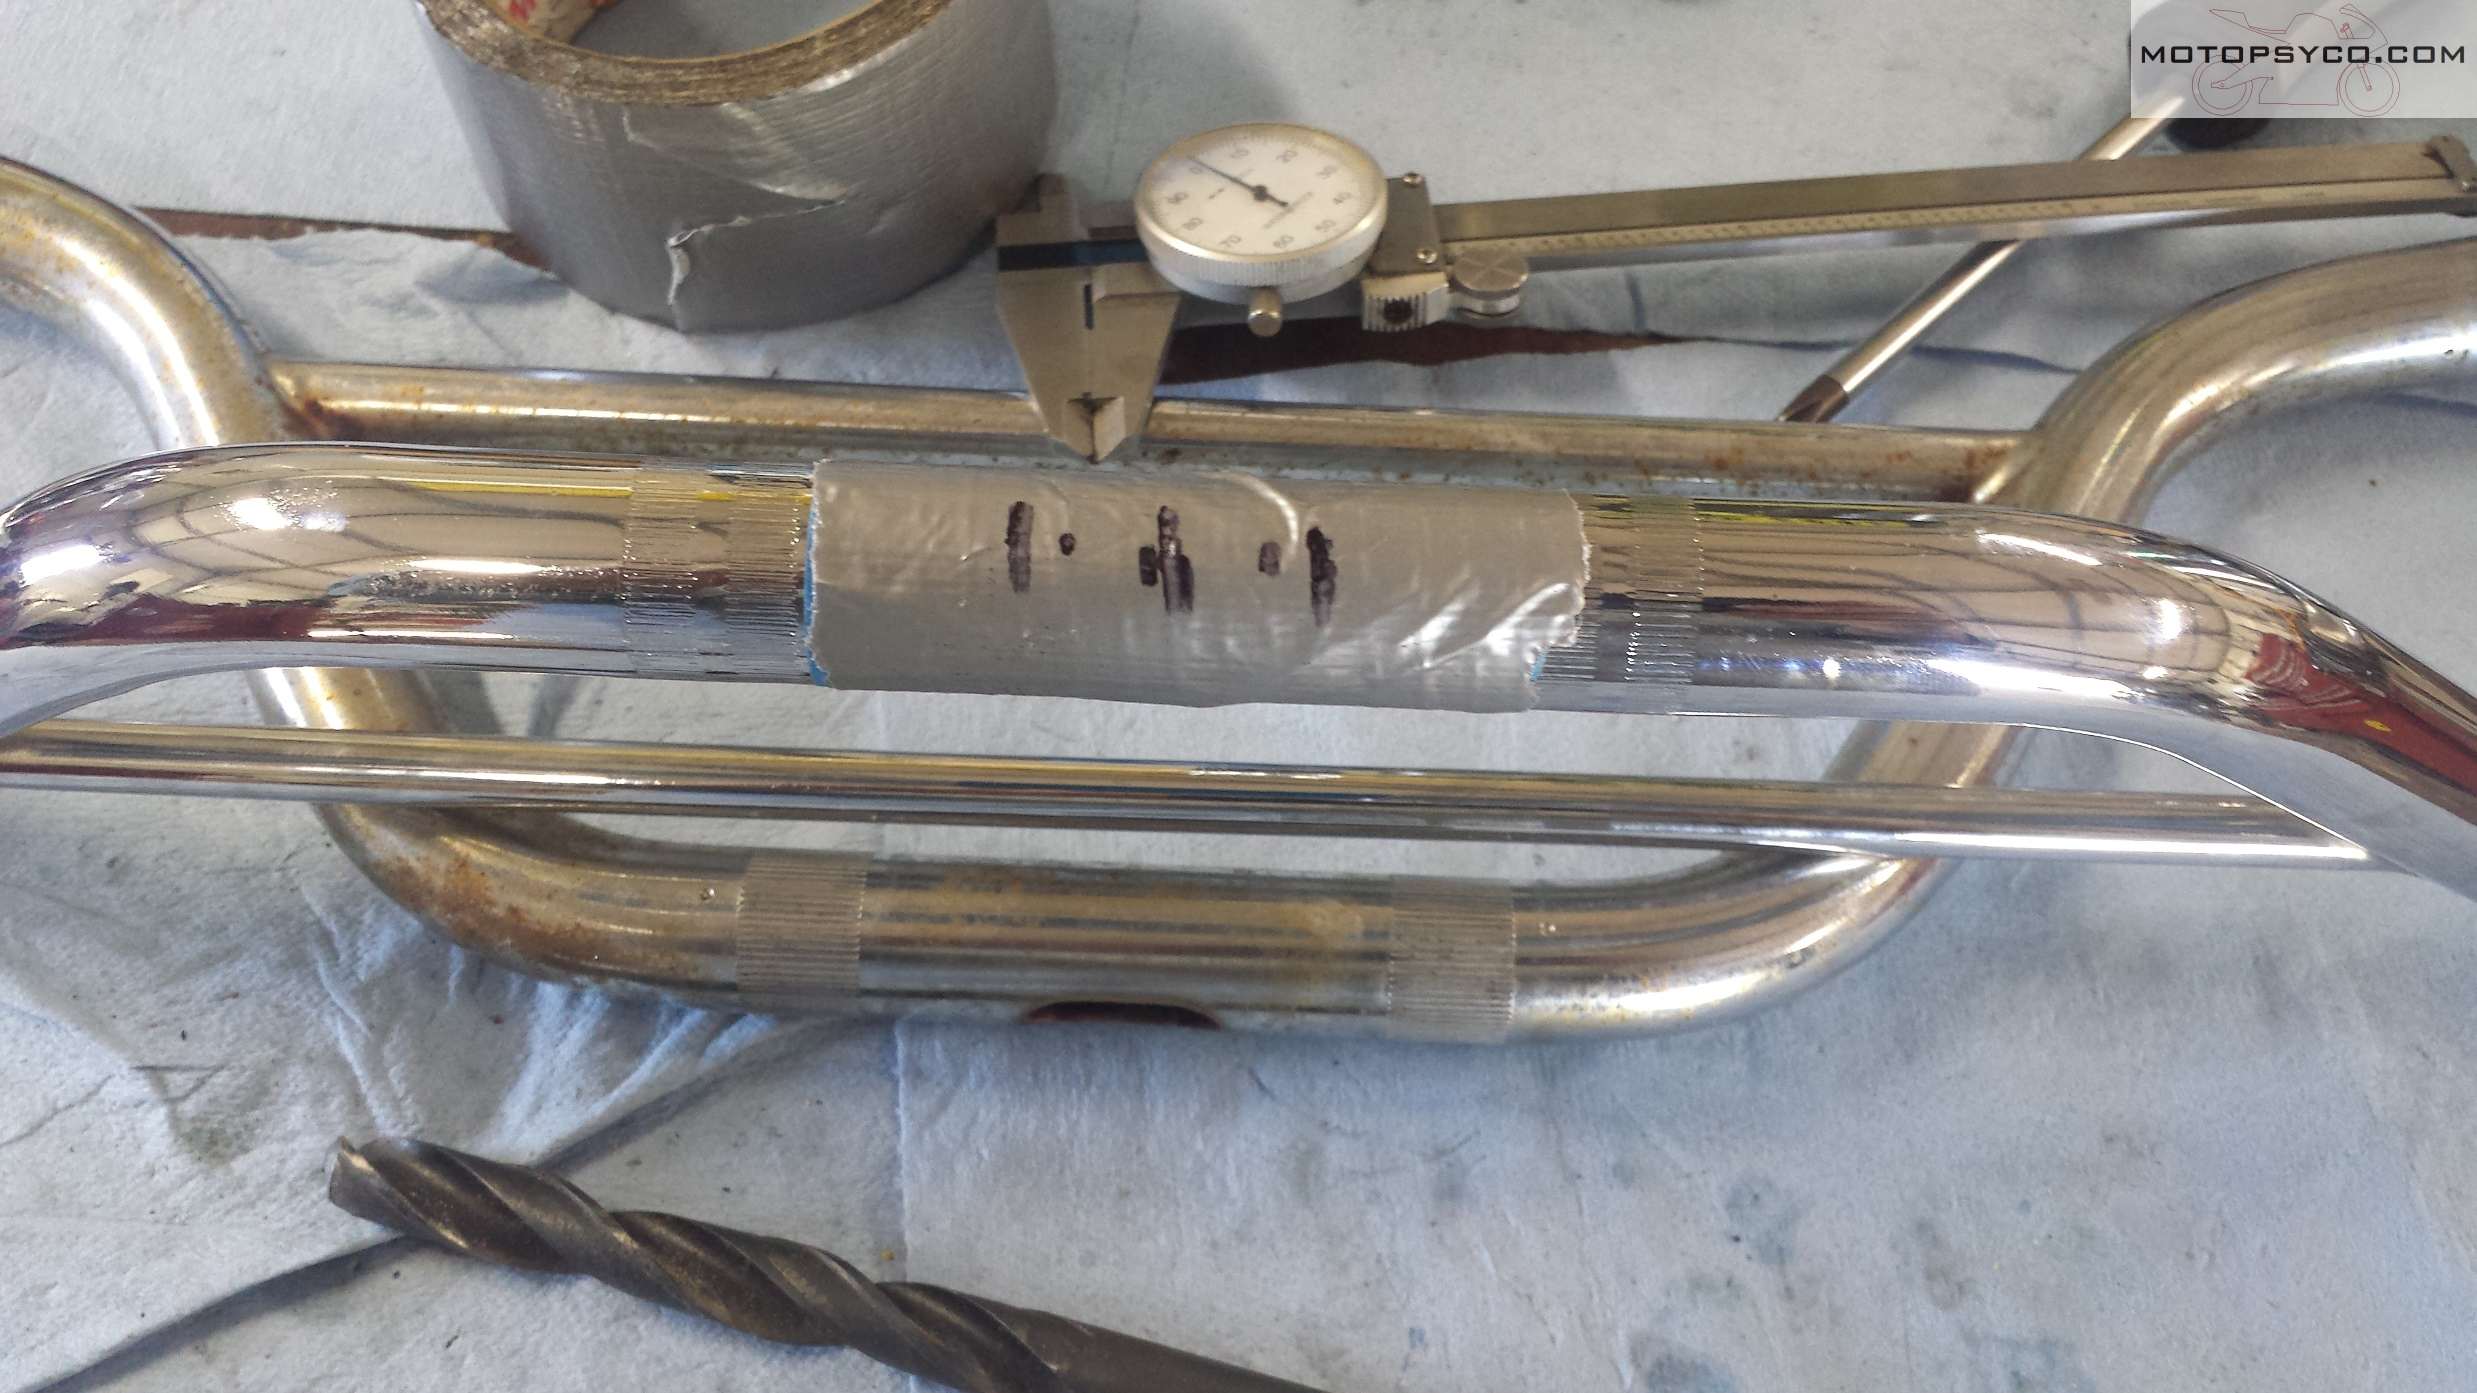
I like to put a couple of layers or masking tape & duct tape on the areas to be slotted out. This does two things, it makes marking the hole & slot locations easier and protects the handlebar from inadvertent tool marks while you are cutting & grinding the slots.

After you get it all laid out & are certain of where you need to drill be sure you use a center punch, otherwise it is nearly impossible to drill a hole straight into a piece of round tubing. For the slots drill a hole of the correct size at each end of the slot & then use a rotary tool or a die grinder with a cut off wheel to cut out the center section. Once that has been done put a small grinding stone or sanding drum on your tool to finish shaping and smoothing the slot. Don’t remove the tape until this step is complete.

Now it’s time to remove the tape, clean up the tape residue & get all of the shavings out of the handlebar. Grab a small file that will fit into your cut outs and go over them one more time to be sure that all burrs & sharp edges that could damage the wires are removed.
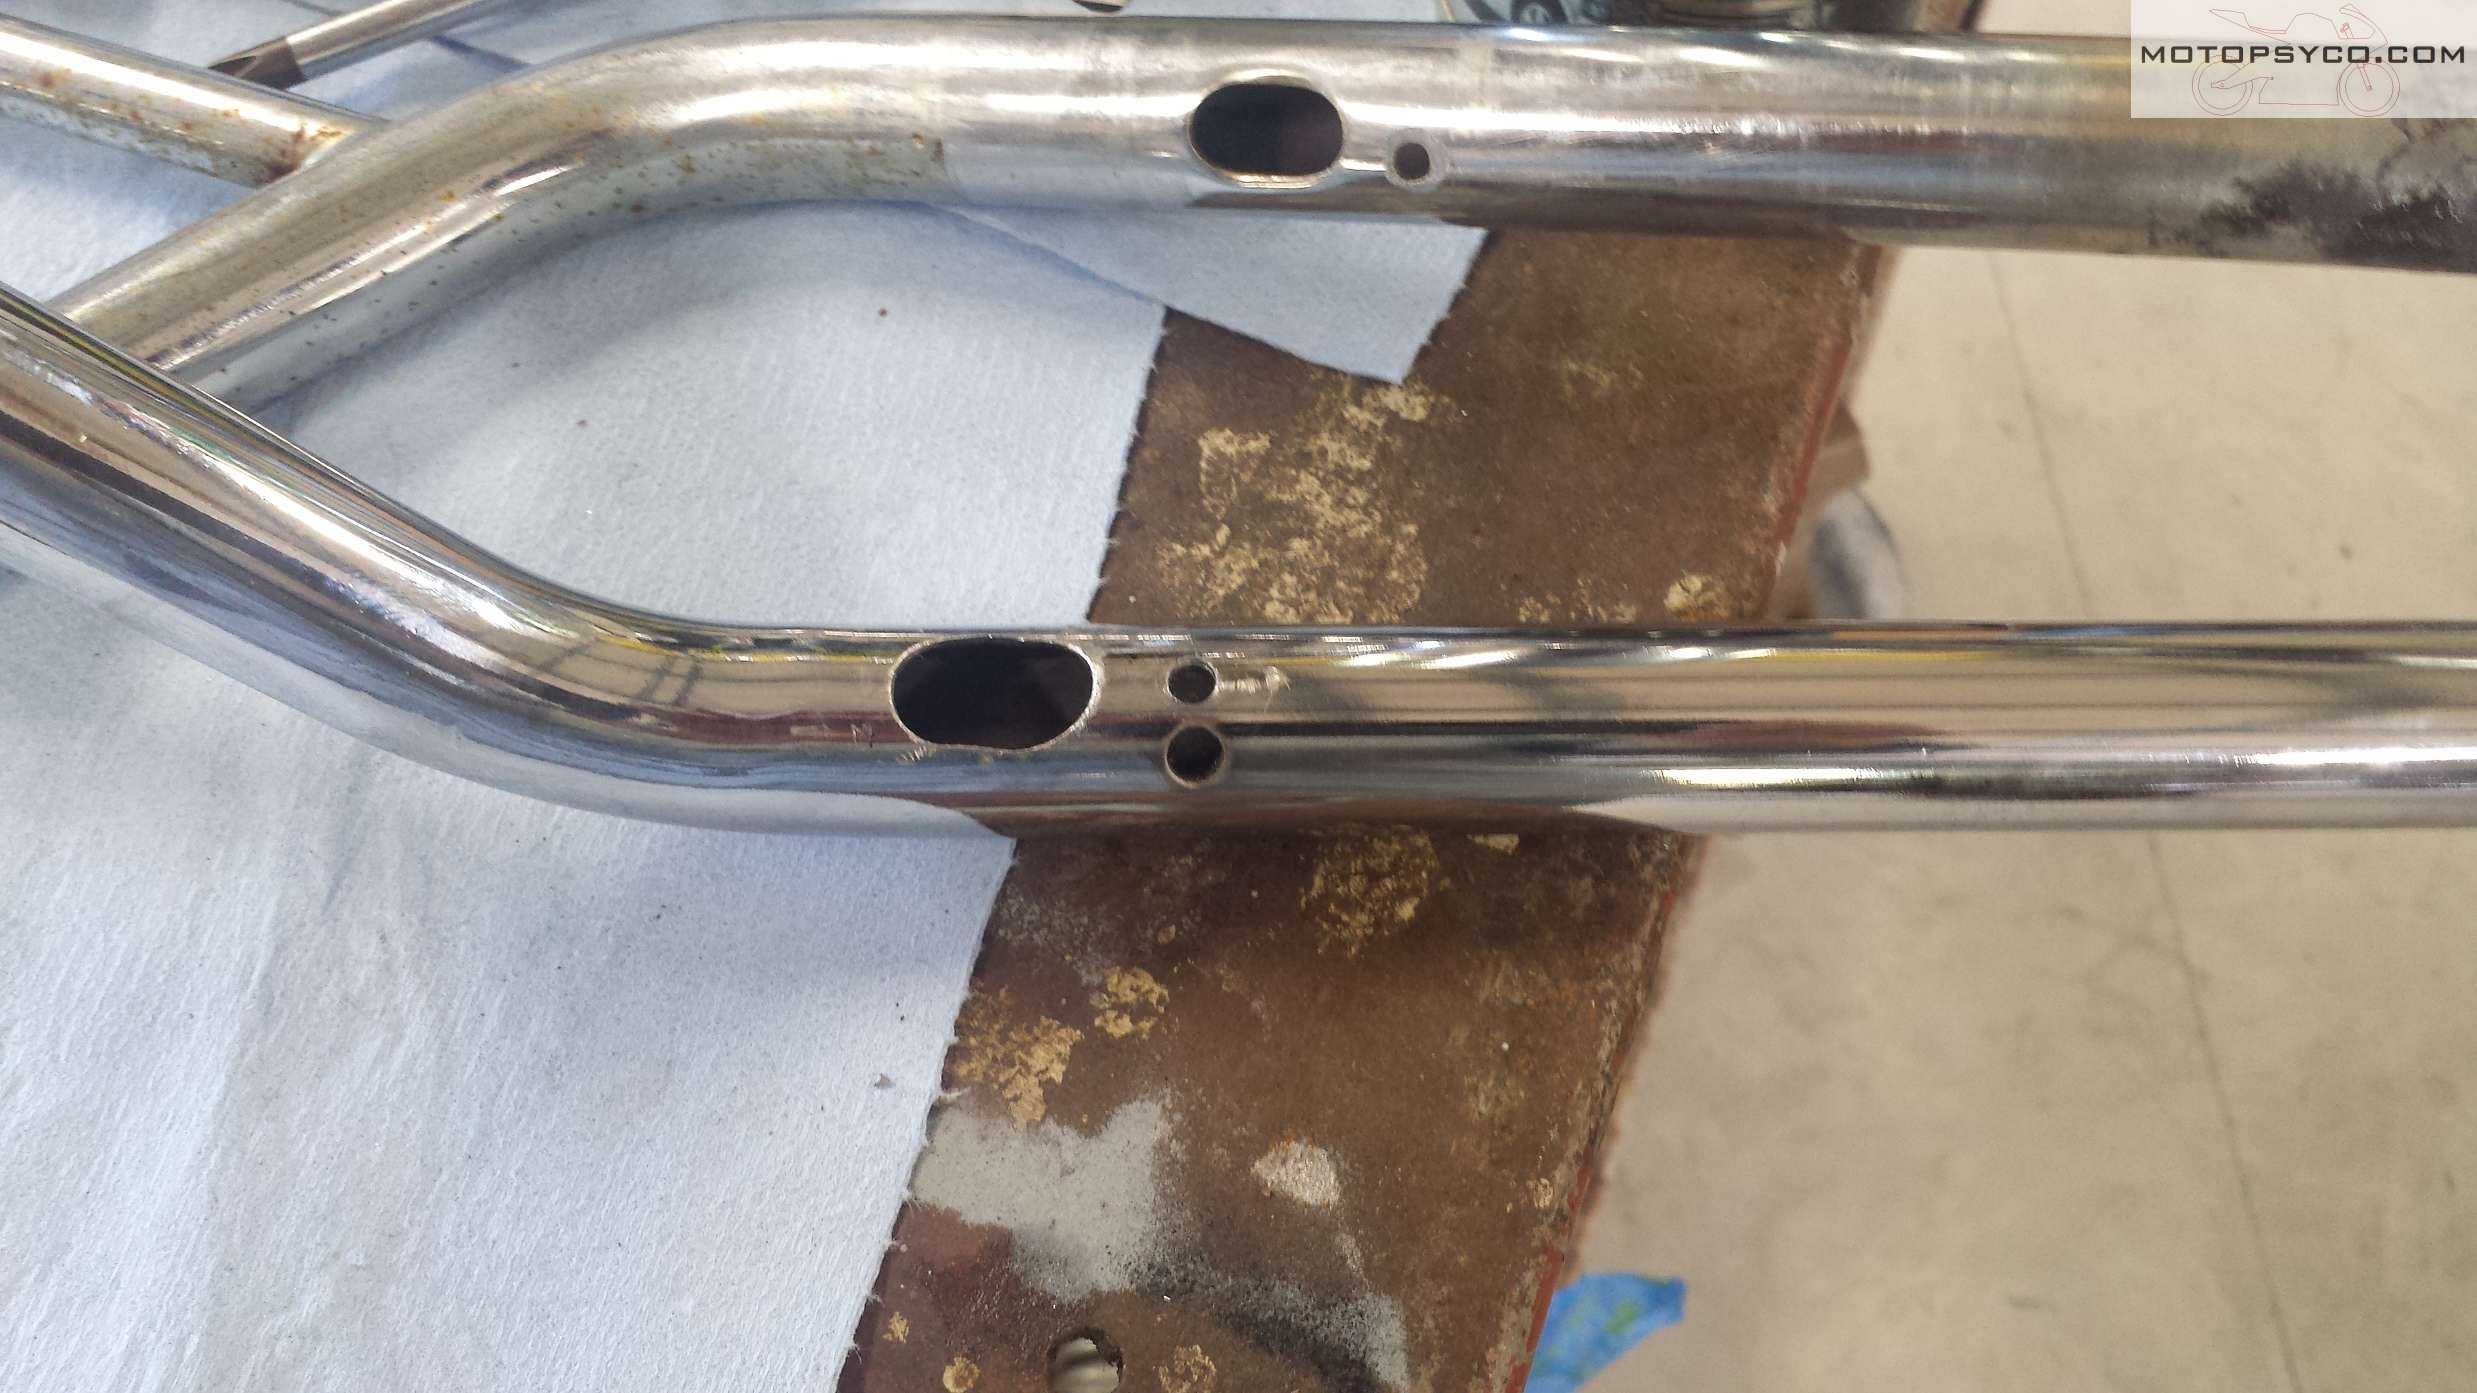
In these next two pictures you can see how I slotted & drilled the left and right ends of the bars.

Before you pull the wiring through, if you have one piece clutch & brake lever perches be sure to put them back on first. I like to put a piece of string through the bars & tape the wire to it as it is much easier to feed the wiring through if you pull it and push it at the same time. Nonabrasive hand cleaner makes a great lubricant for pulling a thick bundle of wires through a small tube with multiple bends in it. The hand cleaner wipes off easily when you get done.

Once you have it a done, reinstall the bars on your bike and admire your handiwork for a minute or two before you get back to work on the rest of your build. If you have ever thought about drilling handlebars for wiring now you have an idea of what is involved. Just work slowly and carefully so that when you finish it will be a job that you’re proud to say, “I did that myself.”

Share this:

2nd Annual Rails & Roads Show Results!
Now that the 2nd Annual Rails & Roads Show is in the history books it’s time for me to let those of you who weren’t able to make it or stay to the end what happened.

Last year we didn’t have any Kawasaki motorcycles at all but this year Team Green was well represented by some fantastic machinery including an H1R road racer
First I’d like to thank everyone who came out & brought a bike. Second I’d like to thank our generous sponsors & door prize donors;
1. The Motorcycle Law Group
2. Carolina Honda
3. T&T Distributing
4. Grainger
5. Bryan Bentley (Swamp Fox Motorcycle Restoration)
Over 300 people cast ballots for their favorite motorcycles in each category this time. Thank to all of you as well. Some of you may have noticed that on show day I was a little bit sick as I’m suffering from a sinus infection that made speaking and thinking difficult so I apologize if I made a mistake or 2 . Without any further ado let’s get to the results of this years show.

Class 1; American
In the right of the photo above is our third place winner, the 1989 Harley Davidson FLHTCU of Glenn Black. On the left side of the photo is the Second place winning 1977 Harley Davidson XLCR owned by Keith Seymour. First place went to the stunning red 1952 Harley Davidson K model that belonged to Carl Senne shown in the center above. Unfortunately no Indians ,Popes or Excelsior Hendersons made the show this year.

Class 2; British/European
Last year this class had a good mix of iron from across the pond, but this year only 1 Moto Guzzi showed up to stave off the British domination of the class. Third went to Ben Doar’s 1966 BSA Thunderbolt. In second place was the 1969 BSA Thunderbolt of Scott & Robin Dials. First place went to the bike featured above, an immaculate 1928 BSA Sloper owned by Robin & Scott Dials.

Class 3; Japanese 1-200cc
This tends to be my favorite class probably because I own at least 4 or 5 small displacement machines. Third place went to Gene Morgan and his 1983 Yamaha MX100. Everybody loves a Honda CT70 and Dan Mcqueen took 2nd place with his very nice 1973. First place went to bike pictured above, the exquisitely restored 1965 Honda CB160 belonging to Bryan Bently

Class 4; Japanese 201-600cc
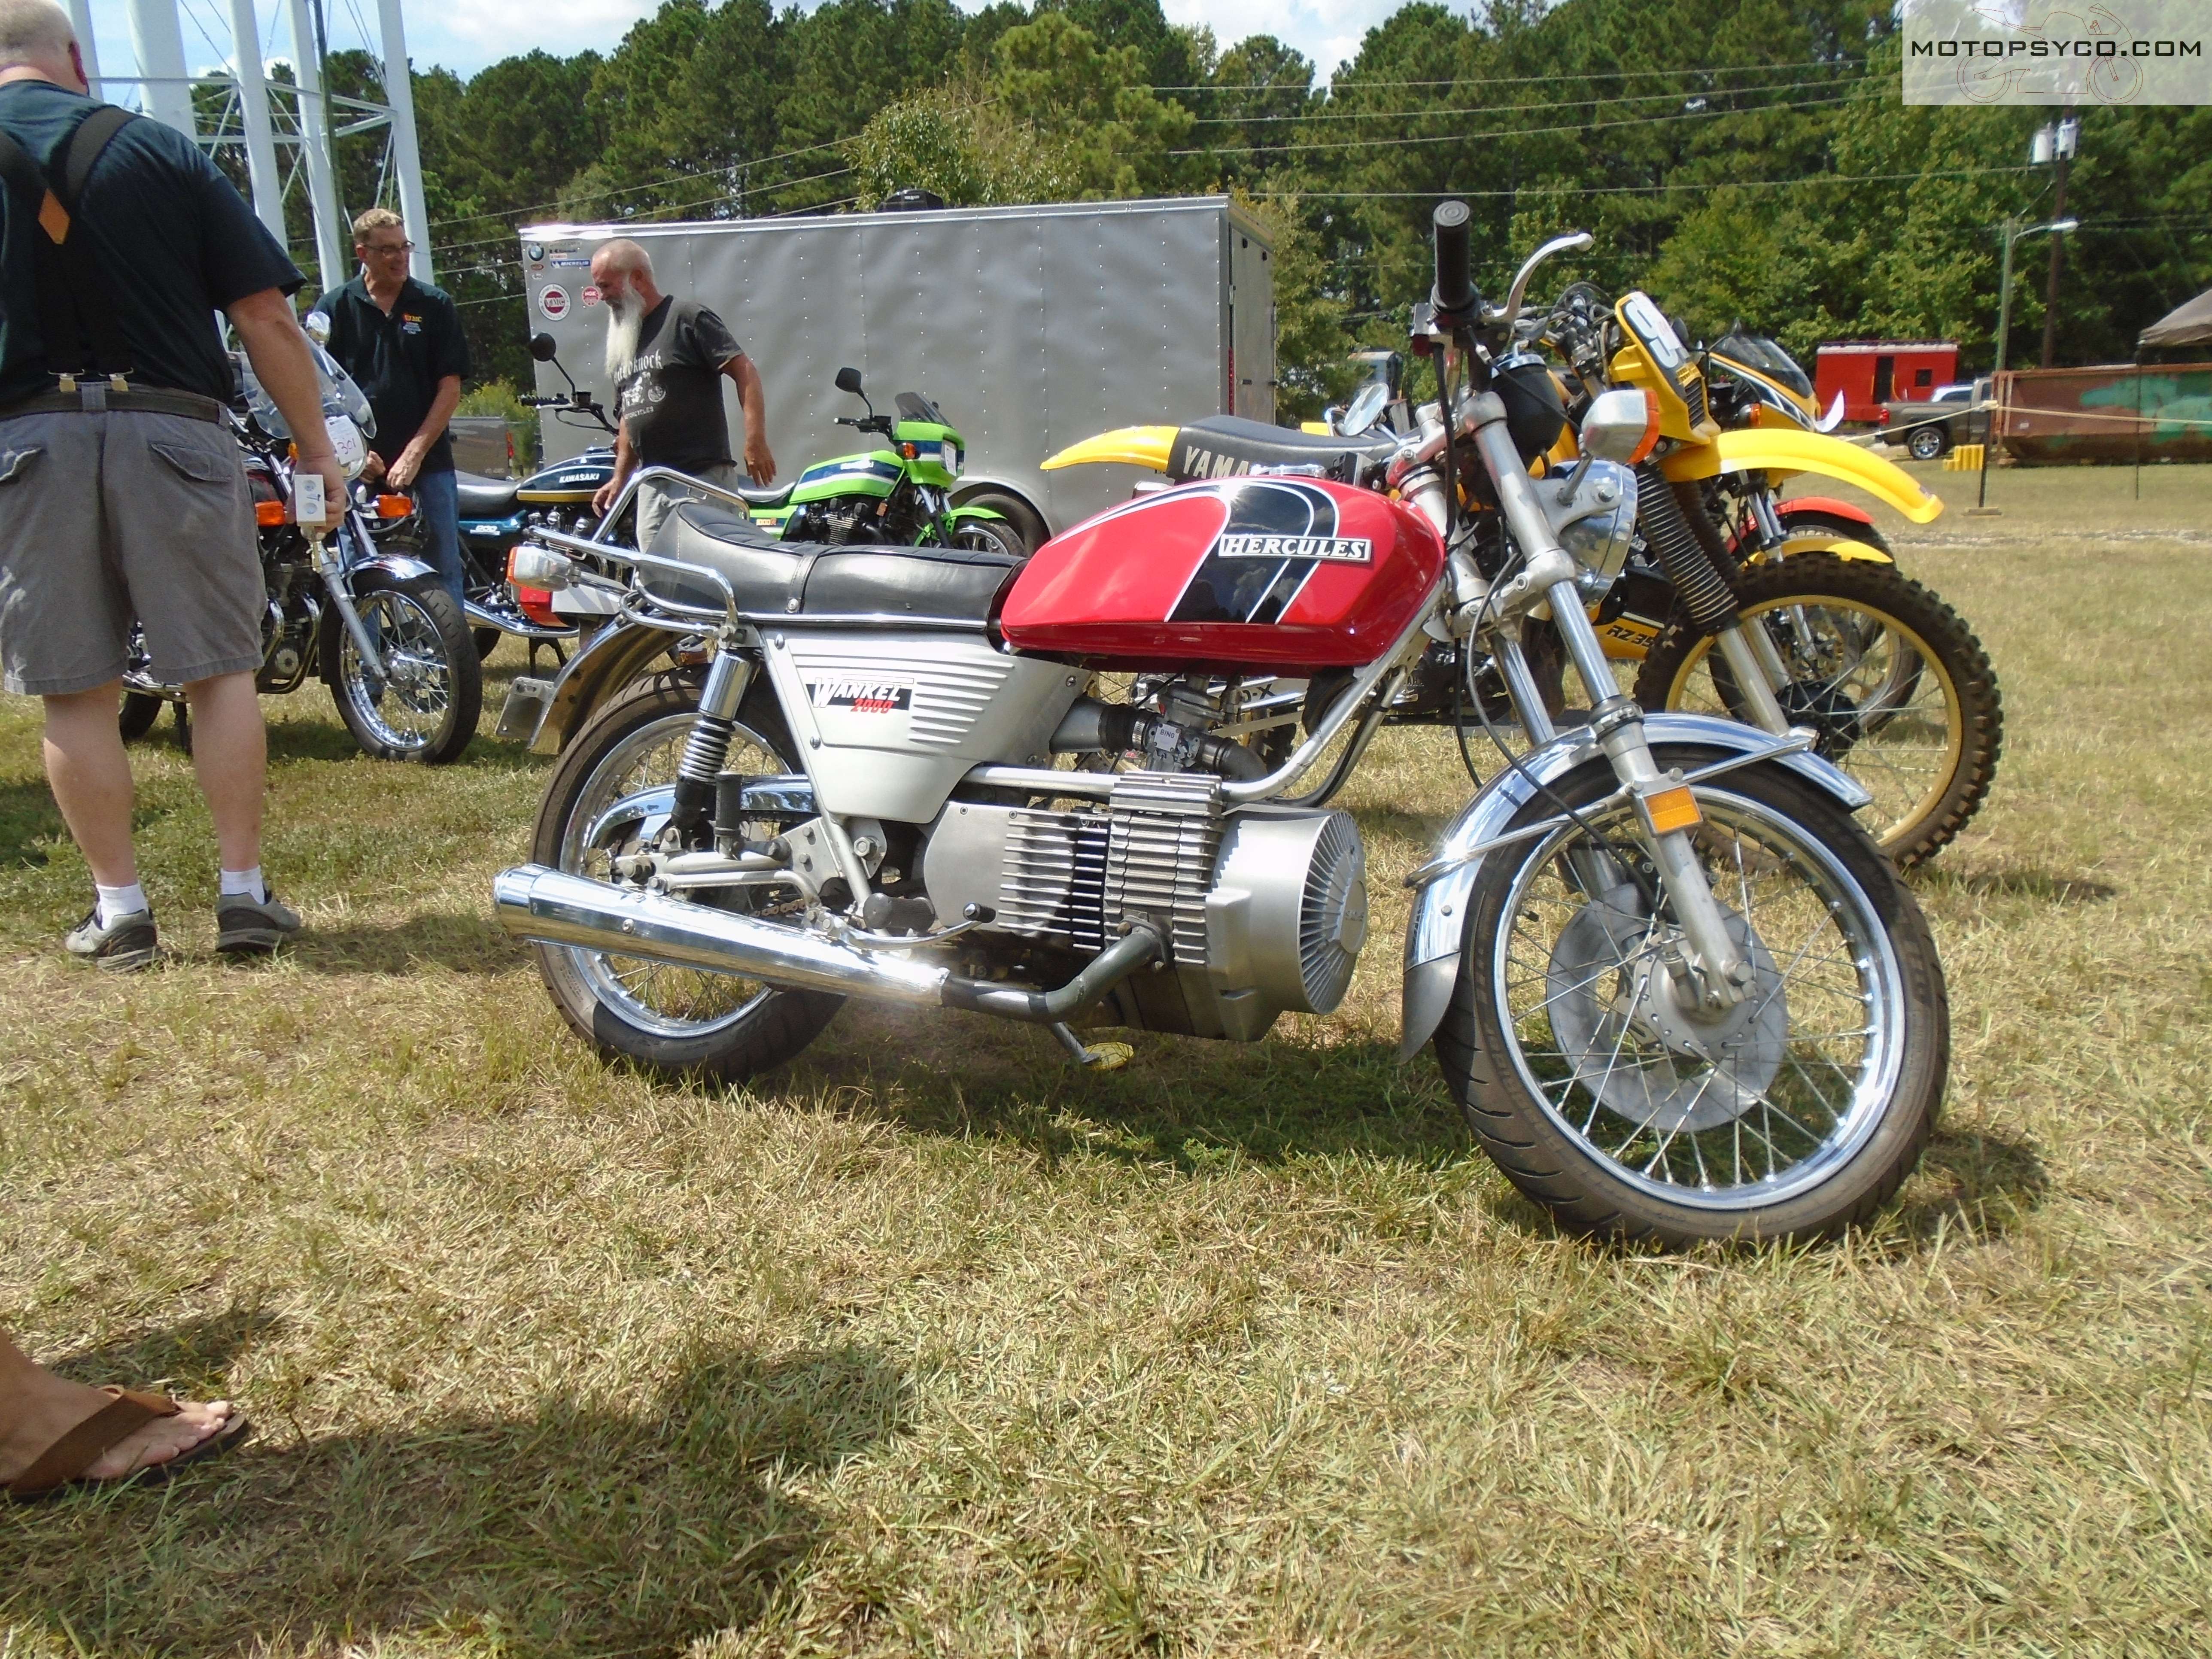
Folks I have a confession to make, I really screwed up this class & that’s why you see 2 pictures above. It was hot that day, and if you were there you know that I was sick but there really was no one that I could hand my responsibilities off to. A serious clerical error was made while I was in a fog of antihistamines & borderline heat stroke. I was so excited to see the Hercules & it’s Wankel engine that when I asked the displacement the owner said it was 300cc, so my fevered brain stuck it into the Japanese medium size class. Hercules is an orphan brand but it’s a German brand not Japanese. Even so the results of the voting will stand & I’m not going to change a thing, just wanted you to know how a German built motorcycle wound up winning a Japanese class. My apologies to anyone who is upset with me & I shall endeavor to do a better job in the future.
At any rate class 4 finished up like this third place went to the fantastic Kawasaki H1 of Chip Tucker. In second place was the fantastic 1971 Kawasaki H1 of Mike Mcsween, (see above) In first place was the 1975 Hercules of Ryan McKeitham

Class 5; Japanese 601cc & up
These are the big boys, and there were some truly heavy hitters at the Rails & Roads Show this year. No Kawasakis were present last year but this year they made up for it with a vengeance.
3rd place in this class went to Kent Mangold’s 1979 CB750. 2nd place went to Chip Tucker and his gorgeous 1975 Kawasaki Z1B. Chip also took home the first place trophy with his 1983 Kawasaki KZ1000 Eddie Lawson Replica.

Class 6; The Motorcycle Freak Show
Open to any truly custom motorcycle from anywhere this years class had winners from 3 different countries. From China was the Hardknock Kikker of Mike Krenger in 3rd place. From England came the 1969 Triumph TR6 of Steve Pope and the 1st place trophy went to well done Bratstyle 1972 Honda CB350 owned by Dave Mims
Last years best of show winner was a highly customized Honda but this year it went to the beautiful old 1928 BSA that won the British /European class. I’d like to thank the Dials for bringing it to the Rails & Roads Show, and we hope to see you again next year.

Let’s not forget the important part, we were able to present the South Carolina Railroad Museum with $501 in donations to go towards their operational expenses. And we are making plans for 2019 but are planning to move the event a little deeper into the fall to hopefully avoid the scorching hot temperatures next year.

Restoration in progress at the SC Railroad Museum
Share this:

1st Annual Rails & Roads Motorcycle Show
The 2017 Rails & Roads Motorcycle Show was held yesterday and here are the results.
Before I dive into the numbers and pictures let me say thanks to all that came out to support the show, and to Tom McGrath’s Motorcycle Law Group who provided the trophies for the show.

I’d also like to acknowledge those who provided swag & door prizes, especially Carolina Honda in Columbia S.C. for the helmet & gloves that they provided. Thank you so much.

Rails & Roads Motorcycle Shoe door prizes
We gave out awards in 5 classes. We had trophies for 7 but no one with Kawasaki or a Suzuki showed up ( I guess they were afraid of all the Hondas ). Even so we still had at least 25 or 30 bikes in the show itself. All voting was done strictly by people choice and here are the results;

1st place American
Class 1 American
2nd place went to a gentleman named Tony (last name escapes me) and his beautiful ’96 Harley Davidson Road King.
1st place went to Mark Fisher who brought out his wonderful 1947 Indian Chief pictured above.

1st Place in the European/British Class
Class 2 European/British
3rd place went to Daniel Horn with his original unrestored ’72 BSA Victor 250
2nd place went to Doug Parker & the very nice 77 Moto Guzzi Convertible that he rode to the show.
1st place went to Mark Fisher and the absolutely stunning 1952 Vincent Black Shadow shown at the beginning of this section.

1st Place Winner Honda.
Class 3 Honda This was the largest class with machinery ranging from 1964 all the way up to 1989.
3rd place went to Bryan Bentley and his 1964 C102 Cub.
2nd place went to Todd Brown & his wicked looking ’80 CB750SS Cafe Racer.
1st place went to Donald Wiseman & the well restored ’73 CL350 shown above.
1st Place Winner Yamaha
Class 6 Yamaha
3rd place went to Tony Berry and his 1979 XS1100
2nd place went to Bryan Bentley and his little 2 stroke 1969 Y5
1st place went to Donald Wiseman who brought his unrestored original 1973 TX500 in the image above.

1st Place winner in the Freak Show
Class 7 The Freak Show; while mainly intended as a custom class it was also used as a catch-all class for orphaned Japanese makes as well.
2nd place went home with Mark Krengel & his Kikker 5150 Bobber
1st place was claimed by Jerry Cole who brought the fantastic little bike in the above picture a 1972 Hodaka Wombat 125.
Best of the Rails & Roads Motorcycle Show
The voting for this trophy was a tight race between two black motorcycles. My gut instinct told me that just like in the ’50s the only thing that would beat a Vincent was another Vincent. But when all the votes were counted Best of Show went to the stunning 1980 Honda CB750SS of Todd Brown. Featuring an upside down fork & other serious upgrades, including custom wire wheels (Honda’s funky old Comstars are stock on these bikes) it was a truly tasty custom. The best part of all? He rode it to the show and it sounds as good as it looks.

Best Of Show 2017!
We’re really happy to report that we were able to raise $175 dollars that was donated to the S.C. Railroad Museum to help with the upkeep of the museum and its rolling stock.
We made a few missteps, adapted on the fly, learned some lessons and we plan to return to Winnsboro S.C. next year with an even bigger better Rails & Roads Motorcycle Show presented by the VJMC of The Carolinas.

