Well I finished The Honda SL100K2. It looks really good and I’m very happy with the way all the cosmetics turned out. It really did wind up making me work much harder that I really wanted too but I wound up with a brand new looking old motorcycle that would start on the first kick.
<The Honda SL100K2 of 1972>
It fought me all the way to the bitter end, I thought I had it running perfectly but then the very last part that I had not replaced yet crapped out on me. The original stator worked well at first but after I let the bike sit for a month or two between the VJMC National Rally and the Vintage Honda Rally at the Copperhead Motorcycle Lodge it quit on me and killed the battery.
<the Honda SL100K2 of 1972>
First I tried a reproduction stator from eBay but the wiring colors didn’t match and the appearance of the wiring plug and sheathing didn’t match the original so I put it on the shelf and ordered a N.O.S. replacement from David Silver Spares & put on it. If anyone in the Continental U.S. would like to buy the reproduction stator from me, I’ll take $50 shipped just to get rid of it.
In the end I accomplished my goal to perform an award winning restoration from one of the biggest turds to ever come into my workshop. This little Honda SL100K2 picked up an Award of Merit at the 2019 VJMC National Rally and another at the 2019 Vintage Honda Rally.
<award wing restored Honda SL100K2>
What’s next for this little machine? Well that’s up to the new owner as I sold it during the Barber Vintage Motorsports Festival in October of 2019. I’ve got several new projects in the works and needed some money for them. So keep your eyes open for the next Motopsycho project bike.
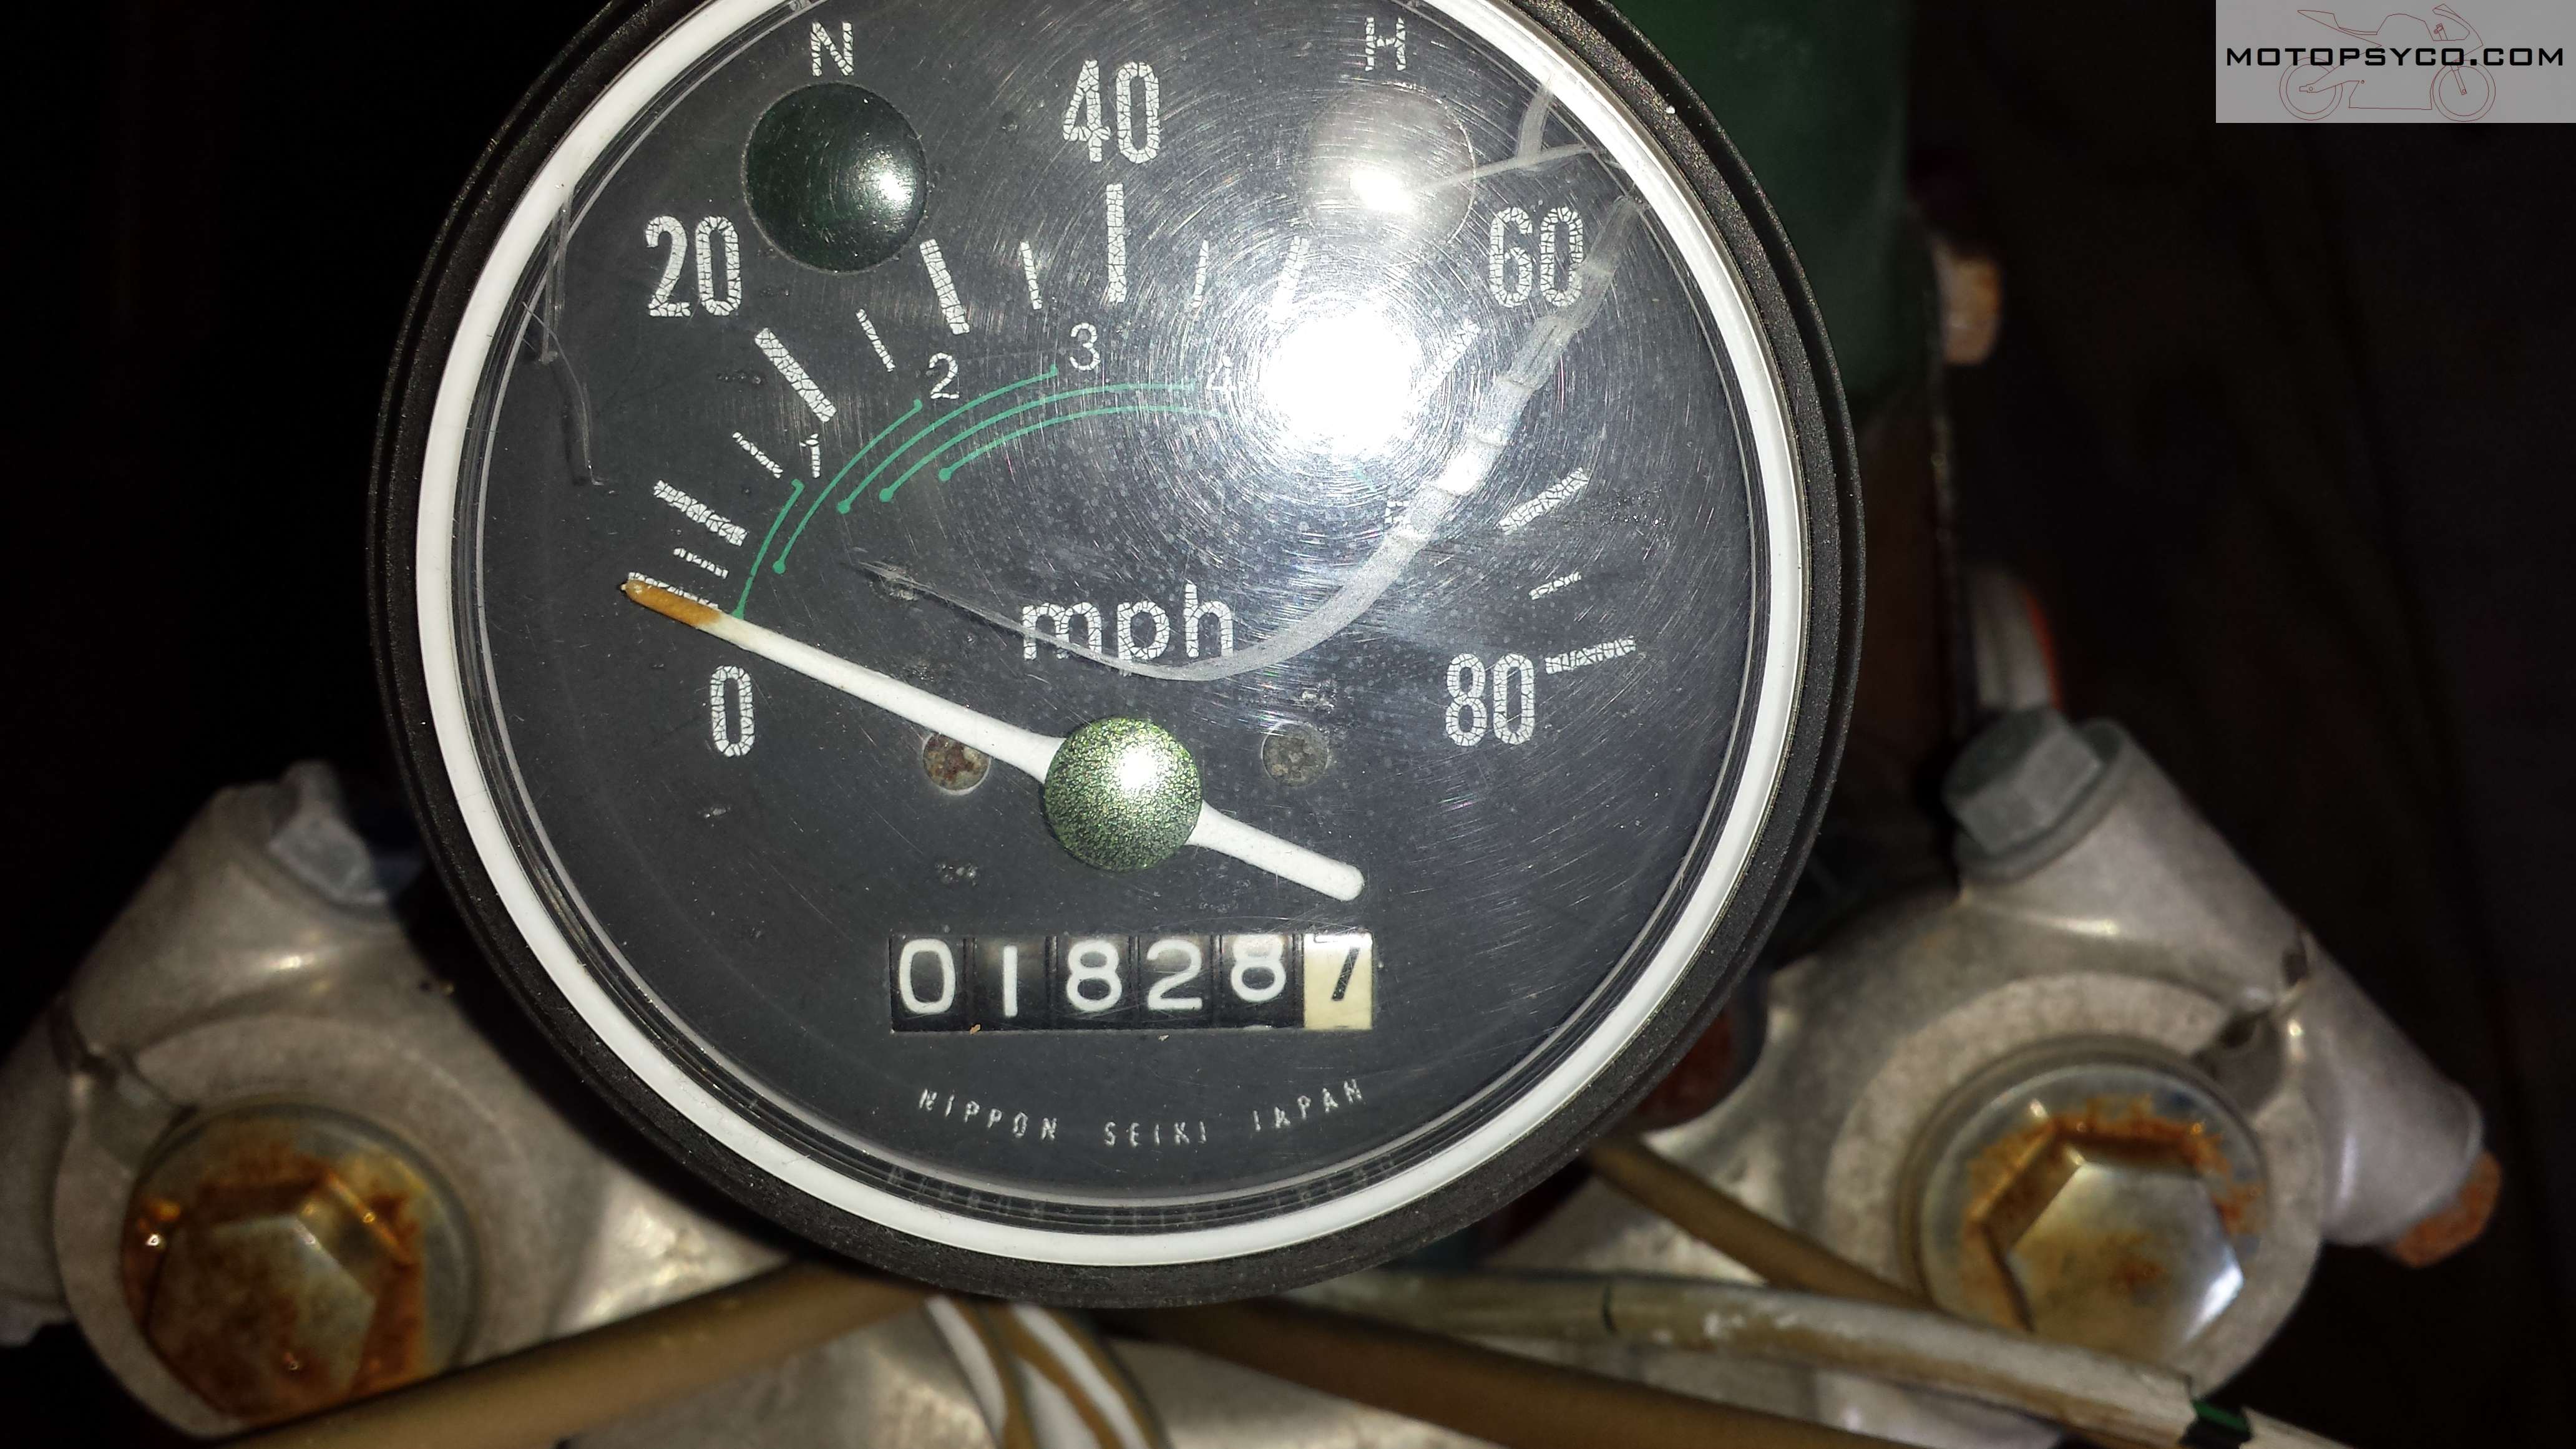
We’ve all seen it before, maybe even on our own bikes, beautiful paint, shiny new chrome, highly polished aluminum and dull faded out hazy looking gauges. Granted for custom bikes it’s pretty easy just to swap in a new speedometer, heck it might even be cheaper than fixing your original. I decided to perform this speedometer restoration for 2 reasons; to keep the original correct low odometer reading on this bike and I had never attempted speedometer restoration before and really wanted to try it. Sure I did make a couple of mistakes along the way but overall I am very pleased with the results. Next time I do this it’ll be even better.
Disassembly
On some instruments the bezel that surrounds the face and mechanism is crimped to the base with a metal ring that has to be carefully removed & re installed to access the inside of the gauge. On this little Honda the bezel was a one piece plastic part that appeared to have been either over-molded onto or permanently glued around the base of the mechanism. The first step after removing the chrome trim on the bottom is to cut away the plastic that is folded over the metal part of the gauge. Cut it all the way around so that you can carefully pull the gauge straight out of the housing. Initially I just tried cutting it part of the way around thinking that it would make it easier to re-seal when I put it back together, big mistake as I bent the thin aluminum gauge face when I tried to pull it out and had to carefully straighten it out. Slice it loose all the way around pull the gauge straight out so you don’t damage it.
After getting it apart, carefully grasp the needle where
it’s attached to the shaft & pull it straight up and off then set it aside
in a safe place. On this particular bike 2 screws held the face plate on to the
speedometer. There are also 2 tubes that the neutral & high beam lights
shine through that have little rubber boots that are glued to the back of the
face plate, cut these away carefully.
Cosmetic improvements
For some more popular motorcycles speedometer restoration is
easier because ready-made gauge faces are available for them, what I did for
this one was to visit my local screen printing & graphics shop and had them
scan the old face in and print me a new one on a vinyl decal that was stuck
into place over my dirty faded speedometer.
The extra one is for sale $18 shipped in North America.
Since the speedometer needle was very faded I gave it a
quick shot of white paint. After the white paint dried a little bit of red was
applied to the tip of the speedometer needle. One very important thing to
remember especially with magnetic drive speedometers & tachometers is that
too much paint will make the needle heavier causing it to be slower to respond
and affect the accuracy of the gauge. Use the absolute bare minimum of paint
necessary to make the needle look good again.
The clear plastic lens on this one was a little hazy &
had a lot of scratches on it so I spent about 15-20 minutes polishing it with
toothpaste & a damp paper towel. This removed the haze & a lot of the
scratches. It’s not perfect but it looks really good.
Reassembly
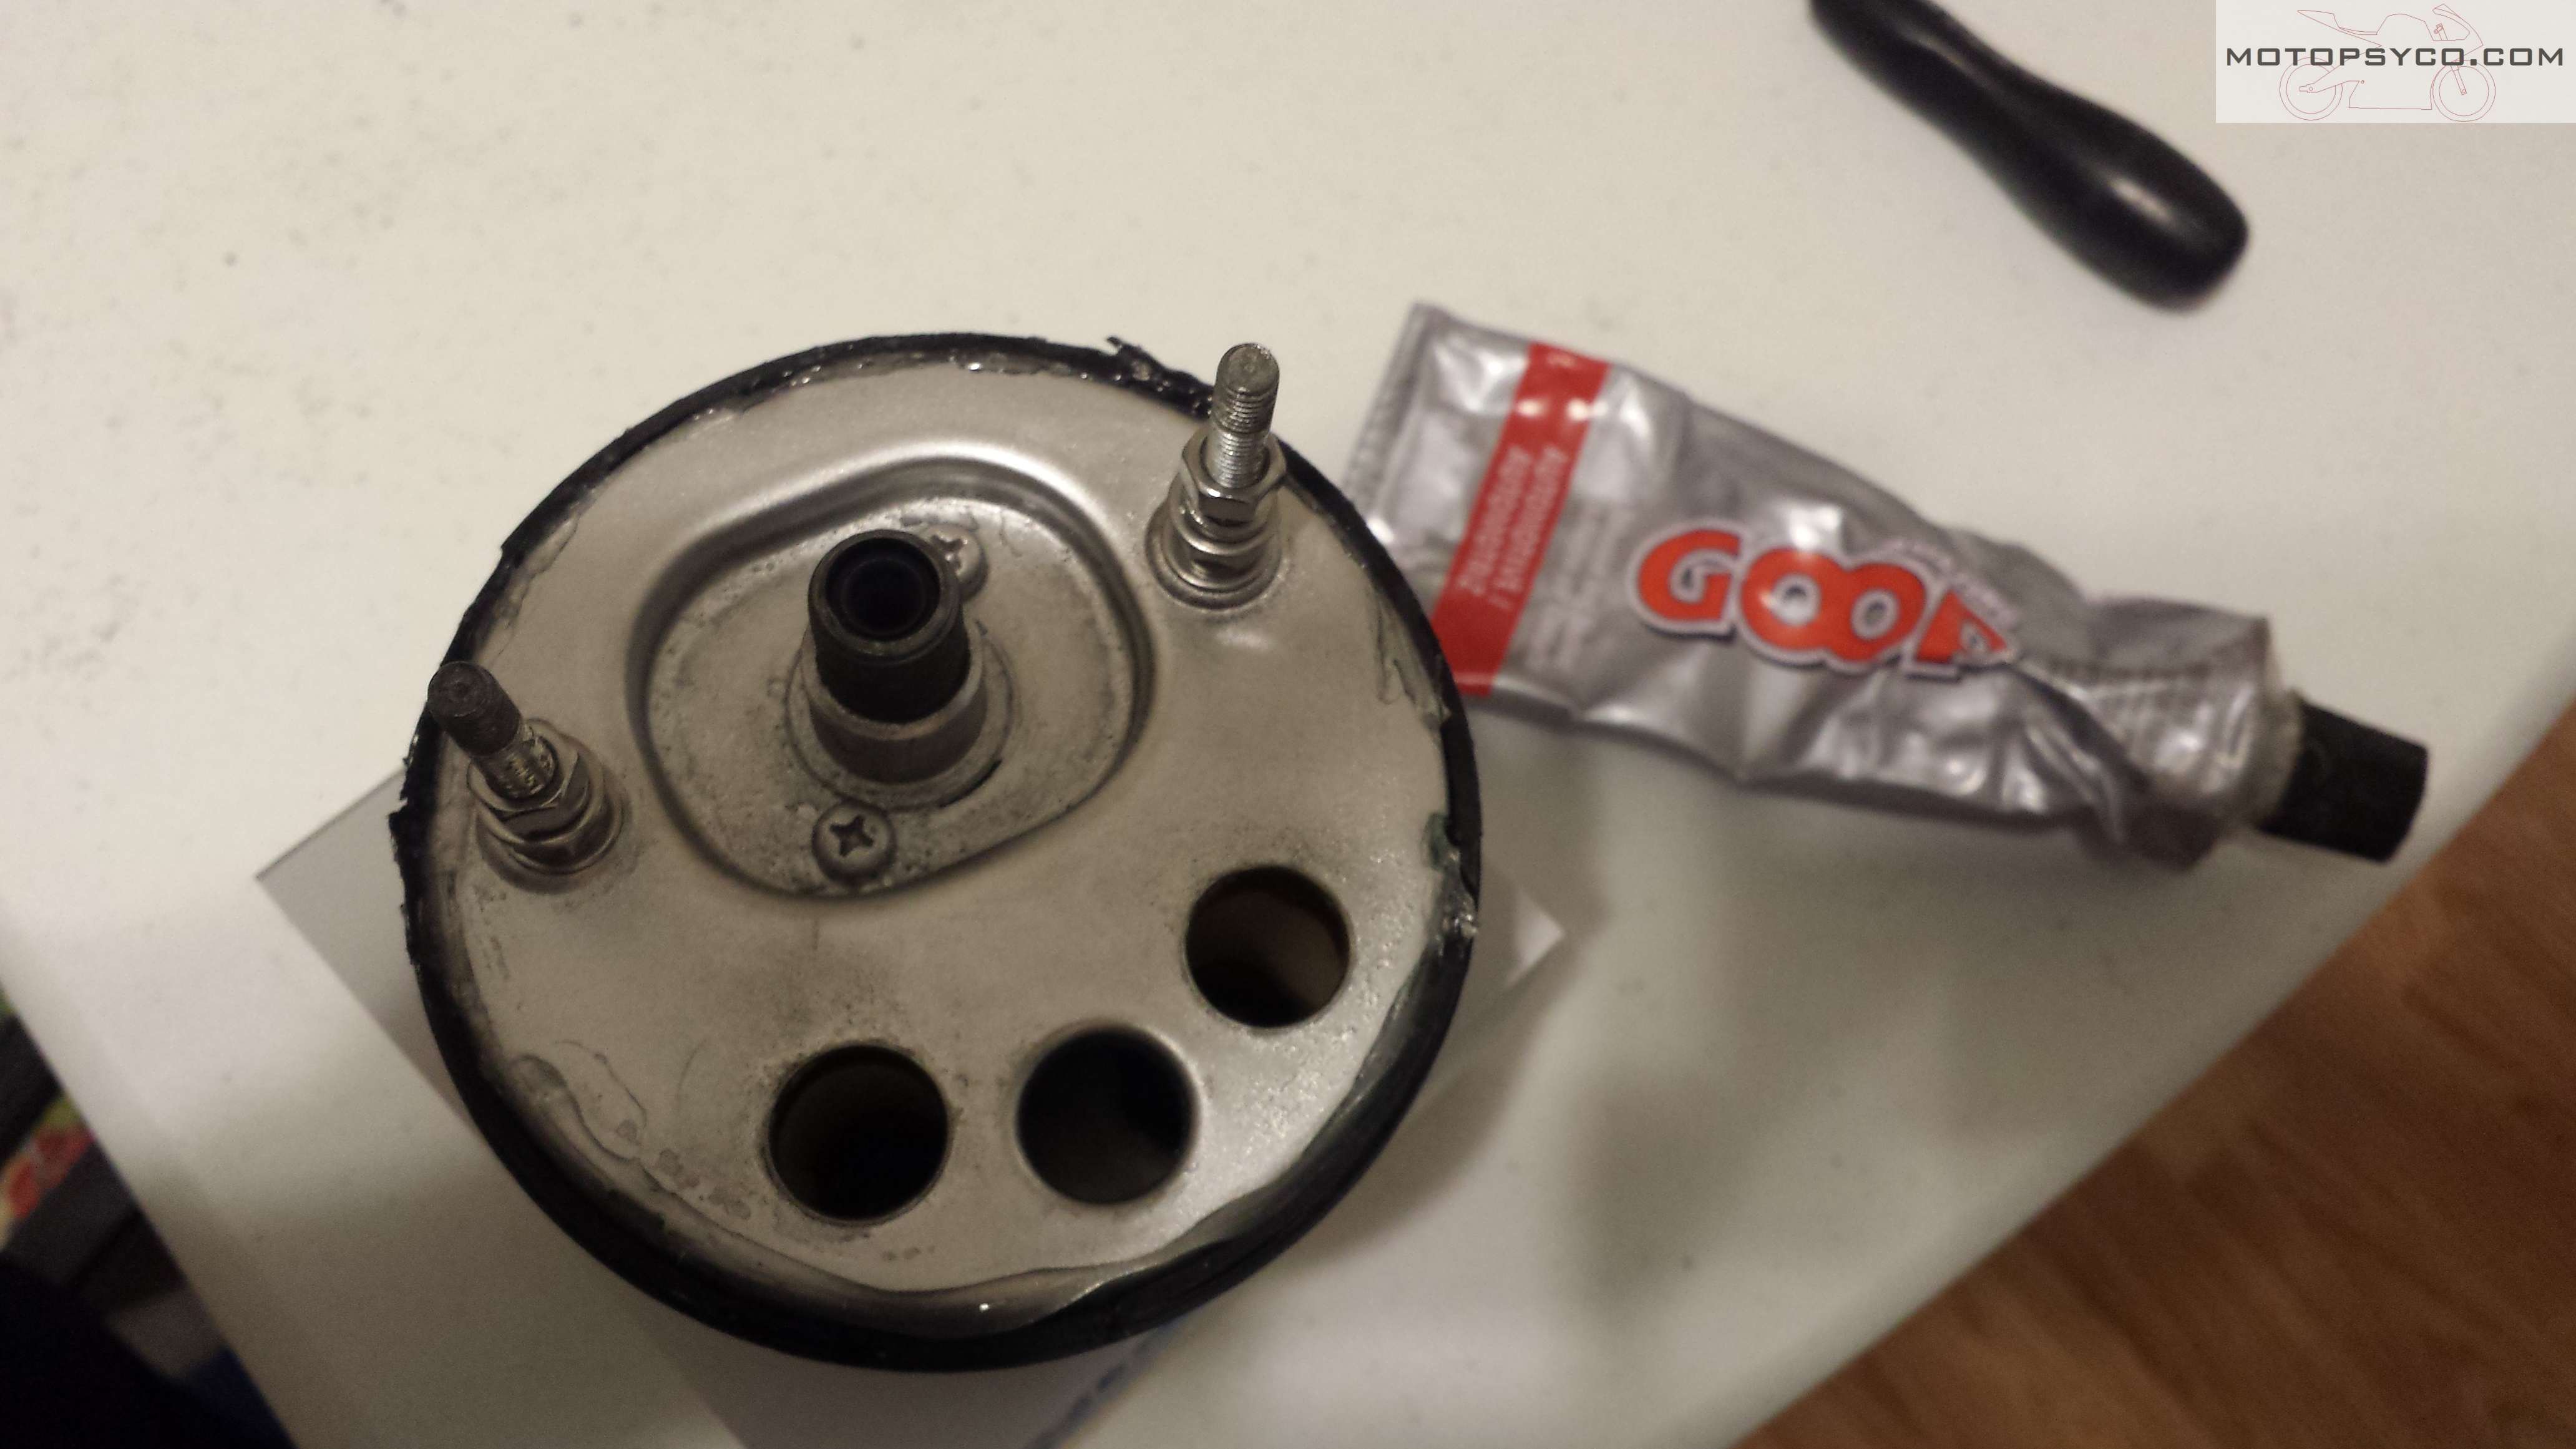
I assembled the face plate to the speedometer carefully lining up the light tubes to the back of their respective lenses sealing them in place with a small amount of my favorite adhesive/sealant, Automotive Goop. Since all of the existing nuts and washers were rusty they were replaced with new hardware at this time.
With a little careful work, on the third try I was able to
slide the speedometer needle back into place so that when viewed head on at
rest the needle indicated exactly zero miles per hour. Just use a little
patience and take your time when doing this and everything will be okay.
Next I made sure everything was as clean & dust free as possible inside & out and dropped the speedometer into the bezel. When I cut it loose I left enough plastic so that it snapped back into place. Then I took a good look at it and since I was satisfied with the way everything looked it was time to pull the gauge back out of the bezel just enough so that I could run a thick bead of the Goop adhesive all the way around it and then snap it back into place for good, then it was time to reinstall the chrome beauty ring on the bottom.
Conclusion
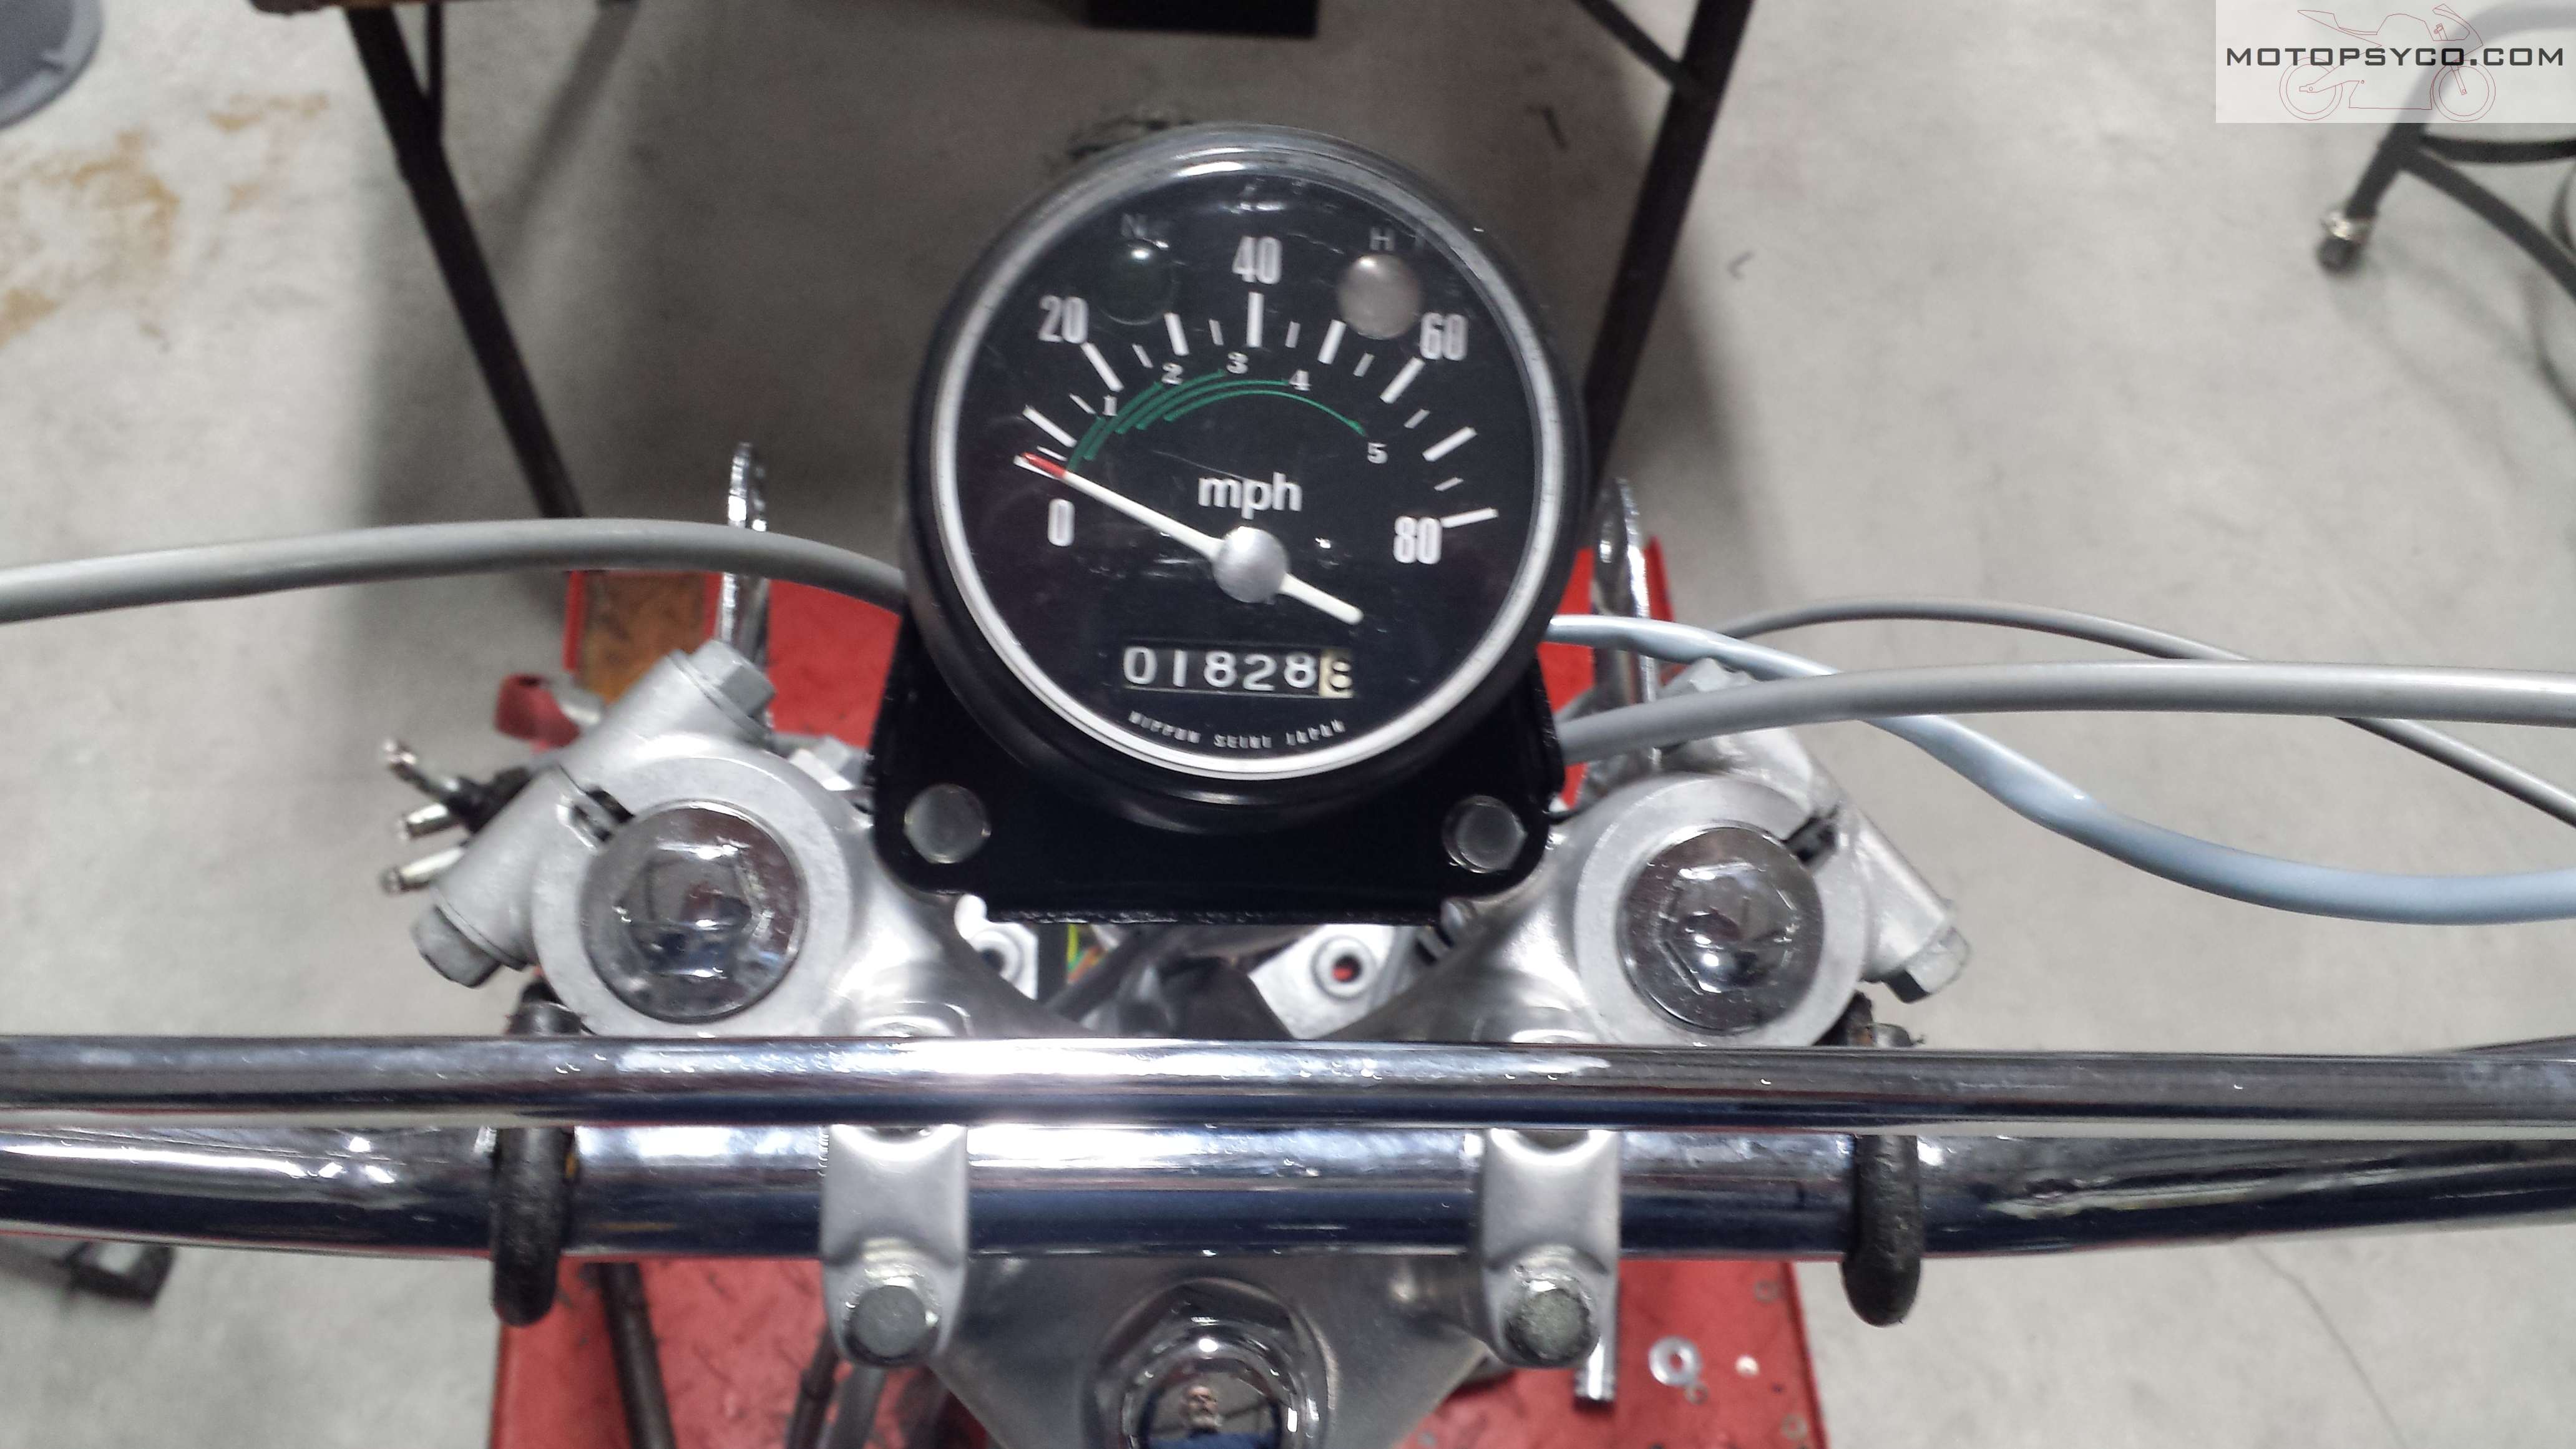
Here’s a picture of the finished assembly mounted on the
bike. Even if you never plan to do speedometer restoration yourself at least
you know how it can be done. There are a few specialist repair shops out there
that do nothing but repair & rebuild gauges. In fact if your gauges are
inoperable you should find one of them to do your repair & restoration for
you. If they’re just faded & ugly you can do them yourself as I’ve shown
here or you can send them to me and I’ll do it for you for a very reasonable
price.
A lot of old motorcycles like my old 1972 Honda SL100K2 have their switch gear wiring inside of the handlebars for a nice neat clean appearance. I was actually able to locate a couple of sets of genuine Honda new old stock handlebars but the cheapest set I saw was over $150. Plus a lot of the NOS parts I find tend to have some shelf wear or corrosion on them so I just went ahead & bought a set of nice new reproduction bars without the wiring holes for $50. So this post is going to be about drilling handlebars for wiring. Whether you are try to do an authentic restoration or a sleek custom the basic procedure is the same
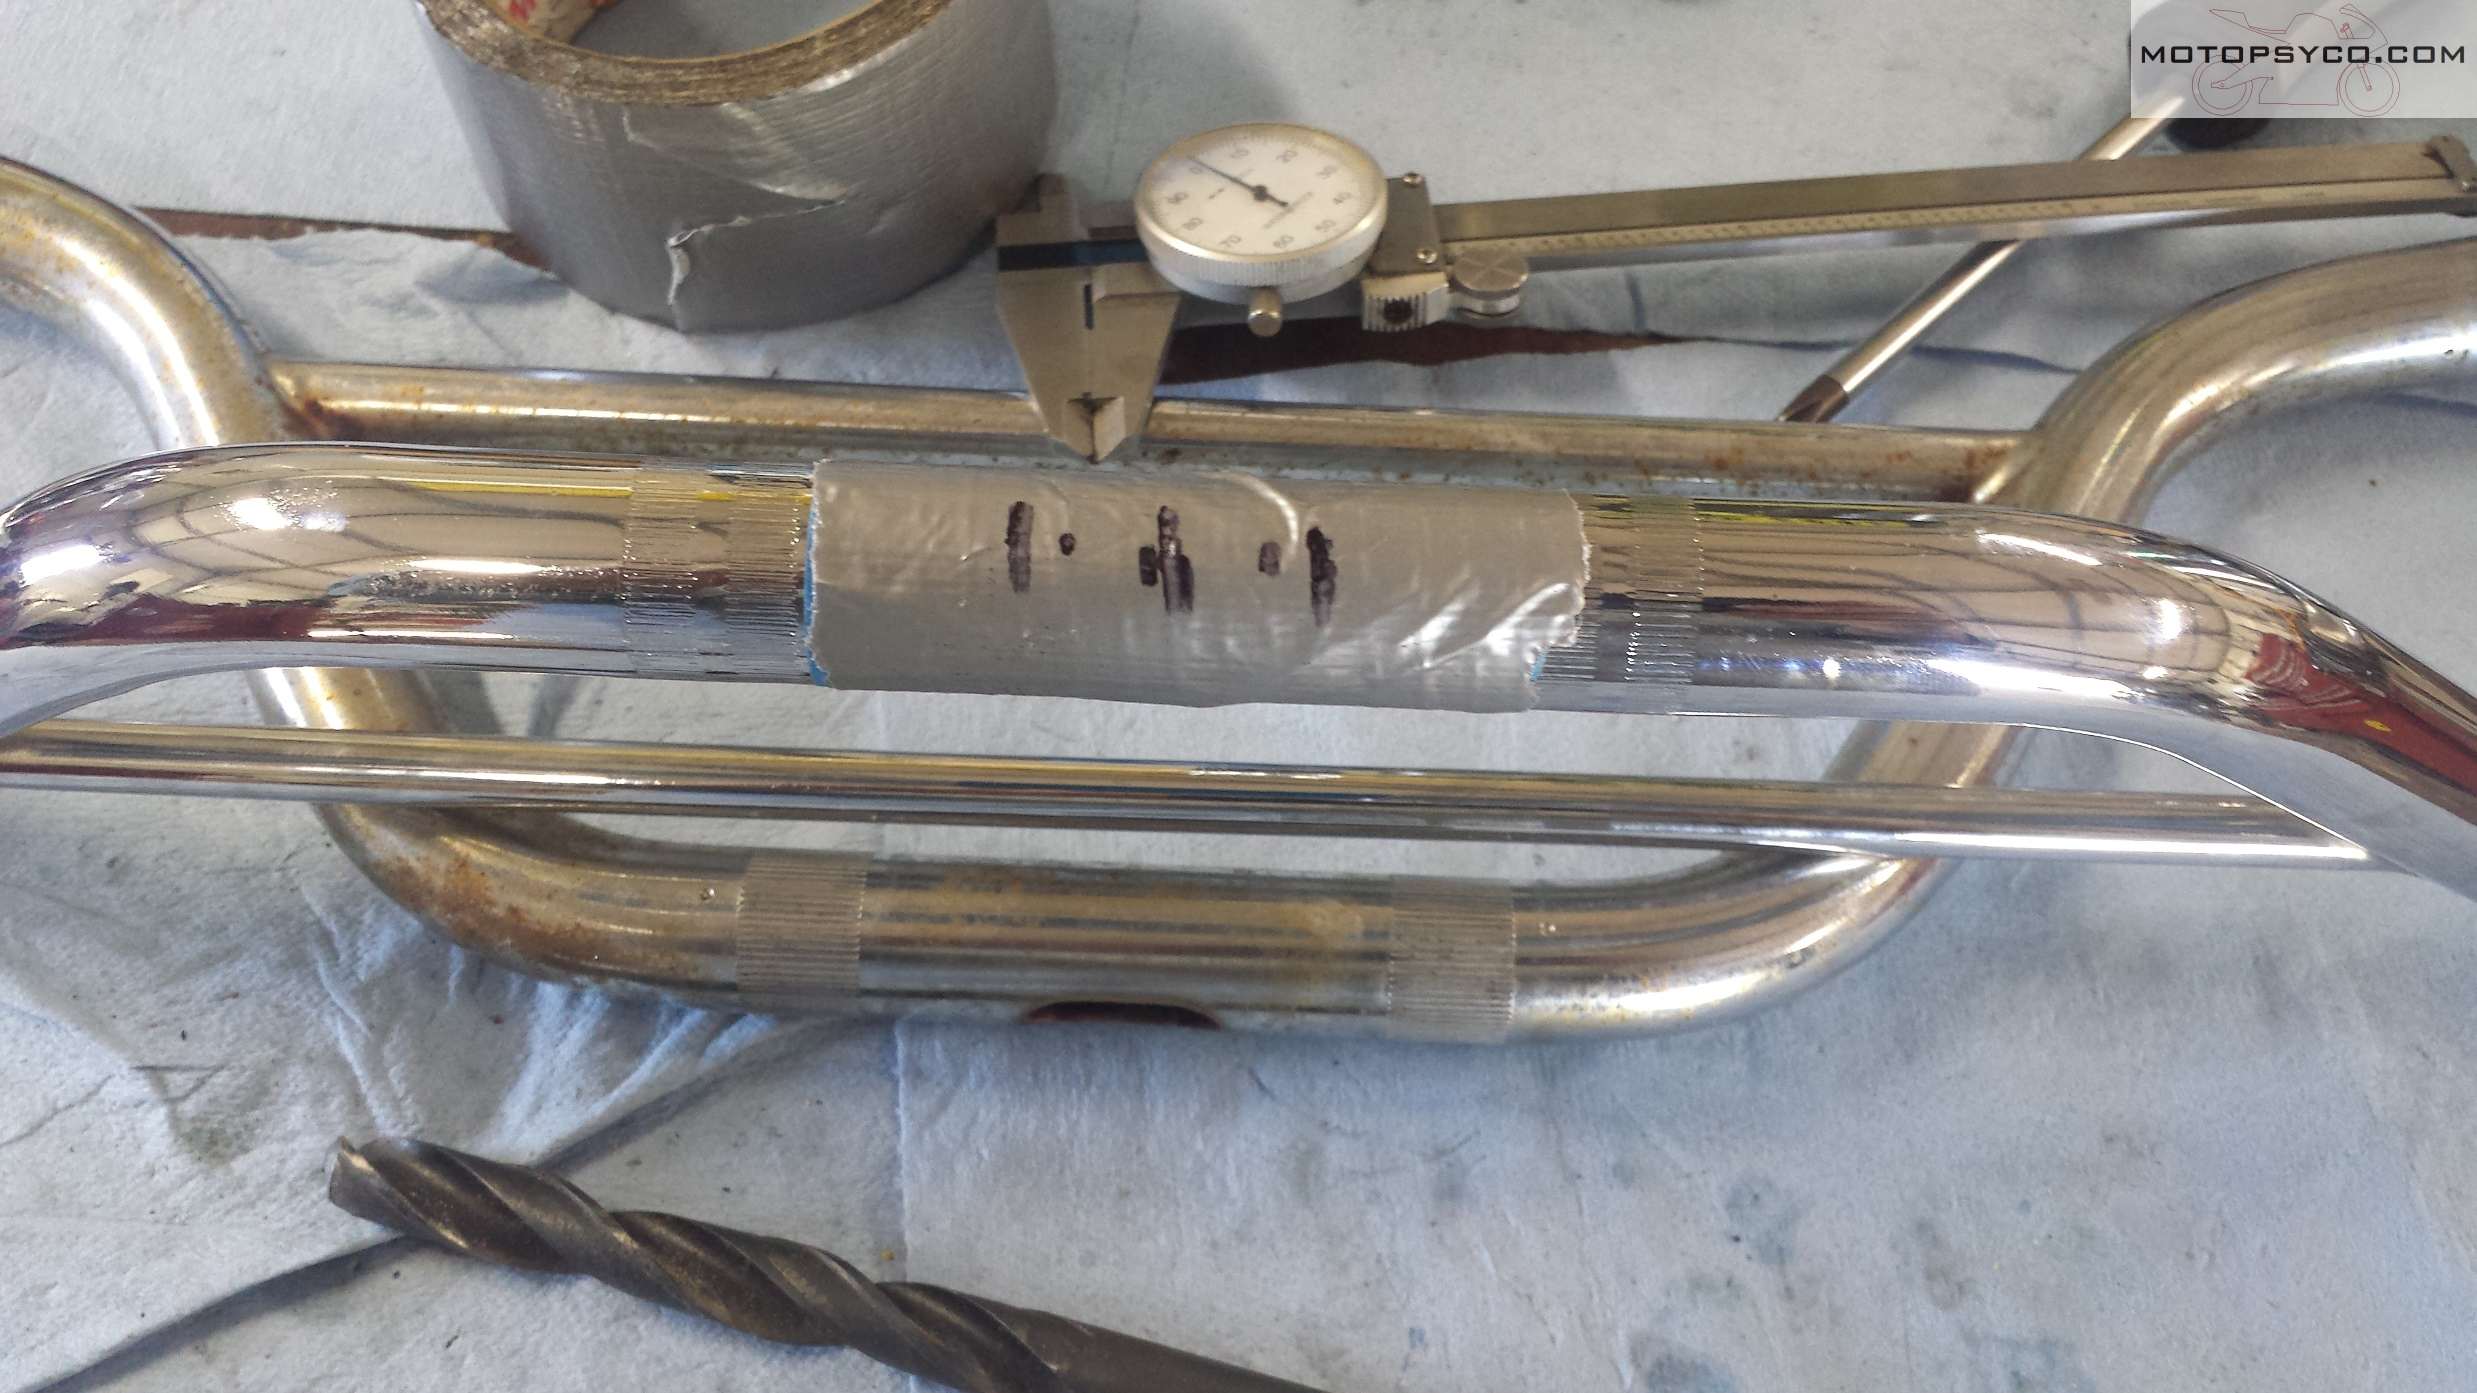
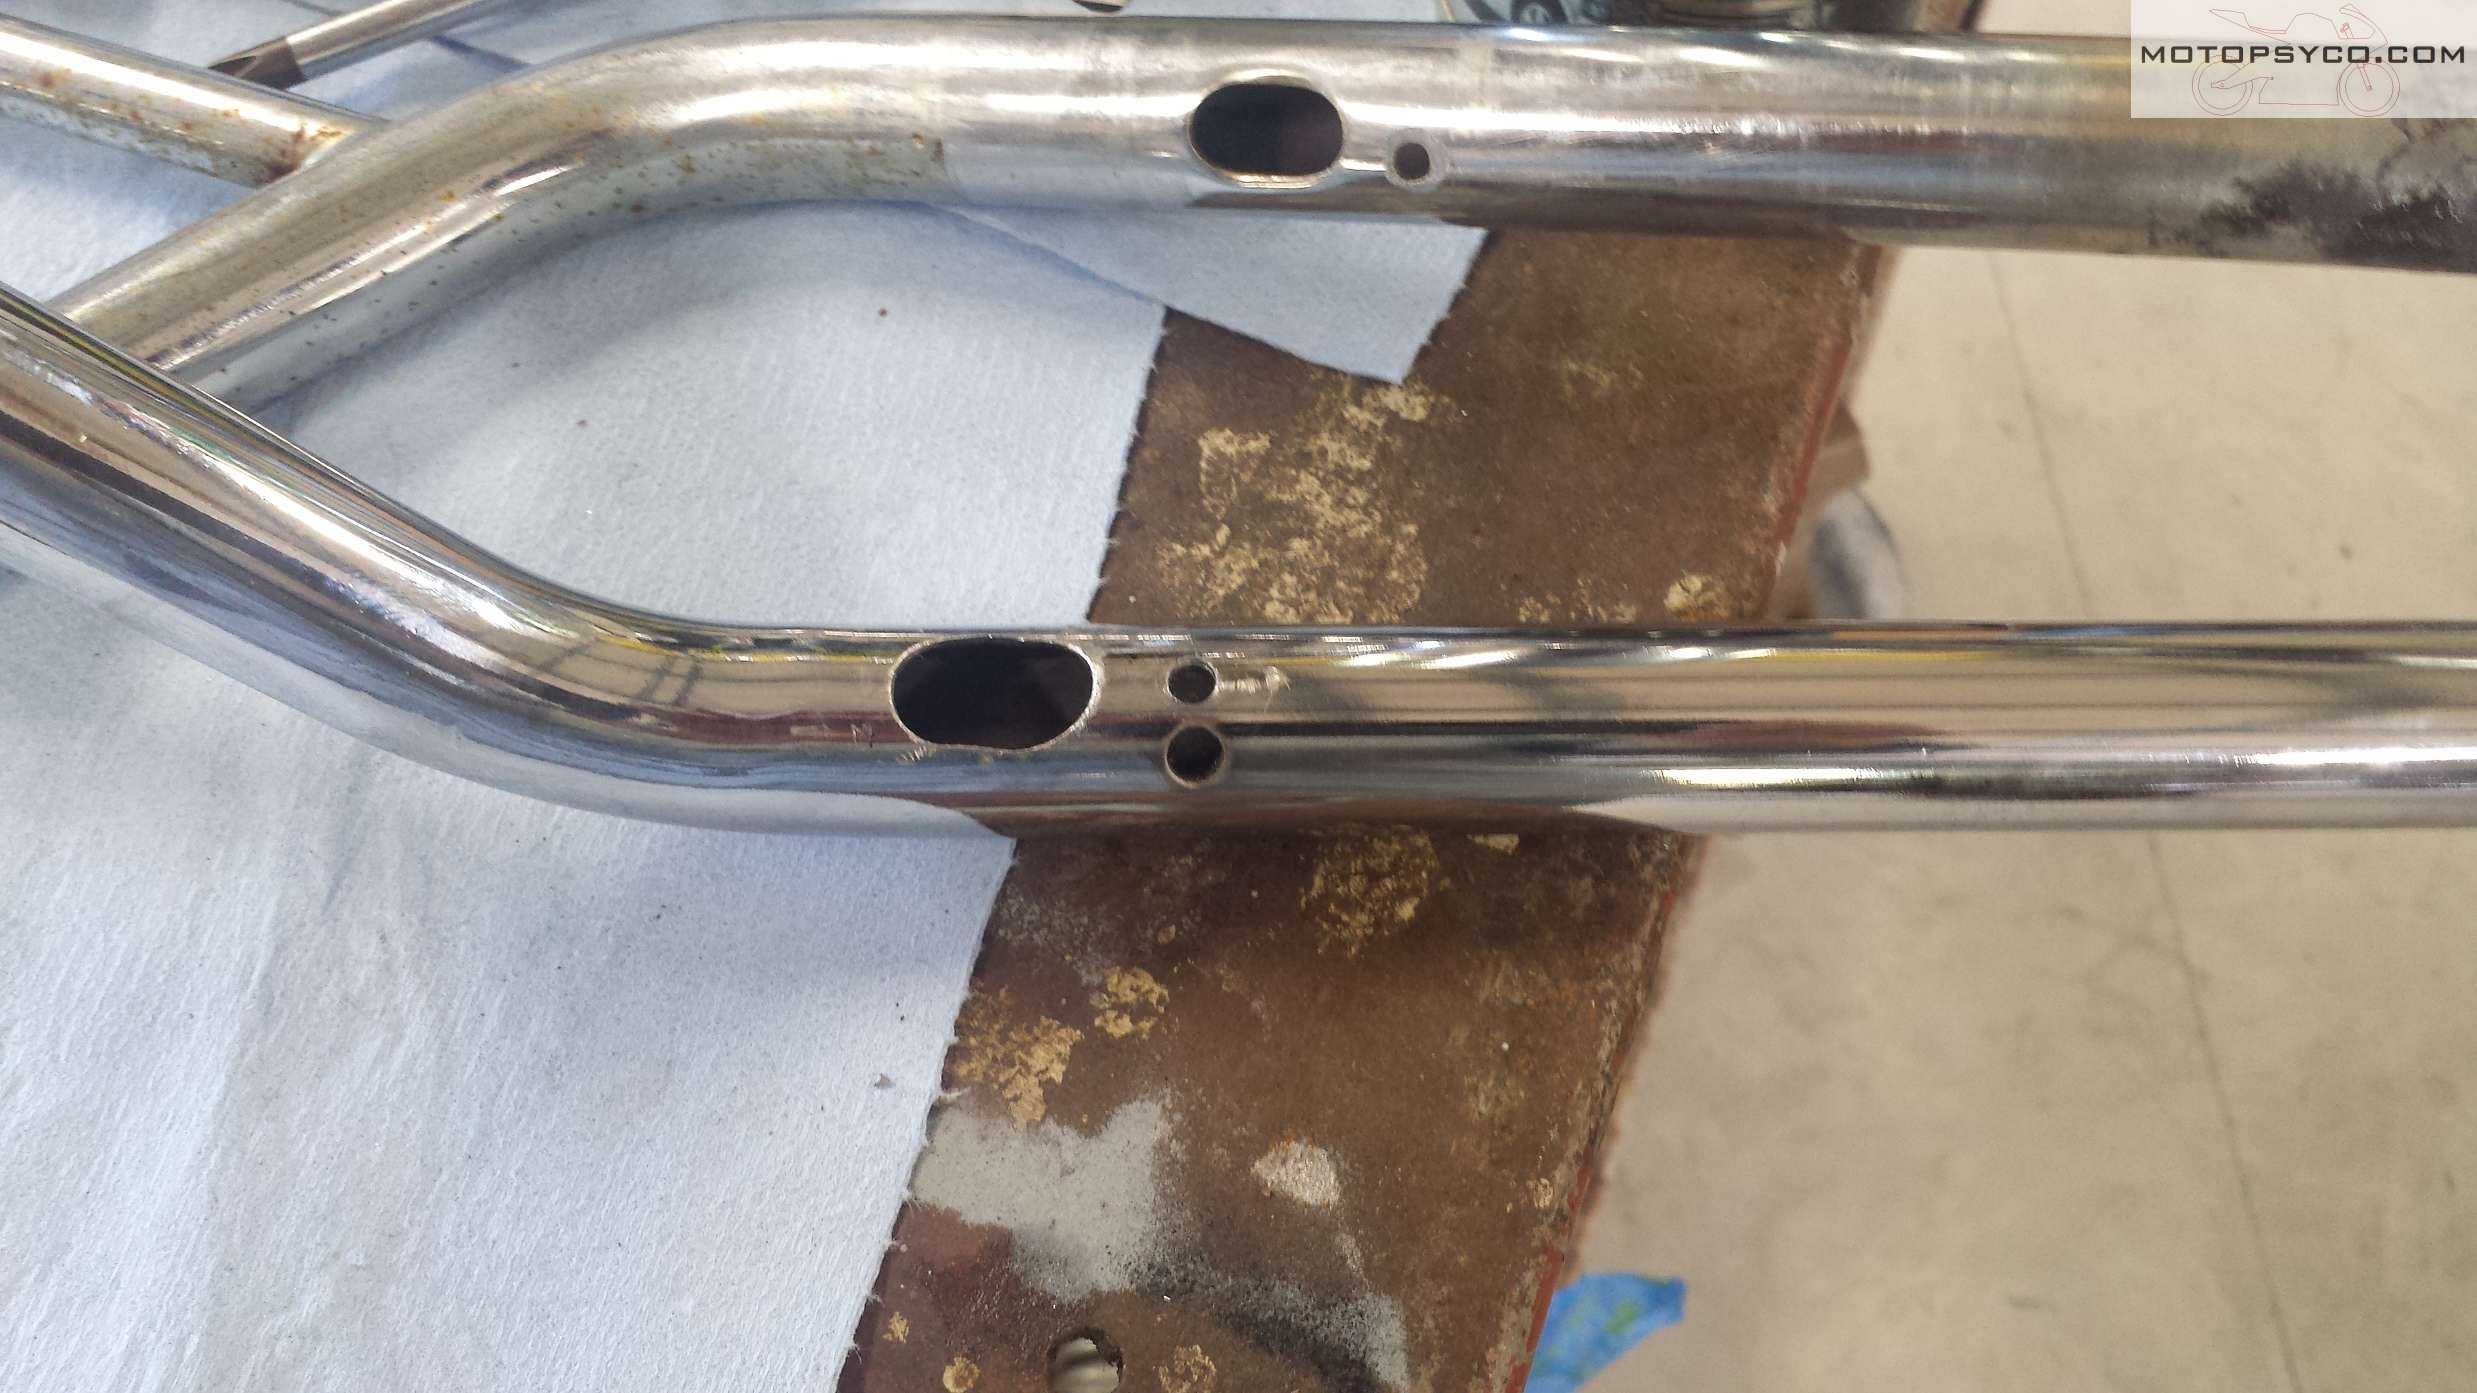
The first step is to determine where the holes & slots should be. These Thailand sourced bars had holes pre-drilled for the switch housing locating pins but they were in the wrong place. Since I was replacing the old but non-original bars I taped them together wile I measured and marked the locations for the new holes and slots. Pay attention to detail while doing this so that you don’t make any mistakes or remove excess metal from your handlebars. A prime example of this is visible on my old handlebars. The left side only needed a hole large enough for the single horn wire but whoever installed them cut a large slot instead. Watch for little things like that.
I like to put a couple of layers or masking tape & duct tape on the areas to be slotted out. This does two things, it makes marking the hole & slot locations easier and protects the handlebar from inadvertent tool marks while you are cutting & grinding the slots.
After you get it all laid out & are certain of where you need to drill be sure you use a center punch, otherwise it is nearly impossible to drill a hole straight into a piece of round tubing. For the slots drill a hole of the correct size at each end of the slot & then use a rotary tool or a die grinder with a cut off wheel to cut out the center section. Once that has been done put a small grinding stone or sanding drum on your tool to finish shaping and smoothing the slot. Don’t remove the tape until this step is complete.
Now it’s time to remove the tape, clean up the tape residue & get all of the shavings out of the handlebar. Grab a small file that will fit into your cut outs and go over them one more time to be sure that all burrs & sharp edges that could damage the wires are removed.
In these next two pictures you can see how I slotted & drilled the left and right ends of the bars.
Right endleft end
Before you pull the wiring through, if you have one piece clutch & brake lever perches be sure to put them back on first. I like to put a piece of string through the bars & tape the wire to it as it is much easier to feed the wiring through if you pull it and push it at the same time. Nonabrasive hand cleaner makes a great lubricant for pulling a thick bundle of wires through a small tube with multiple bends in it. The hand cleaner wipes off easily when you get done.
Once you have it a done, reinstall the bars on your bike and admire your handiwork for a minute or two before you get back to work on the rest of your build. If you have ever thought about drilling handlebars for wiring now you have an idea of what is involved. Just work slowly and carefully so that when you finish it will be a job that you’re proud to say, “I did that myself.”